You are browsing camaro5 
|
|
 04-04-2013, 11:02 AM
|
#1 |
       
Drives: 2012 45th Vert, 2011 4x4, 9sec Vega Join Date: Mar 2012
Location: Canada
Posts: 2,188
|
My alignment Specs. Feels a bit funny to me. Help please.
I installed the Hotchkis 1" drop springs and replaced all the rear bushings and did cradle inserts. Timed the bushings. Took it in and got it as close as we could to the "aggresive street" alignment specs.
Car does great under straight line WOT (TVS2300) and feels locked too through high speed turns. What feels off is low speed sharp cornering. Just before the middle of the turn the back end feels like it does a little move, then all is good. Is this rear end step out? It never did this before when it was bone stock. Also feels real wiggly driving on rutted pavement. Below are my final specs. The mechanic talked me into leaving the extra half degree of chamber on the front right to help with road crown. The rear chamber is adjusted as far as it can go towards 0. Thanks for your input in advance. 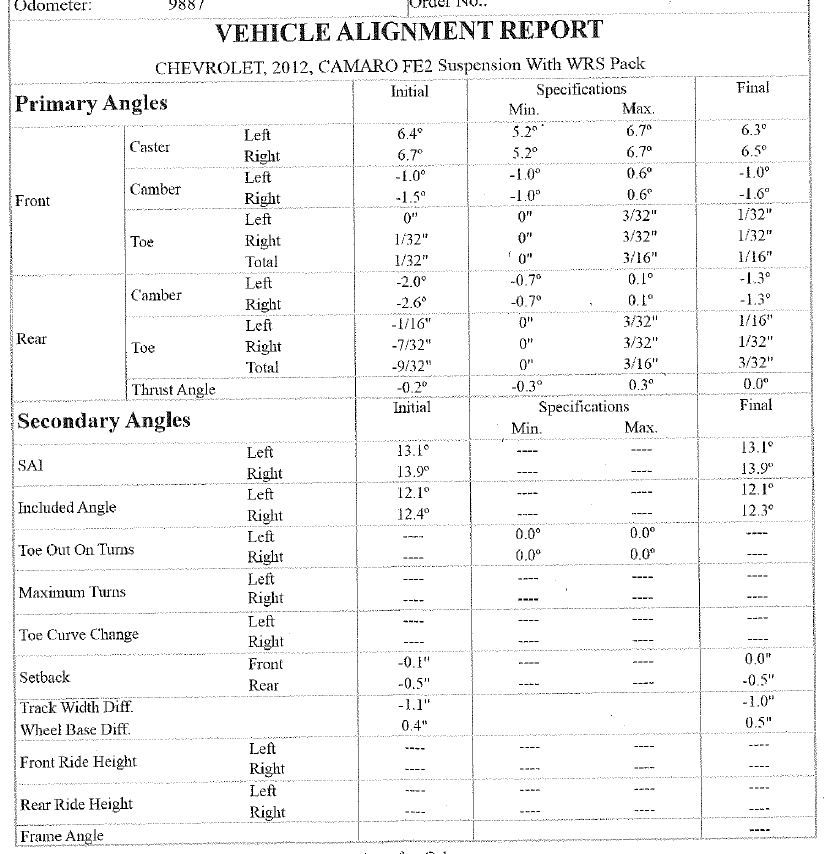
__________________
I feel it only fair to warn you, I have a black belt in CAPS LOCK.
|

|

|
|
04-04-2013, 11:11 AM
|
#2 |

|
No say on the pavement bit but the step out sounds like oversteer to me. That's just a guess though

__________________
El gato. Mods: Eagle eye headlights, 18" Axis Sport graphite, Roto-Fab cold air intake, Vmax ported TB, 3/8" Vmax Black-Ice, RX single valve catch can, RX breather, Pedders inserts, Trifecta tune, BBK LTH 304 SS.
 art/ärt/Noun. Definition: 5th generation Camaro. |
|
|
|
|
04-04-2013, 11:16 AM
|
#3 |

Drives: 2010 2SSRS headers/CAI/tune/corsa, Join Date: May 2010
Location: Commerce twp Michigan
Posts: 1,413
|
willhe64
Having mine done this weekend . I will not go to aggresive. How do you like the Hotchkis 1" drop springs ?
__________________
Stainless works headers/cats Roto fab CAI /
Corsa install and tune Livernois TSW Nuburgring 9 &10" x 20 on Invos (315 & 275 ) JL Audio XD400/4 amp Pfadt trailing arms & tie rods sway bars. pedders street 1 package. ,Hurst short throw shifter With bronze bushings . |
|
|
|
|
04-04-2013, 11:28 AM
|
#4 |

Drives: Camaro Justice Join Date: Jun 2007
Location: Virginia
Posts: 20,174
|
The front camber is off. Left is -1.00 Right is -1.6. Put another way the Right Camber is 60% higher. I don't think the tech knew how to set camber on a Camaro because there is no reason for it to be this far out.
You don't mention if your bushes were timed before the alignment. Here is a detailed how to. Print it and take it with you back to the alignment shop. Bush Timing, Alignment and Torque Specs Do NOT use camber adjusting offset bolts on the Camaro  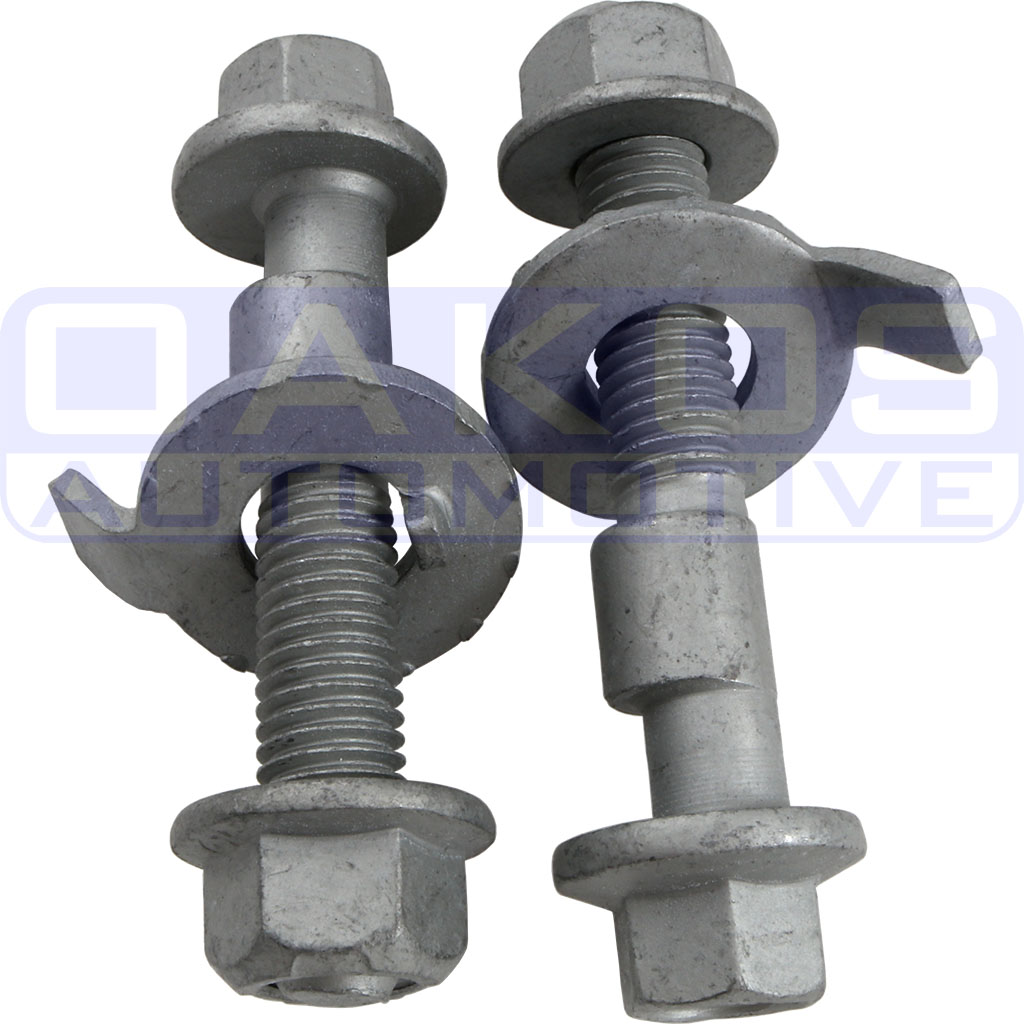 If you want to put them on your Honda or Subie it is up to you. They are not as strong as the OEM clevis bolts and are absolutely necessary on a 5th Gen Camaro. It is in the  This is the correct way to adjust front camber on the 5th Gen. One the alignment machine with the clevis bolts loose turning the camber screw tighter (Righty Tighty, Lefty Loosy) will push the knuckle away from the strut. Loosening the camber screw allows the knuckle to fall in toward the strut. It is a 10mm 1.5 pitch thread.  Your alignment shop may have a T.O.M.C.A.T. Air-Assisted Multiple Camber Adjustment Tool air bag. It fits between the wheel and the strut and works in the same way as the camber screw. Inflate (Righty Tighty) the bag to push the knuckle away from the strut or deflate (lefty Loosy) the bag to allow the knuckle to fall into the strut. If they don't, they have a guy that can push or pull on the wheel while they tighten it. Never, ever use those lame camber eccentric bolts on a Camaro. EVER!  Anyone that tells you different, have them call me  Pedders foundation as a company is more than just a range of bits, we are Suspension specialists committed to delivering a Pedders Driving Experience. A lowered vehicle should have a full range of alignment adjustments. The Camaro delivers from Chevrolet with a fixed Castor position. The radius arm bolts into round holes with no available adjustment. Front Camber is adjustable from the factory. There is a threaded hole for front Camber Adjustment Bolt / Screw, but no bolt is installed and no part number is listed by Chevrolet. The rear OEM eccentric adjusters for Toe and Camber provide approximately one degree adjustment range. For an alignment specialist, this is unacceptable. You want to get your Camaro perfectly setup. This is what Pedders is all about. Our solution is a set of cadmium plated eXtreme Alignment Bolts. While GM made the hole round for the front Castor Adjustment or lack thereof, they did weld in brackets for an eccentric to work against. Your local Pedders Dealer can create a slot to provide Castor adjustment with Pedders Camaro Alignment Bolts. The kit provides the front Camber screws that GM didn't.  For the 5th Camaro, GM decided to produce the front sub-frame with only a round hole, but they kept the 'fences' for caster adjustment with eccentric bolts just like th Pontiac G8 and Holden Commodore. The slots to allow adjustment were lost in translation. For a performance driver, a vehicle without full alignment adjustment capability feels like driving with one hand tied behind your back. Pedders made the decision to make the Camaro front suspension fully adjustable. Stock Radius Bush Mounting area with a round hole and adjustment 'fences'.  Step one requires the technician to drill two holes in the bracket.  Step two requires CAREFUL GRINDING. We use the two holes to make the grinding process more accurate while the technician creates a slot. The eccentric that will be used does not reach all the way to the bracket sides so a bit of excess metal is not an issue. The technician can check the clearance with a Pedders Castor Eccentric Bolt as they grind to make sure the fit is Pedders Perfect.  When assembled the Cadmium plated eccentric allows the alignment technician to increase or decrease Castor. A fully Pedderised Camaro with good tires will not require ANY BIAS in the alignment. We can do a road course style alignment and your Camaro will not pull. This is because the Pedders component have made the suspension more stable by reducing excess motion. Should your Camaro be tweaked and develop a pull the same Pedders Castor Eccentric Bolts can be used to create a bias to correct the pull. We strongly recommend that before you alter your alignment due to a pull that you have a qualified technician, because the machine is only as good as the tech, check your tires on a road force balance machine to make certain the pull is not induced by a tire. We will adjust them on the alignment rack. Here is the installed eccentric.  Alignments are Pedders core business so we decided to make the front camber screw part of the Camaro Alignment Bolt Kit. To install the Pedders Front Camber Screw it is essential that you use LocTite Blue. The Camber screw will never bear a load while driving, but we want to make certain they never vibrate out. LocTite Blue is ideal for this.  Pedders Rear Eccentrics are virtually bullet proof with approximately 2 degrees or double the factory adjustment. With the Camaro alignment Kit installed your Camaro can be setup for the drag strip, road course, auto cross or every day flawless driving. Even better, Pedders alignment eccentric bolts carry a unique warranty feature. Should a Pedders eccentric ever fail while you own the vehicle we will replace it. You get a superior alignment, improved driving experience and a life time warranty with Pedders Camaro Alignment Bolt kits. To get the aggressive alignment we prefer Pedders Full Camaro Alignment Kit is required. They increase the adjustment range by 1 degree or in layman's terms a lot. We achieve this result my moving the eccentric to the outer edge of the bolt. The eccentrics are cut on a water jet, assembled in a jig and welded. This is a time consuming process. To finish the bolts we have them cadmium plated.  Eccentrics have a bad habit of drifting under high loads. We address that with more material. We make our eccentrics out of stock that is much thicker than the OEM bolts. More material means more strength and improved holding power.  We use a thick 'holding' nut and a thin jam nut. Unlike quenched nuts, you can use these again and again.  Taking the performance of your 5th Gen and alignment to the next level requires the use of Pedders Dual Bearing Camber Plates. With the stock front struts or Pedders coilovers you can achieve -2.2 Degrees of front camber. Relieving the upper slot in the strut to allow it to fall in a bit more will get you to -2.5. When running high negative camber it is Mission Critical to check spacing between the inner tire sidewall and the strut or coilover. We use a standard #2 lead pencil as a gauge. If the pencil passes between the tire and the strut or coilover you are good to go. With Pedders Dual Bearing Camber Plates we suggest you run them full in, maxed out for negative camber. Positioning the stut top well in toward the engine improves SAI. Your 5th Gen will drive better. Final adjust the negative camber at the knuckle using the camber adjustment screw. Maxed out for Negative Camber  Neutral Position i.e. The same position as the OEM Mount.  FE4 / FE5 / ZL1 / Pedderised Hardcore Track Alignment with Appropriate Tires Front Caster: Max it out with Pedders Caster Eccentrics Camber: -3.5 With Pedders Dual Bearing Camber Plates and NO Strut Tower Bar. Camber : -4.00 With Pedders Dual Bearing Camber Plates and a Strut Tower Bar Toe: OUT 0.50 Total Toe OUT 1.00 Rear Camber -0.80 Toe: IN .20 Pedders Full Camaro Alignment Kit and Dual Bearing Cambers Plates are Required. Bush Timing Step 1. Lift the car on a two post lift and raise it. Step 2. Loosen the following bolts/nuts: Front: ---Inner Control Arm Bushing ---Inner Radius Rod Rear: ---Trailing Arm Bushings (both ends) ---Toe Rod Bushings (both ends) ---Lower Control Arm Bushings (Inner) ---Upper Control Arm Bushings (Rearward) ---Lower Strut Bushings Step 3. Lower the car and drive it around the parking lot SLOWLY and on to the alignment lift. Step 4. With the weight of the car on the wheels tighten all of the nuts/bolts to spec. Step 5. Align the car at the new ride height. Alignment   Front and Rear Bolt Torque Values   NOTE: Torque specifications that read XX torque value and XX degrees are usually TTY and require replacement of the bolt, nut or both. If replacement parts are not available from GM the minimum acceptable torque will be those values stated along with a liberal application of a thread locker i.e. LocTite. |
|
|
|
|
04-04-2013, 11:34 AM
|
#5 | |
|
Drives: 2012 45th Vert, 2011 4x4, 9sec Vega Join Date: Mar 2012
Location: Canada
Posts: 2,188
|
Quote:
Edit: I would like to compensate for road crown if this is not the way to do it. I won't track the car and don't like the tiny pull from the crown.
__________________
I feel it only fair to warn you, I have a black belt in CAPS LOCK.
|
|
|
|
|
|
04-04-2013, 11:45 AM
|
#6 | |
|
Drives: Camaro Justice Join Date: Jun 2007
Location: Virginia
Posts: 20,174
|
Quote:
Your Camaro will have less understeer and drive more responsively. Will it pull a bit on a crowned road or grooved pavement? Yes it will, but not tot the point that is becomes a bother. FYI: The rear end step out is more pronounced because you have modified your suspension. When the load increases the compliance in the rear sub-frame bushes becomes more pronounced. You could just add inserts or full bushes, but I would try the re-alignment first to see if that is enough to satisfy your driving style needs. |
|
|
|
|
|
04-04-2013, 12:48 PM
|
#7 |
|
Drives: 2012 45th Vert, 2011 4x4, 9sec Vega Join Date: Mar 2012
Location: Canada
Posts: 2,188
|
Thanks Pete. I'll take it back and have the front chamber fixed.
When we set the rear chamber, for some reason we were able to get the left side all the way to -0.8d but the right side only to -1.3d, the lower control arm eccentric is all the way in, so I had them match the 2. Why would one side have plenty of adjustment and not the other? Am I going to need after market eccentrics? The car has cradle bushing inserts. And all new urethane bushings.
__________________
I feel it only fair to warn you, I have a black belt in CAPS LOCK.
|
|
|
|
|
04-04-2013, 01:02 PM
|
#8 |
|
Drives: Camaro Justice Join Date: Jun 2007
Location: Virginia
Posts: 20,174
|
Rear camber and rear toe work against each other just like a race car style A-arm. That is why we set the toe eccentrics to a neutral position and set the camber first. Have him try it this way and the results should improve.
|
|
|
|
|
04-04-2013, 03:52 PM
|
#9 | |

|
Quote:

|
|
|
|
|
|
04-05-2013, 05:48 AM
|
#10 | ||
|
corner barstool sitter

Drives: 08 Mustang GT, 19 WRX Join Date: Jul 2012
Location: Eastern Time Zone
Posts: 6,990
|
Quote:
Check also for situations where the bushing material might be axially longer than the ferrule that runs inside it. If you've wasted fastener torque compressing the bushing material, you've lost clamp load through the ferrule and the joint can slip a little bit. Usually this puts up a clunk, but maybe not always. Finally, about the alignment procedure itself. Cars with stability control normally require the alignment tech to reset the steering wheel sensor. Sometimes odd behavior can be traced back to this not having been done. Quote:
You already have a small amount of cross-caster (and it's in the right direction) and a rather large amount of cross-camber. Whether your car's amount of cross-caster would be enough all by itself is unknown, but my own preference is to work primarily with caster here. Like Pete I'd like to see your car with a lot less cross-camber. A tenth, maybe two tenths more negative on the right side. No more than that, and only that much if the roads in your area have a lot of crown. Don't accept an alignment where the right side ends up being any less negative than the left side. Norm Last edited by Norm Peterson; 04-05-2013 at 06:01 AM. |
||
|
|
|
|
04-05-2013, 11:24 PM
|
#11 |

Drives: 2012 SS LS3 Join Date: Nov 2011
Location: NorCal
Posts: 818
|
Trust Pete he knows what he is talking about. Do exactly as he says. I had similiar problems and went to two diferent shops that couldn't get the alignment right because they wouldn't do it following Pete's exact step by step instructions. Finally, I went to a race shop and they knew exactly what Pete was talking about and did it Pete's way-problem solved. Not all alignment techs are equal.
|
|
|
|
|
04-05-2013, 11:26 PM
|
#12 | |
|
Moderator

Drives: 2018 Harley-Davidson Street Bob Join Date: Nov 2007
Location: San Diego
Posts: 14,769
 |
Quote:
 I love your technical posts. I love your technical posts. 
__________________
RDP Motorsport//GEN5DIY//Cultrag Performance//JPSS//Rodgets Chevrolet//
Operation Demon//Buy at Invoice//RACECARWEAR RESPECT ALL CARS. LOVE YOUR OWN. warn 145:159 ban |
|
|
|
|
|
04-06-2013, 01:29 PM
|
#13 |
|
Drives: Camaro Justice Join Date: Jun 2007
Location: Virginia
Posts: 20,174
|
Thank you.
|
|
|
|
|
08-18-2013, 08:45 AM
|
#14 |
|
Drives: 2012 45th Vert, 2011 4x4, 9sec Vega Join Date: Mar 2012
Location: Canada
Posts: 2,188
|
Took it back in and tweaked it, now I love it. Doesn't walk around at all.
0.9 camber in the front. 0.8 in the rear. 1/16" toe in the front. 0 in the rear. We can not get the rear any less than 0.8. It is maxed out. I know how the toe rods and LC arm work together but we fiddled with it for an hour. Such is the drop springs and bushings. When we hooked it back up we found the rear had toed in 3/32" a side. Best guess is the springs and bushings had settled in. If you put in drop springs and/or bushings I'd make sure you check your alignment again after a month or 2.
__________________
I feel it only fair to warn you, I have a black belt in CAPS LOCK.
|
|
|
|
|
|
|
|
 |
| Thread Tools | |
|
|


