You are browsing camaro5 
|
|
 12-31-2011, 12:39 AM
|
#1 |
 Drives: 2010 2SS/RS Join Date: Sep 2011
Location: Mn
Posts: 481
|
Adding the Factory Strut Brace to your 2010 Camaro
This Install WILL Require Using A DRILL.
I will first start off with an overview of whats involved so those of you can decide if it is for you to do. I am a collision repair tech of 23 years, so this is quite simple to me. And I understand it may be difficult for others. Boy did they get us on this one!!! These Strut Towers are ROUND! lol Ok here we go. First I removed the hood strut while proping the hood up. marked the spot welds on the factory hood strut bracket on the Strut tower, there are 3 of them 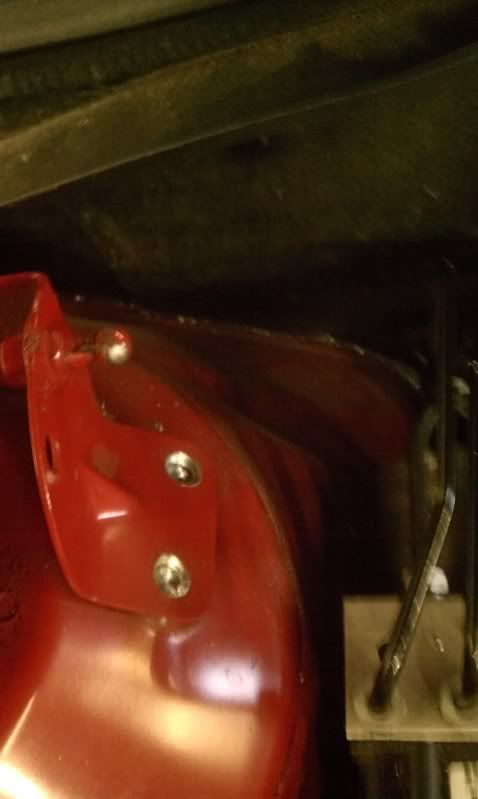 I used a 5/16 drill first then a 3/8 bit to drill out the center of each spot weld. If you do it slowly you will see a ring showing you seperated the two metals, then stop (Do not drill thru both panels). use a flat plade to pop the bracket off it will look like this. 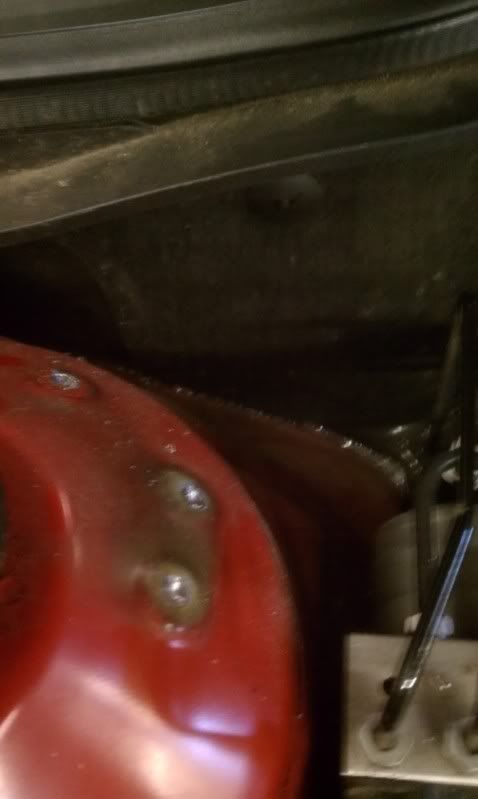 Remove the hood strut pin using a 1/2" 6-Point Socket! from the hood strut bracket, the backside nut is welded so you can hold that side with a 13mm box end wrench or put in a vise. Install your pin into the threaded hole on the new hood strut bracket and secure on the back side with the supplied nylon lock nut. Now before you go any further notice the foward two spot welds see pic directly above., they will be grouped close together away from the single one towards the back? they will have a raised boss around them. That is your first drill location, Set the Right mount pad on those bosses and using a 5/16 drill bit locate the forward closet to the Front of the car. using the drill, Drill thru the mount pad JUST TO MARK IT, ***Paying close attention to the drill angle!!! *** remove the pad and drill thru both layers. Now is the time to take a break! and reflect that you just drilled your first hole.lol! clean both towers off and apply masking tape like this. 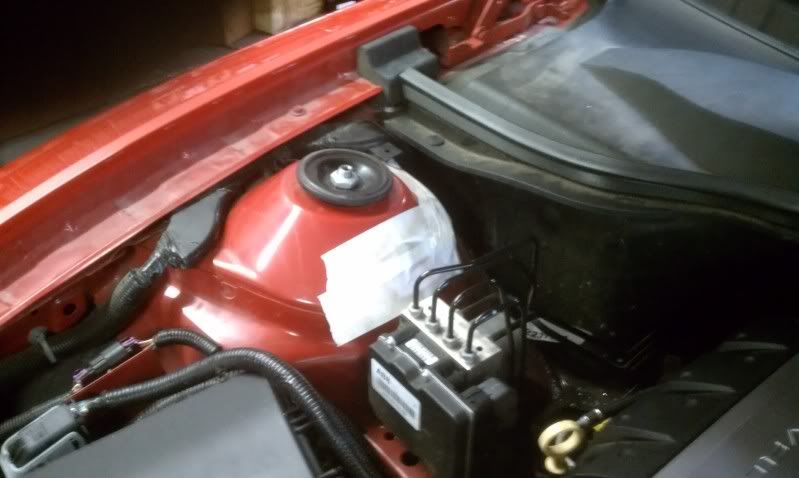 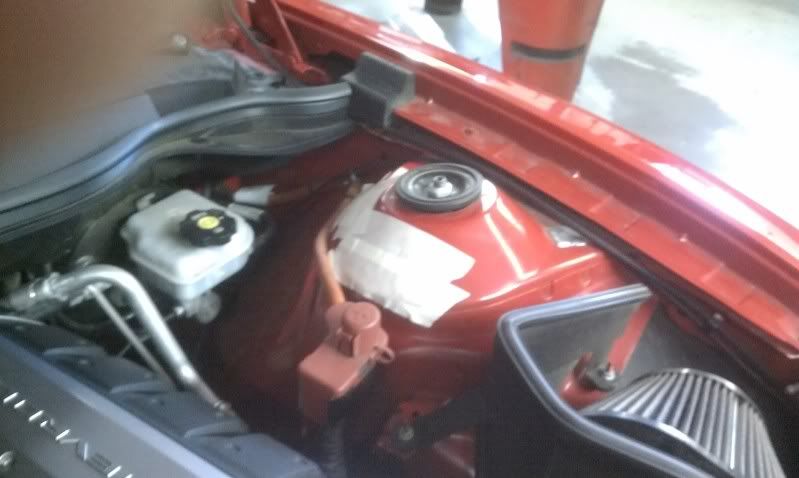 Put a jack under the car safely rasing it to allow reach to the underside of your strut towers, both wheels should be removed and jack stands put in place for ease of install. Now its time to set the brace in place. You will need an extra set of hands now. lay the brace accross locate both right and left mount pads and start on the passenger side 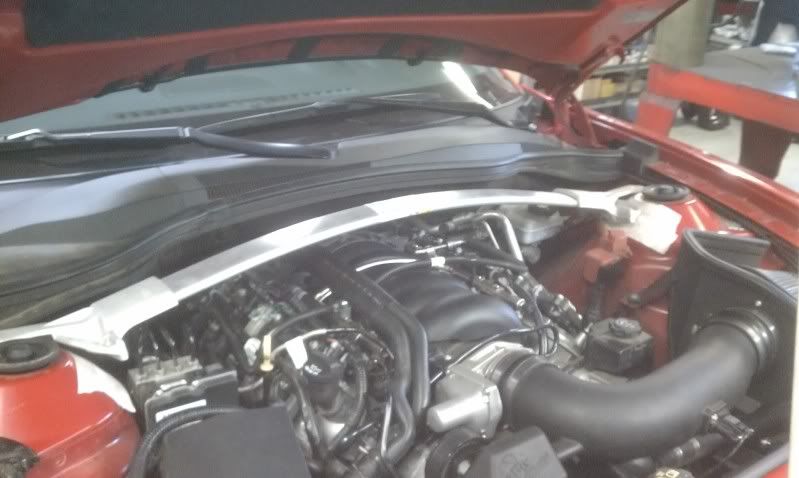 install one of the 4 8mm x 70mm stainless bolts and washer and insert in that first hole drilled. reach under and secure with nylon nut and washer supplied. tighten bolt just to hold pad snug. move to driverside and install pad align brace evenly accross and mark the holes with a scribe. 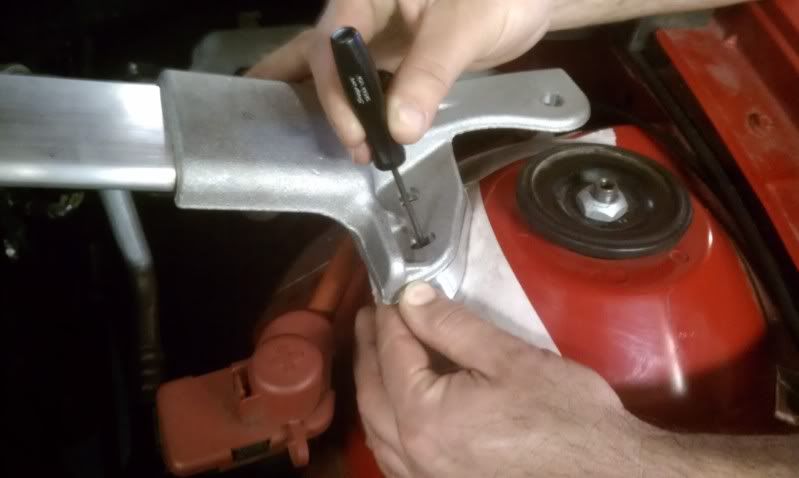 Insert drill and mark it using the 5/16 drill bit *** paying close attention to drill angle!! move brace off to the side and drill thru both layers. 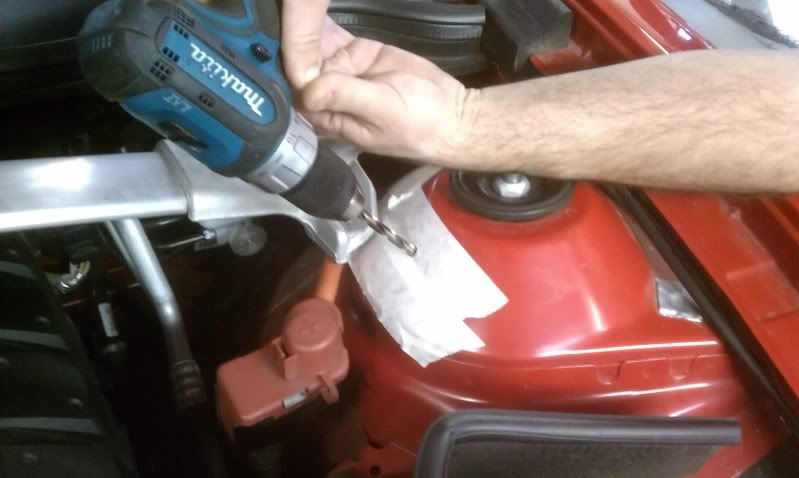 set brace back in place and insert 8mm bolt only allowing the brace to stay in place. Now install outer cylinder spacers on both side mark and drill holes thru both layers using a 3/8 drill bit. 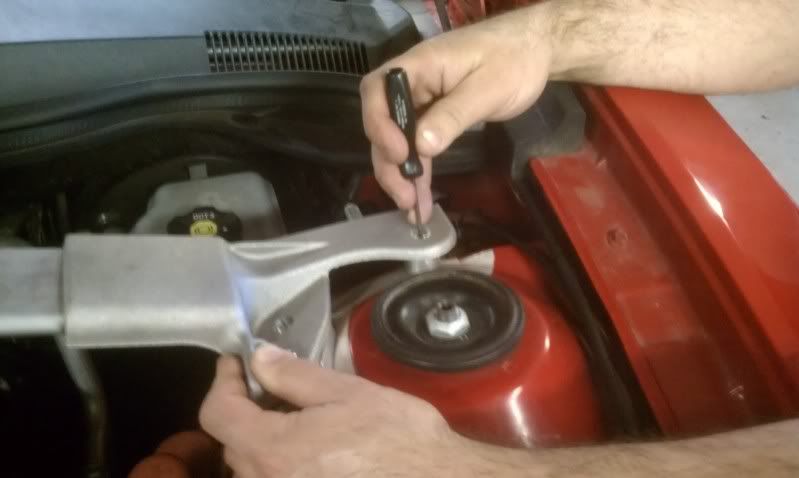 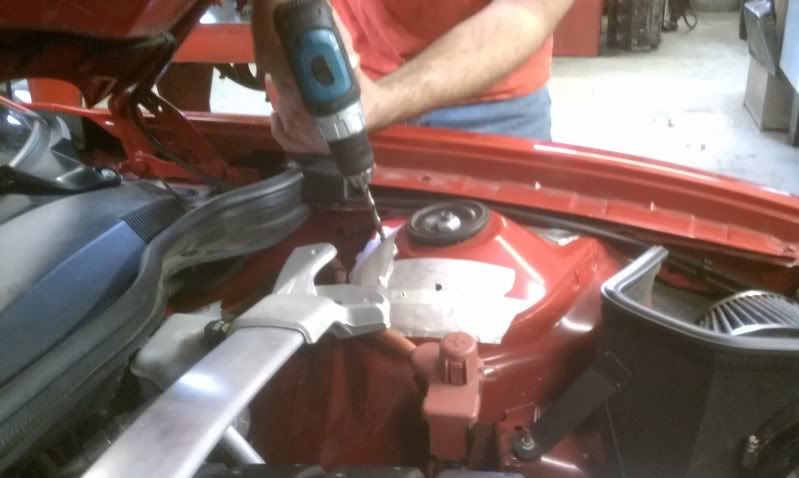 Insert 10mm bolt provided after you drill the left and right outer holes. now move back to the remaining bolt holes and drill thru using the 5/16 drill bit.  Remove all the bolts,hardware and pads, Remove tape clean off any burs, touch up paint around all the drilled holes. Re-install brace and hardware in the same order as before and secure with nylon nuts and washers from below only this time install the hood strut relo bracket on the passenger side. 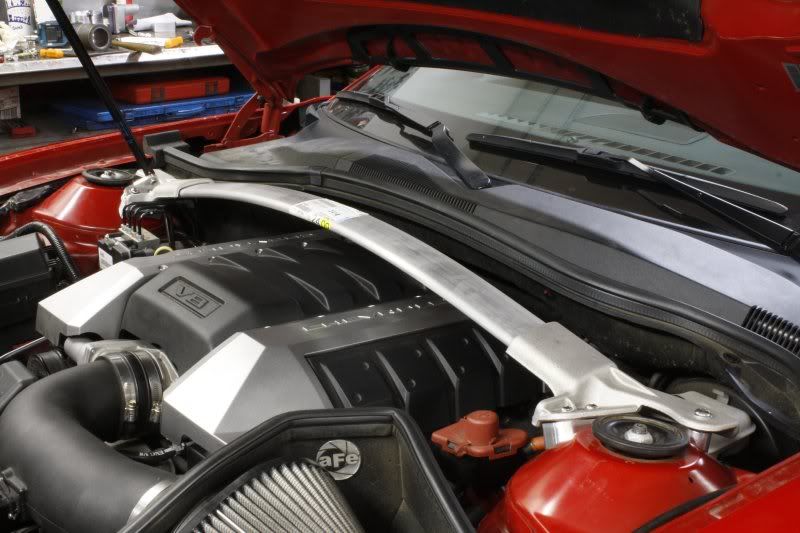 Sit back and enjoy what you have accomplished!! 
|

|

|
|
12-31-2011, 08:43 AM
|
#2 |
|
Drives: 2008 cts Join Date: May 2008
Location: staten island
Posts: 375
|
that looks great i would like to do this to my 10 camaro
|
|
|
|
|
12-31-2011, 09:12 AM
|
#3 |

Drives: 2014 Z/28 #82+#192, 18ZLE 66Nova Join Date: Oct 2008
Location: By the lake in AZ
Posts: 15,719
|
That looks like some thing i can do, send info on cost for your kit, i want one.
|
|
|
|
|
12-31-2011, 09:19 AM
|
#4 |
|
Drives: G5.R Join Date: Sep 2010
Location: SoCal
Posts: 2,377
|
Great ride up, Thanks for taking the time. Everything takes time. Most people who read this wont realize it probably took you as much time to do the write up as it did the install, LOL. So just want to give you props for sharing.

|
|
|
|
|
01-02-2012, 09:08 AM
|
#5 |
 
Drives: 2010 Callaway SC572 Join Date: Aug 2011
Location: Richmond Hill, Ontario
Posts: 564
|
I already posted in your other thread, but wanted to post here as well just to make sure you saw.
Hope you can ship the required parts to Canada.
__________________
Steve
2010 Callaway SC572 2019 Jeep JL Rubicon |
|
|
|
|
01-02-2012, 04:42 PM
|
#6 |
       
Drives: 2017 Camaro SS1LE 2000 Trans Am WS6 Join Date: Jul 2008
Location: Portland, TN
Posts: 2,955
|
Is there a gap between the spacers and the bar or does it just look that way in the pics?
__________________
2017 Krypton Green SS 1LE
Magnacharged 2000 Trans Am WS6 manual trans 2002 Trans Am 2015 Ram Crew Cab Cummins |
|
|
|
|
01-11-2012, 03:17 PM
|
#7 |
 
Drives: 2LT/RS White with orange stripes Join Date: Jun 2011
Location: west palm beach
Posts: 145
|
how does ur ride feel after installing this? im trying to get rid of the feeling of the car leaning in turns
__________________
2011 2LT RS
this is my build plz check it out and give me any ideas and ur opinion http://www.camaro5.com/forums/showthread.php?t=195089  |
|
|
|
|
01-11-2012, 04:25 PM
|
#8 |
|
SoCal C5 Family Member

Drives: RJT 2010 camaro 2SS Join Date: Aug 2009
Location: Los Angeles, CA
Posts: 1,016
 |

__________________
 |
|
|
|
|
01-11-2012, 05:53 PM
|
#9 | |||
|
Drives: 2010 2SS/RS Join Date: Sep 2011
Location: Mn
Posts: 481
|
Quote:
Quote:
Quote:
|
|||
|
|
|
|
01-11-2012, 06:24 PM
|
#10 |
|
Drives: 2017 Camaro SS1LE 2000 Trans Am WS6 Join Date: Jul 2008
Location: Portland, TN
Posts: 2,955
|
Wonder if it would be possible to weld the brackets to the bar and smooth it out to give the appearance of one piece?
__________________
2017 Krypton Green SS 1LE
Magnacharged 2000 Trans Am WS6 manual trans 2002 Trans Am 2015 Ram Crew Cab Cummins |
|
|
|
|
01-11-2012, 06:48 PM
|
#11 | |
|
Drives: 2010 2SS/RS Join Date: Sep 2011
Location: Mn
Posts: 481
|
Quote:
|
|
|
|
|
|
01-30-2012, 09:49 PM
|
#12 |
|
BOD 5/28/09 #13485

Drives: 2010 Camaro 2LT RS Join Date: Jan 2009
Location: Chesapeake, Virginia
Posts: 913
|
I got it installed today. This is a great rightup, it help a lot with the install. The only thing I would say is to put the intire brace in place with all of the bolts before you drill the first hole.
__________________
 |
|
|
|
|
01-31-2012, 06:04 AM
|
#13 |
|
NEcamaro5

|
How much please pm
|
|
|
|
|
01-31-2012, 04:02 PM
|
#14 | |
Drives: Summit White 2011 2SS/RS Join Date: Feb 2011
Location: The Central valley California
Posts: 272
|
Quote:
__________________
 |
|
|
|
|
|
|
|
|
 |
|
|
 Similar Threads
|
||||
| Thread | Thread Starter | Forum | Replies | Last Post |
| CAMARO WIKI | Tran | Wiki | 65 | 12-14-2022 07:23 AM |
| Latest Camaro Products - March 2010 | Sean@Phastek | V8 Bolt-Ons & Tunes | 26 | 08-04-2010 04:42 PM |
| 2010 CAMARO CHASSIS MAX STRUT BRACE | Hotchkis | Suspension / Chassis / Brakes | 2 | 04-16-2010 11:29 AM |
| Ambient lighting (ABL) - the FINAL update = LIMITED TO DOOR PANELS | CamaroScotty | 5th Gen Camaro SS LS LT General Discussions | 338 | 04-15-2009 05:33 PM |


