You are browsing camaro5 

|
 08-19-2013, 08:57 PM
|
#1 |
  
Drives: 2013 zl1 Join Date: Nov 2012
Location: st louis
Posts: 838
|
lsa supercharger removal and port thread
ok, this thread is going to show how to do a complete removal of the supercharger. Most of you guys will never go farther than a snout removal for a pulley or to just fix the rattling some cant stand from the isolator and this will show you how to do that as well as pull entire unit for either bearing regreasing or full port.
the project car is a CTS-V but other than the actual lid and the routing of a few hoses (that all end up in the same place) is exactly the same as your zl1. first picture will show you how much easier the cts v lid is to remove than your zl1 lid.. the rear 6 bolts on the lid are EXTREMLY hard to get to.. all I can tell you is take your time, get a 1/4 inch drive socket and at least 1 swivel and a couple short extensions and go to town...this is by far the hardest thing you will do during this job. you can see the primary diff between the lids is the cts-v has its water entry for the intercooler brick in the back of the lid.. 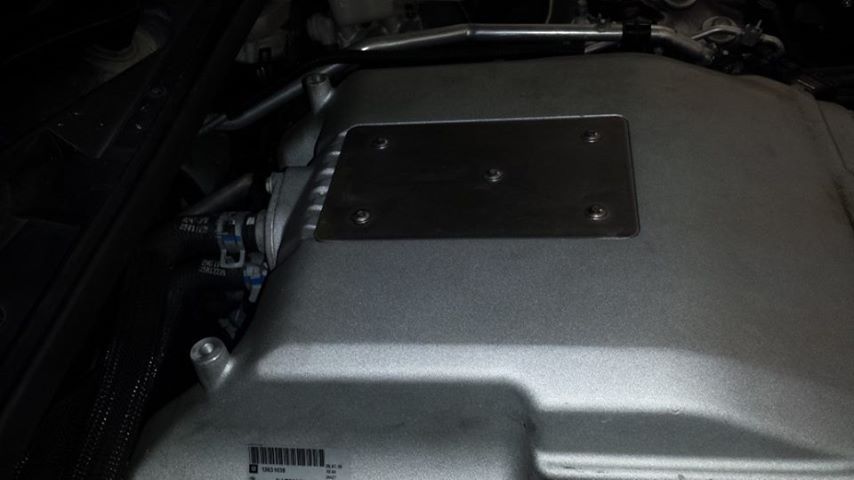 here are the two lids side by side... the cts-v lid on the right and the zl1 lid on the left. this is my zl1 lid and has been cleaned up a bit.. the cts-v lid is brown from having a stock evap system and sucking oil into the blower for the majority of its life.. as you can see they are the same bolt pattern but the bricks bolt up differently and no the cts-v brick will not interchange. 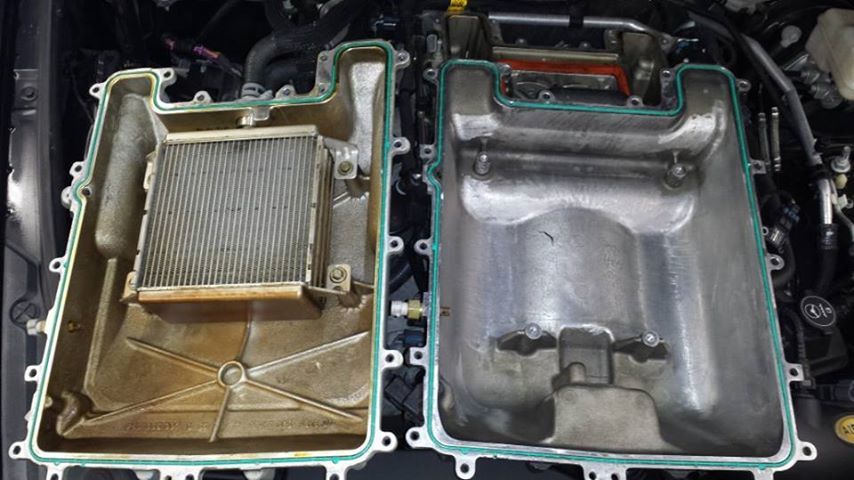 the rear tabs that hang off the back on the lids (the top of this pic) are the bolt holes that require a special kind of patience to get the bolts out of... now there is another way but its not for the squeamish... my zl1 was bought under the notion of being a race car.. and I knew the blower would be coming off on a reg basis... so it has had its windshield wiper cowl removed and holes drilled in the overhang under it so as for me to get to those holes without a thought.....if you saw my car you would never know this because the plastic cowl covers it up.... t
__________________
 2011 cts-v coupe (pinky) wifes car.. ls9 cam c.a.i. 11.44 2007 corvette vert ..retired.. 2013 zl1 stock blower stock ci 20" wheels 10.36 135...so far.. |

|

|
|
08-19-2013, 09:02 PM
|
#2 | |
|
Drives: 2013 zl1 Join Date: Nov 2012
Location: st louis
Posts: 838
|
now the next step I going to show is not needed UNLESS you plan on removing the entire blower...
if your only going to remove the snout this part is not needed.. this is how you remove the fuel line. the proper tool is required... any autozone type store carries this.. 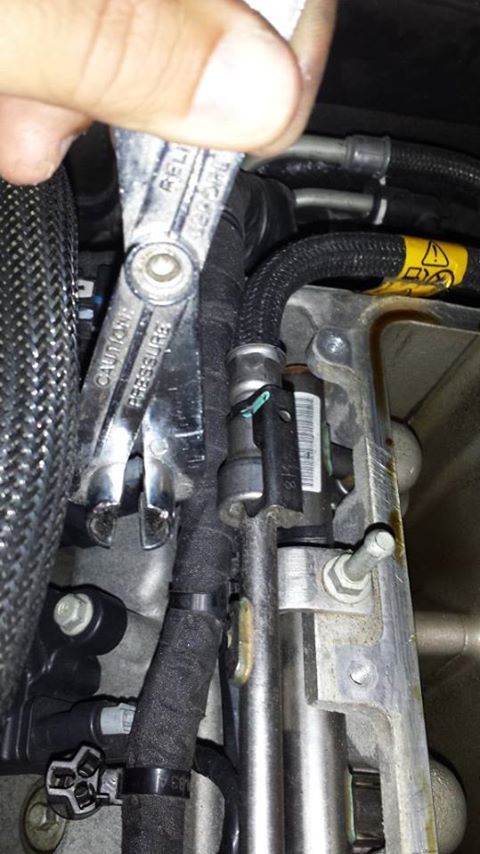 here is a short vid that shows how its done.
__________________
2011 cts-v coupe (pinky) wifes car.. ls9 cam c.a.i. 11.44 2007 corvette vert ..retired.. 2013 zl1 stock blower stock ci 20" wheels 10.36 135...so far.. |
|
|
|
|
|
08-19-2013, 09:20 PM
|
#3 | |
|
Drives: 2013 zl1 Join Date: Nov 2012
Location: st louis
Posts: 838
|
now the next step is to remove the actual intake bolts out so you can remove the snout.
the intake bolts that hold the lower part of the blower to the intake are 8 mm.. there are 10 of them and they ALL need to be loosened to get the snout off as the front of the intake actually has to be lifted to get the snout bolts out and to get the snout to slide out and off.
__________________
2011 cts-v coupe (pinky) wifes car.. ls9 cam c.a.i. 11.44 2007 corvette vert ..retired.. 2013 zl1 stock blower stock ci 20" wheels 10.36 135...so far.. |
|
|
|
|
|
08-19-2013, 09:25 PM
|
#4 |
|
Drives: 2013 zl1 Join Date: Nov 2012
Location: st louis
Posts: 838
|
now the next step is to physically remove the snout bolts..
they are 10 mm bolts and CAN be removed with the tb on but is easier to remove with the tb off there is a sensor directly behind the tb that a needs the bolt removed from to get a extension through to get the socket on the bolt. here is a pic of that sensor.. it is a 10mm bolt.. 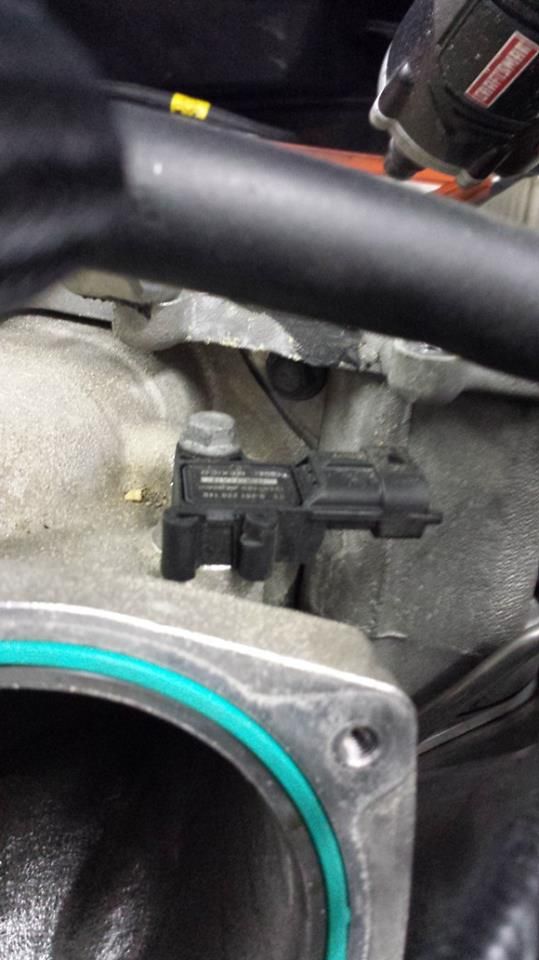
__________________
2011 cts-v coupe (pinky) wifes car.. ls9 cam c.a.i. 11.44 2007 corvette vert ..retired.. 2013 zl1 stock blower stock ci 20" wheels 10.36 135...so far.. |
|
|
|
|
08-19-2013, 09:30 PM
|
#5 | |
|
Drives: 2013 zl1 Join Date: Nov 2012
Location: st louis
Posts: 838
|
here is a vid that shows were the inlet bolts are
__________________
2011 cts-v coupe (pinky) wifes car.. ls9 cam c.a.i. 11.44 2007 corvette vert ..retired.. 2013 zl1 stock blower stock ci 20" wheels 10.36 135...so far.. |
|
|
|
|
|
08-19-2013, 09:35 PM
|
#6 | |
|
Drives: 2013 zl1 Join Date: Nov 2012
Location: st louis
Posts: 838
|
now once the snout bolts are removed, you can remove the few lines from the bottom of the snout.. this vid shows how to get the snout loose from the blower which can be a pain but it will come off with a little help.
__________________
2011 cts-v coupe (pinky) wifes car.. ls9 cam c.a.i. 11.44 2007 corvette vert ..retired.. 2013 zl1 stock blower stock ci 20" wheels 10.36 135...so far.. |
|
|
|
|
|
08-19-2013, 09:37 PM
|
#7 | |
|
Drives: 2013 zl1 Join Date: Nov 2012
Location: st louis
Posts: 838
|
snout removal
__________________
2011 cts-v coupe (pinky) wifes car.. ls9 cam c.a.i. 11.44 2007 corvette vert ..retired.. 2013 zl1 stock blower stock ci 20" wheels 10.36 135...so far.. |
|
|
|
|
|
08-19-2013, 09:40 PM
|
#8 |
|
Drives: 2013 zl1 Join Date: Nov 2012
Location: st louis
Posts: 838
|
so far this is as far as iv gotten on this car guys.. I will be removing the blower this evening after I put the kids to bed and will take some vids of actual rotor removal and the special little tool I made for that and show you guys where the bearings are and even how to repair the dreaded bearing squeal if it were to happen to a car that was not under warranty...
I hope this has been helpful guys.. this is the first time I have ever done anything like this... so please, I know im no james cameran... if you have any question feel free to throw them at me now.. I will prob load some more pics and vids up in 4-5 hours..
__________________
2011 cts-v coupe (pinky) wifes car.. ls9 cam c.a.i. 11.44 2007 corvette vert ..retired.. 2013 zl1 stock blower stock ci 20" wheels 10.36 135...so far.. |
|
|
|
|
08-19-2013, 09:46 PM
|
#9 |
|
Cartoon Maus
Drives: White ZL1, Chevroyota Prizolla Join Date: Aug 2013
Location: Charlotte, NC
Posts: 303
|
You're doing great, and I think I can safely speak for everyone when I say thanks. Keep up the good work. Subscribed and grateful for the shared knowledge.
|
|
|
|
|
08-20-2013, 08:50 AM
|
#10 |
    
Drives: '12 ZL1 #1609 Join Date: Feb 2010
Location: Georgia
Posts: 1,762
|
Great work here Baron, I was on last night and was going to post but realized you were still updating so I decided to wait. Wondering if you considering putting on a supercharger spacer: http://d3groupinc.com/d3-supercharger-lid-spacer/
__________________
Life is too short to drive cars that suck.
My build Thread |
|
|
|
|
08-20-2013, 09:12 AM
|
#11 |
|
Petro-sexual

|
SWEET thread! Great info' here. These would be things I'd be thinking about.
__________________
 '20 ZL1 Black "Fury" A10, PDR, Exposed CF Extractor Magnuson Magnum DI TVS2650R // RFBG // Soler 103 // TooHighPSI Port Injection // THPSI Billet Lid // FF // Katech Drop-In // PLM Heat Exchanger // ZLE Cradle bushings // BMR Chassis-Suspension Stuff // aFe Bars // Diode Dynamics LEDs // ACS Composites Guards // CF Dash // Aeroforce // tint // other stuffs |
|
|
|
|
08-20-2013, 09:14 AM
|
#12 |
|
Car Lover By Nature
Drives: 2016 Hyper Blue Metallic SS Join Date: Dec 2009
Location: Central FL
Posts: 2,327
|
Great thread. One day I will replace my coupler.
__________________
 |
|
|
|
|
08-20-2013, 02:50 PM
|
#13 |
|
Drives: 2013 zl1 Join Date: Nov 2012
Location: st louis
Posts: 838
|
Im finishing the job today. Yes a supercharger spacer is in the works but not a heat transfering aluminum one. I am working on a phenolic version to keep heat out of the lid.
More vids and pics coming tonight finishing up the job.
__________________
2011 cts-v coupe (pinky) wifes car.. ls9 cam c.a.i. 11.44 2007 corvette vert ..retired.. 2013 zl1 stock blower stock ci 20" wheels 10.36 135...so far.. |
|
|
|
|
08-20-2013, 05:24 PM
|
#14 |

|
Thanks! it's very interesting.
after you pulled out the snout looks like it had a gasket in back all glued up i presume some parts were off and some still on.. tuff to clean and install one new without, it, to not to fall when installing the snout back on.. |
|
|
|
|
|
|
|
 |
|
|


