You are browsing camaro5 

|
 12-06-2009, 02:05 AM
|
#1 |
|
www.Camaro5store.com

|
DIY Hurst Short Throw Shifter Install - Pix and Video
I got my Hurst Short Throw Shifter delivered a couple days ago (Thanks, Chris!!!) and FINALLY had an opportunity to get in the garage to get it installed.
 Like all my installations, I like to help out others with DIY threads so that everyone can see for themselves how the installation works. Like all my installations, I like to help out others with DIY threads so that everyone can see for themselves how the installation works.This following thread should be used as a tool (along with the directions for the install provided by Hurst) to help you get your new shifter installed with ease. First, let me tell you that this install is EASY. If you have any mechanical experience, this is super easy. For someone who's never done anything like this before, follow the directions and you'll be fine. Anyone can do this....and it's actually fun to do it yourself. No need to pay the local guy $100 for install when you can get it done in 45 minutes.  Onward to the pix and video!!!!  First things first, open that box up and make sure all your parts are there. Included in the box are:
Tools needed for the install:
Once you have all the parts down, make sure you have a clean, flat surface to work on...or a lift which is preferable. I did this in my own garage using a floor jack and two jack stands. But...I would have preferred to use a lift (if you can get one). To start: Use a trim tool to lift up the silver surround (trim/gauge cluster) that goes around the shifter. If you use a flat head (which I don't recommend), USE CAUTION. Scratching the piece is SO easy to do. I decided to slide my fingers under the very bottom right side of the center console and completely pull off the right side cover. I reached under finding two tabs that held the center silver piece in place and pushed them up.  The silver surround popped right up and I removed it laying it over the right side on the floor (never even needing a trim tool or screwdriver). 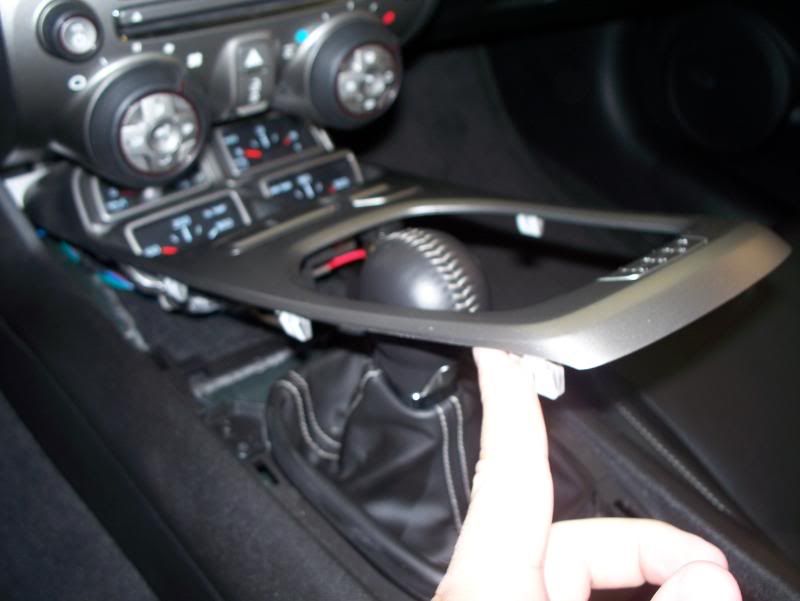 No need to disconnect any wires as this part will not get in the way. 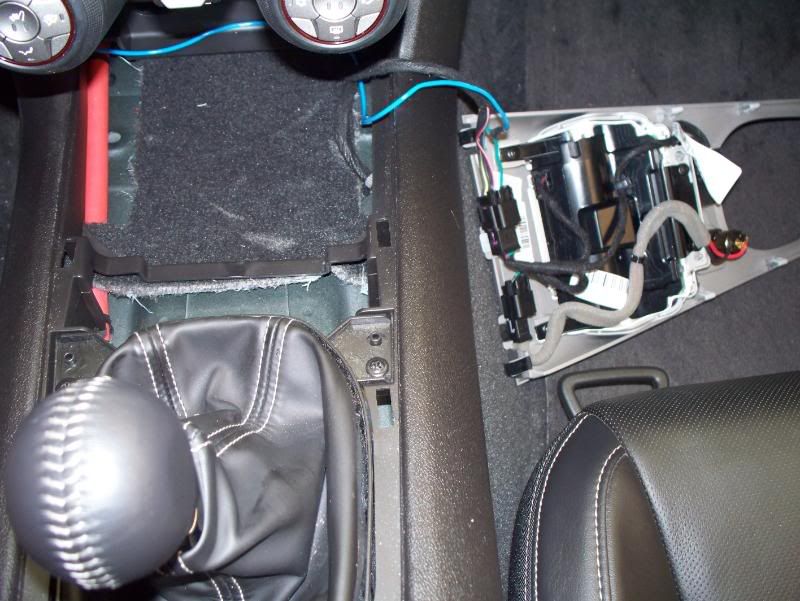 Next part is to unscrew the 4 screws that hold the shift boot ring in place. Put them in the cup holder for later. Two on either side... 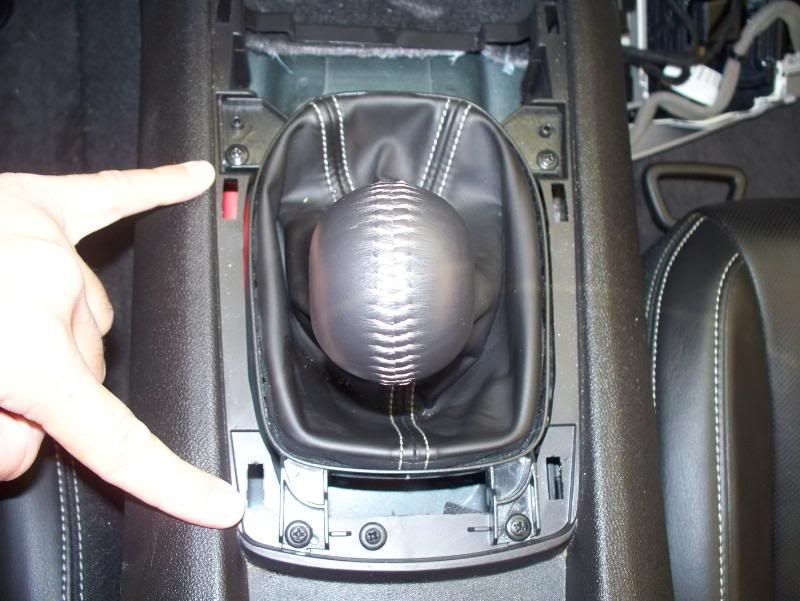 Next, pull up sharply on the stock shifter. You might need to twist it ever so gently and rock it a bit to get it to come up. It DOES take some force. Don't worry...you won't break it. It'll just pop right up. NOTE: MAKE SURE YOU UNSCREW THE 4 SCREWS FIRST....if not, and you pull up on the shifter, that shifter is going to continue going upward with all that force you put into it and the leather boot will come up straight off that boot ring. You'll have to use a flat head to align and pinch the leather back into the holding tabs. Ask me how I know this...  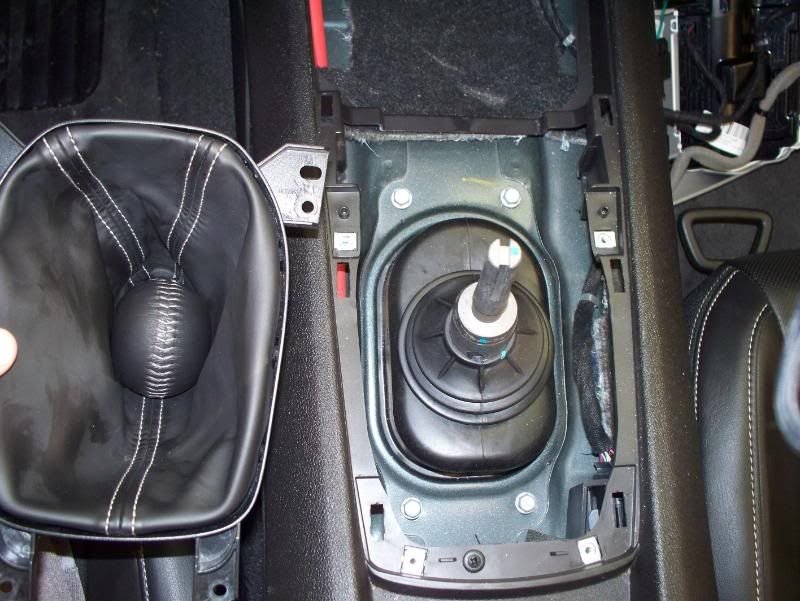 Next, put the car on a lift or use the floor jack to lift it up...put it on jack stands so it doesn't fall on ya! Safety first!   The next step is easy....(as they pretty much all are)... Use the small extension, ratchet, and your 15mm socket to loosen the 4 bolts that hold the rear transmission cross member bolts. Be careful not to loosen them up too much. It'll drop about 1/2 to 1 inch giving you better access to the shifter. I unscrewed them one at a time and allowed the first one to completely come out. I screwed it back in a few full revolutions and repeated for all 4 bolts. I'm pointing to the two bolts on either side shown here.  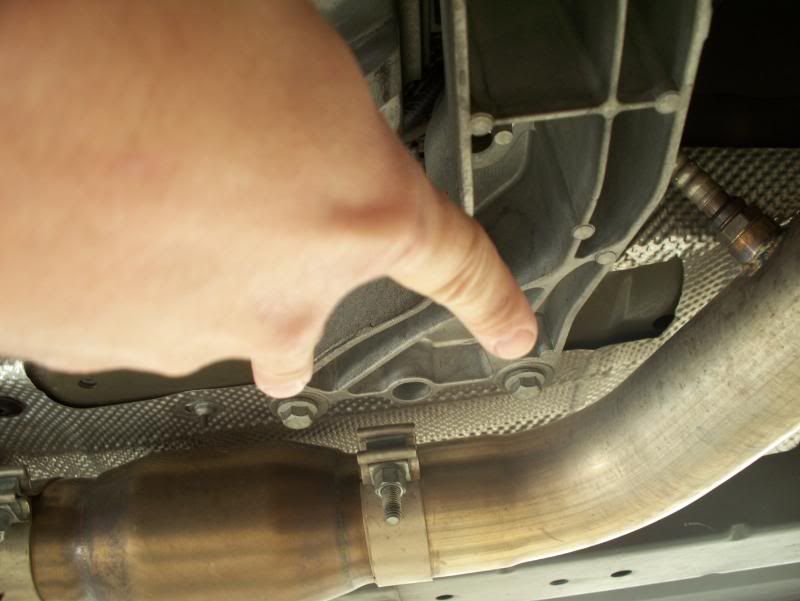 Next part is to pull the dust boot forward (putting it back is an utter PAIN).  Under that dust boot, you'll see the shifter. There are two connection pin clips on both sides of the lower shifter. 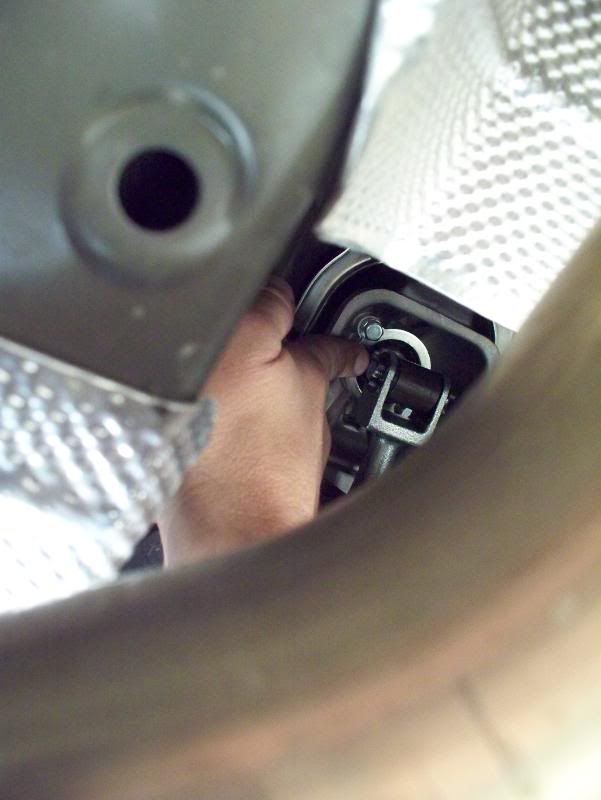 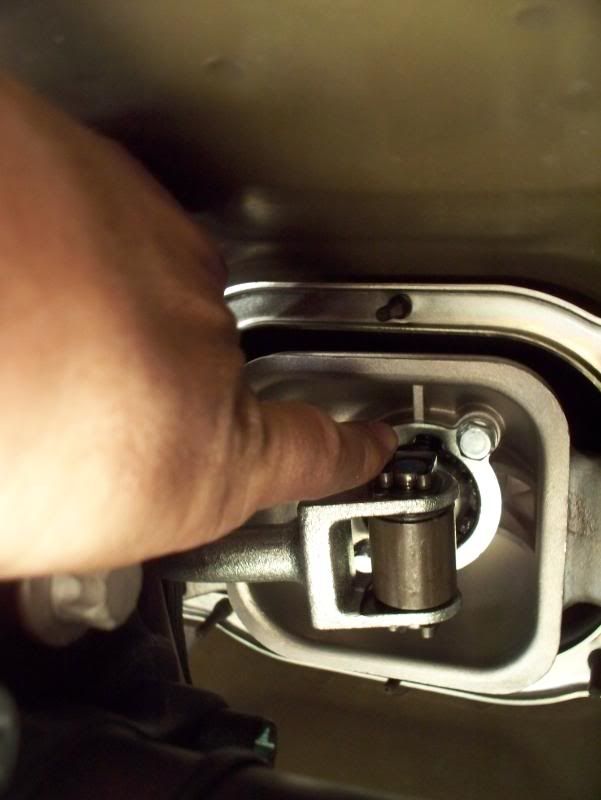 Included directions show a flat head being used to push them off the pin. I was able to remove them by hand. Once you have the pin clips removed, slide out the cross pin either way and disconnect the change rod from the shifter allowing it to hand out of the way. I actually pushed mine backwards to the rear of the car (probably putting it in gear). But, it got it out of the way a bit. Then, use that long ratchet extension, a 10mm socket, and your ratchet to remove the two mounting screws and mounting plate. You won't need those anymore. Pull down firmly on the shifter and it'll pop right out. It's a bit of a pain getting it around the change rod, but if you angle it to the drivers side when pulling it out, it'll come out. 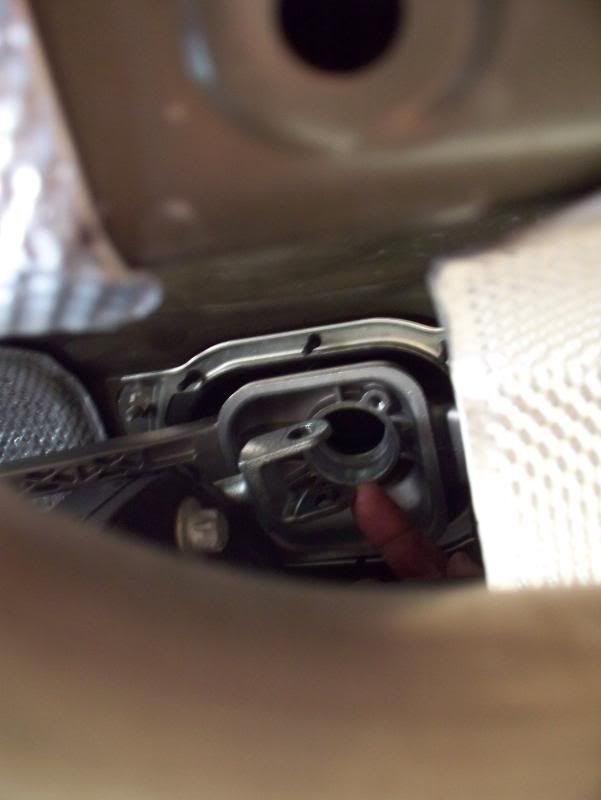 Next step is to use the supplied grease and grease up those O rings on the new shifter and pop it up in place. Remember, the longer stepped side of the lower bushings go towards the driver and the ridges of the upper stick connection to the passenger. Pop it up in place (it'll stay by itself) and line up the mounting screw holes. 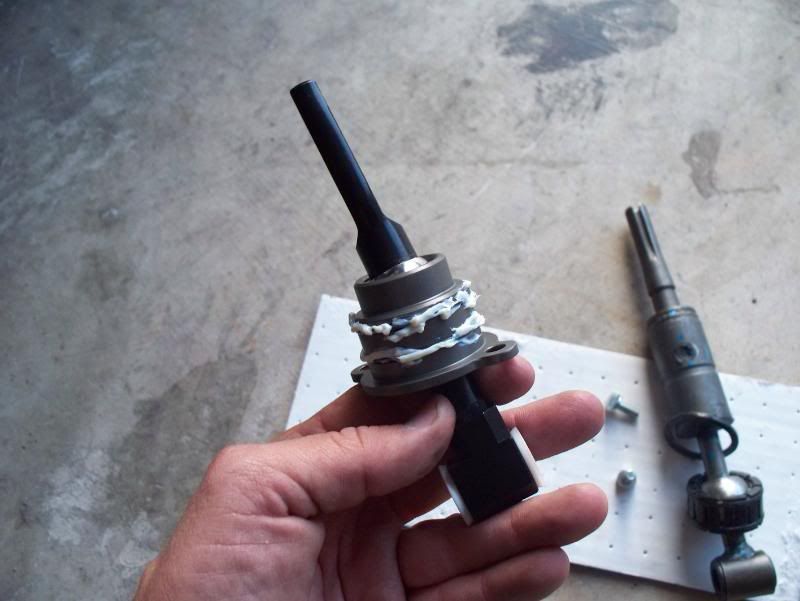 Here comes the tough part... Use the provided Locktight (adhesive) placing a drop onto either counter sunk mounting screw. Reach up there with your allen wrench and tighten them down. There is NOT a lot of room at all to work in there. It's a pain... Just stick with it and you'll get them screwed in. Then attach the connecting rod to the lower shifter bushings sliding the cross pin in place. Secure the cross pin back in place with the locking clips you took off earlier. Next up? Put that dust boot back in place. This was a pain since there is no room to work under there. Just get one side in place and pull the tabs (one at a time) to stretch the boot around and it'll pop back in place in it's grooves. Now, double check the boot and make sure it's all good. Tighten those 4 transmission cross member bolts back up with your 15 mm socket wrench and your in business. Drop the car back down. Using one of the supplied boot supports, slide it down over the shifter stub stick. Then work the rubber boot into the groove of the boot support. Push it down far enough so that it clears the two screw holes.  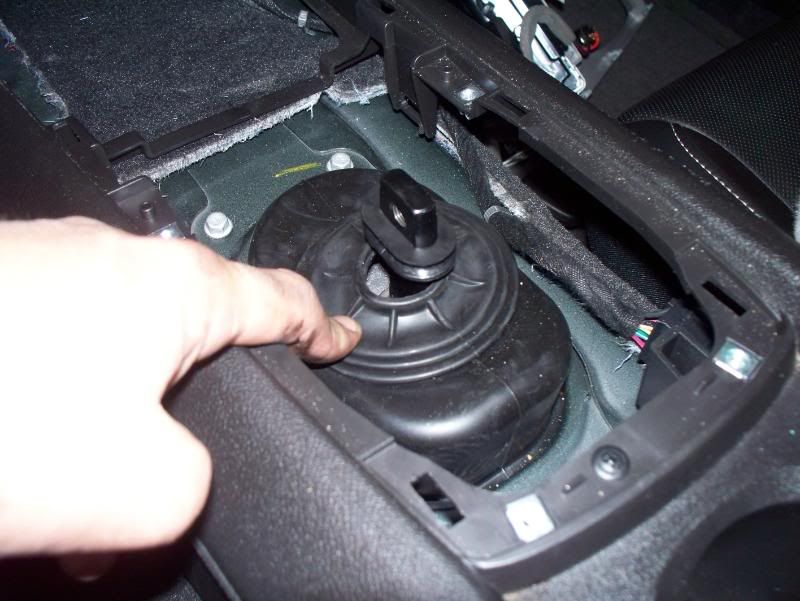 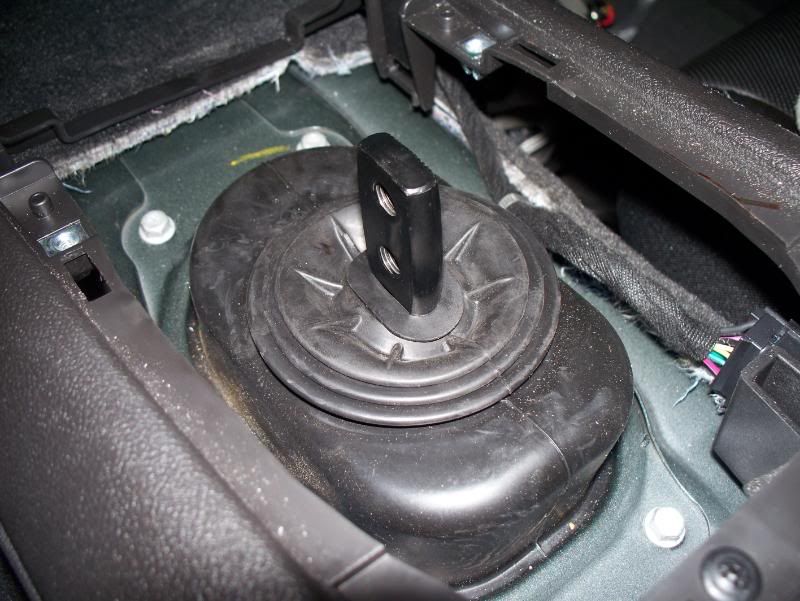 Either use the chrome Hurst handle or stock OEM stick for stock handle shifter. I used the chrome handle for now. Slide the other boot support on the Hurst handle passed the mounting holes. Remove the stock shifter handle by cutting the zip tie. Replace with the Hurst shifter and line up the leather boot around the boot support using the new zip tie to secure the leather to the boot support. Easy to do...just reverse the process in taking apart the original. 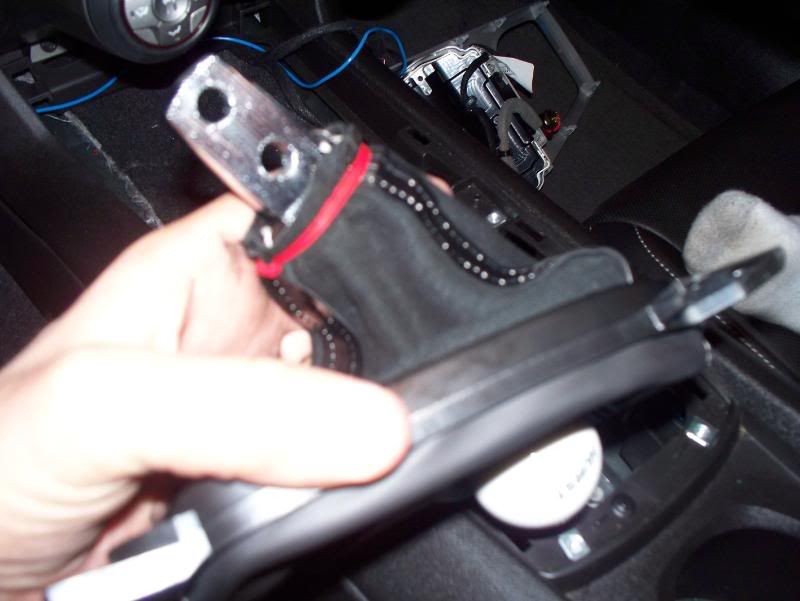 Here's another angle since that first one was blurry.  Line up the groves on the chrome handle to the lower Hurst shift stick and screw in the mounting screws with washers one at a time. I hand tightened mine while holding the shifter in place so that the shifter handle grooves were sure to line up. I then tightened them down properly with my allen wrench.  Then, just put the boot ring back into place screwing it back down w/ the 4 screws left in your cup holder.   Screw the nut onto the top of the Hurst shifter and screw on the white "Q ball." You have to use a wrench after getting the Q ball screwed on to align properly...tighten the screw to keep it in place. Then, just toss the silver console/gauge cluster back in place and you are ready to rock. Make sure you can shift through all the gears. It might be tough at first, but start the car and keep the clutch in. It moved really tight and was hard to get into revers for mine...until I started the car. Then, it moved into reverse with ease. 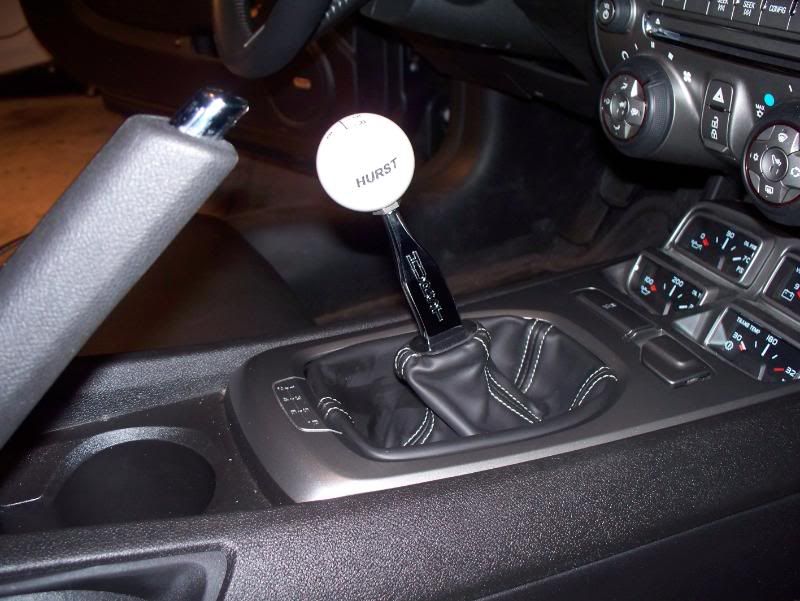 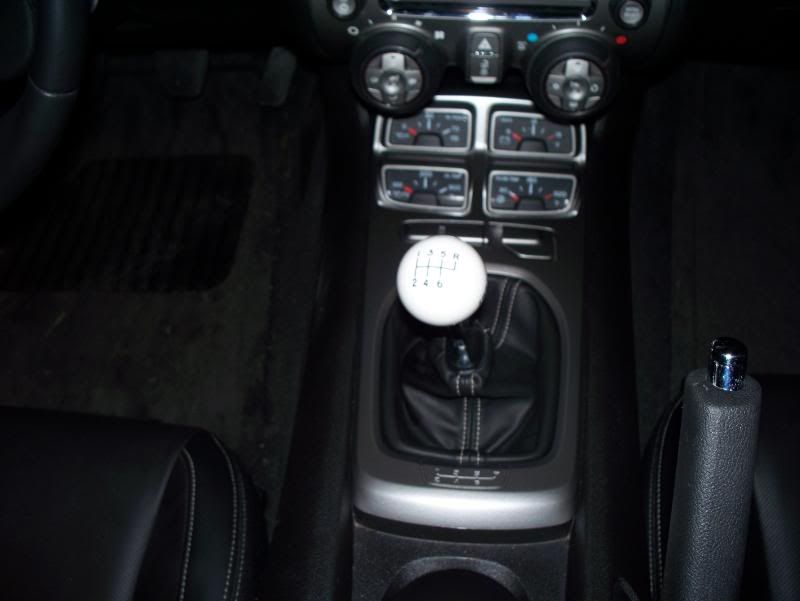 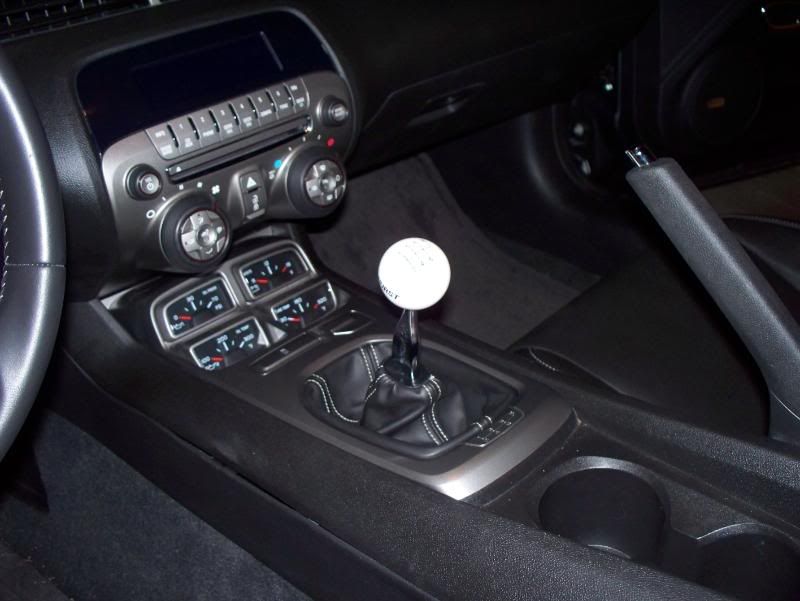 Summary on the install? EASY. There is LITTLE room to work up there around the driveshaft...and that is the ONLY drawback. Other than that, it's a breeze. Very simple install process. And my final opinion on the shifter?  TOTALLY different from the stock OEM shifter. MAJOR difference. If you know anyone with a short throw shifter and have not yet run through the gears, dude...you HAVE to try it. It is UNBELIEVABLE. The two MAIN differences between stock and Hurst are the firmness of the shifts through the gates (waaaay too smooth with stock - I swear, it always felt like I was going to break that stock shifter handle when shifting quickly) and the throw distance. It is immediately apparent that you don't have to move the shifter as far. When rowing through the gears, you FEEL the Hurst shifter go into each gear almost with a "click." It is FIRM. You can FEEL it. If you want smooth, easy, and mushy, stick with stock. If you want to feel your shifts, this is the shifter for you. You KNOW when you shift into gear.  Yeah...so far, I LOVE it. I have not yet "gotten on it." But, when I have the chance, I will...and I'll let ya'll know how it goes. I believe it honest reviews of the parts I put in my car. If I don't like it, I'll say it. Not the case here. I LOVE the shifter so far.  Great job, Hurst!!! Now...for those back ordered black Hurst knobs.....  
|

|

|
|
12-06-2009, 02:09 AM
|
#2 |
|
Camaro SL,UTs

Drives: 2010 Camaro SS/RS #16429 Join Date: Sep 2006
Location: South Jordan, UT
Posts: 7,358
|
Love my Hurst! Great write up.
__________________
 |
|
|
|
|
12-06-2009, 02:10 AM
|
#3 |
|
~ Love or Lust ~

Drives: R6P 1SS/RS BLK/L99 Join Date: Oct 2008
Location: With My CynAgain
Posts: 25,198
|
What a great thread you created TAG!!! Wonderful information and photographs!!!

__________________
~ Then conquer we must, when our cause it is just, And this be our motto, "In God is our trust." And the Star Spangled Banner in triumph shall wave O'er the land of the free and the home of the brave ~ Francis Scott Key ~
 |
|
|
|
|
12-06-2009, 02:18 AM
|
#4 |
|
www.Camaro5store.com
|
Thanks, guys. The directions they supplied were really easy to follow.
However, in my experience, having someone there to help run you through the process showing you step by step is the next best to having someone do it for you. If this helped anyone in their install process, I did my job. ...and thanks again. I love doing stuff like this!! Next up, Vararam installation thread!!! MONDAY MONDAY MONDAY!!!
|
|
|
|
|
12-06-2009, 03:20 AM
|
#5 |
|
Account Suspended
Drives: 4 wheels Join Date: Mar 2009
Location: Here
Posts: 1,404
|
nice write up!
|
|
|
|
|
12-06-2009, 08:50 AM
|
#6 |

Drives: 2014 Z/28 #82+#192, 18ZLE 66Nova Join Date: Oct 2008
Location: By the lake in AZ
Posts: 15,719
|
Good job tag, I know you will like "getting on it" Hurst makes a good shifter. IMO
|
|
|
|
|
12-06-2009, 09:00 AM
|
#7 |
|
Member

Drives: 2010 ABM 2SS/RS LS3 Join Date: Feb 2009
Location: Where you vacation...Tahoe
Posts: 928
|
I followed the Hurst DIY video and it went as planned, I love it now! haven't missed 3rd since I installed it. This is a great addition to our cars, as GM knew and tried to launch with it. Threads like yours really help people to make the choice!
________ Vaporizers.net review Last edited by superstockcam; 04-19-2011 at 03:29 AM. |
|
|
|
|
12-06-2009, 11:31 AM
|
#8 |
  
Drives: 2010 Camaro 2SS Join Date: Aug 2009
Location: NorCal
Posts: 958
|
I've put 2,000 miles on mine and it just get better and better!!!!
|
|
|
|
|
12-06-2009, 01:11 PM
|
#9 | ||||
|
www.Camaro5store.com
|
Quote:
Quote:
Quote:
Then putting this together was worth it! Glad it helped you out! Quote:
 I swear...I could drive this car all day long every day... |
||||
|
|
|
|
12-06-2009, 02:21 PM
|
#10 | |
|
Drives: 2014 Z/28 #82+#192, 18ZLE 66Nova Join Date: Oct 2008
Location: By the lake in AZ
Posts: 15,719
|
Quote:
I can call you boss and ask if they need a new car. |
|
|
|
|
|
12-06-2009, 04:58 PM
|
#11 | |
 
Drives: 2010 SS/RS Join Date: Jun 2009
Location: Colorado
Posts: 288
|
Installed at the same time?
Quote:
I started my Hurst install around 10pm last night. It took me longer to get the car on jack stands than it did to get the shifter in. I decided to tackle THE boot this morning......... well.... this afternoon. After a few unsuccessful attempts I got on the forum to see if I could find any tips on getting that bugger back on  . Any suggestions, anyone? . Any suggestions, anyone?Thanks in advance. |
|
|
|
|
|
12-06-2009, 05:50 PM
|
#12 |
|
Drives: 2010 SS/RS Join Date: Jun 2009
Location: Colorado
Posts: 288
|
GOT IT!!
Tag,
I watched the video again and did what you had said. First I raised the car another 1.5" or so and I could get a better angle on the boot with my arms. I then put the passenger side in the groove first, then pulled the driver rear tab, then the front tab. The thing damn near jumped on!  THANKS TAG! oh ya one more thing to whine about............ my ball doesn't say "Hurst" So how was the ride? Any noise to speak of? It's supposed to snow through Tuesday here, so I won't get to test 'er out for a few days. 
|
|
|
|
|
12-06-2009, 07:57 PM
|
#13 |
|
Blessed

Drives: 2013 Sonic RS MT Join Date: Dec 2007
Location: Saint Augustine FL
Posts: 28,444
|
__________________
Click image to see build thread. PQ - "the love of cars. It's a boys first step toward manhood and a mans last hold on boyhood." Fbodfather - "We do not want to use the Z28 moniker on a car that does not deserve this hallowed name." The_Blur - "Let's not confuse competitors with equals." |
|
|
|
|
12-07-2009, 12:01 AM
|
#14 | |||
|
www.Camaro5store.com
|
Quote:
Quote:
I like the post below...lolQuote:
That's right! Exactly what I hoped would happen for others. Don't know why yours doesn't say Hurst. Maybe it's one of the original shifter balls? I really want the black shifter ball w/the orange "H." THAT one is just plain cool.  ...and it'll go with my interior better. ...and it'll go with my interior better.Noise? Really haven't noticed any so far. I have a total of 6 hours of driving tomorrow and if there's a time to notice anything, it'll be then. If there is, I'll just put another "boot" over the original thin boot below the leather cover on the shifter. When you go to test out the car, you are going to LOVE it. I mean, I really can't believe the night/day difference this shifter is over the stock OEM shifter. Totally perfect! I mean...NIGHT/DAY!!! LOVE IT!
|
|||
|
|
|
|
|
|
|
 |
|
|
 Similar Threads
|
||||
| Thread | Thread Starter | Forum | Replies | Last Post |
| My JL 12" and JL 250 amp install VIDEO AND PIX! | TAG UR IT | Audio, Video, Bluetooth, Navigation, Radar, Electronics Forum | 55 | 02-12-2011 01:03 AM |


