You are browsing camaro5 

|
 02-14-2013, 09:27 PM
|
#29 | |
  Drives: 2010 rs/ss black # 10,308 Join Date: Mar 2009
Location: hoffman estates, il
Posts: 914
|
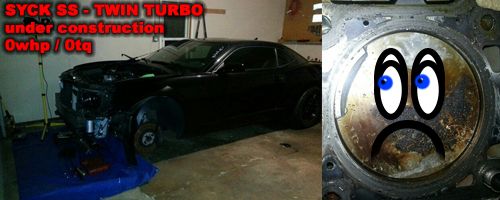
So i finally was able to make it to the track and test out the Meth/water injection. Man does it make a difference. Not only was I able to set my new personal best of 11.23 BUT i also picked up over 4mph finishing at 127-28 mph. All by spraying a little bit of water. But i also ran into a little speed bump. I have a little video summing up everything so check it out.
so basically what happened... when you i went to do my last burnout, i lurched out of the water (a sign i need a line lock) and it messed with my traction causing a one wheel peel. Basically frying my posi clutches and causing my spider gears to literally shatter. Good news was that even after trying to hot lap a couple times, The highest my IAT went was 125-130. That is a temperature drop of over 70 degress. THANK YOU METH!!!! haha. on the runs where i gave the car time to cool off i only would reach 100 degrees in the top of 4th. That is just amazing. Once again big thank you to CM RACING because he was able to get my rear end out and diagnose the problem. take a looksy 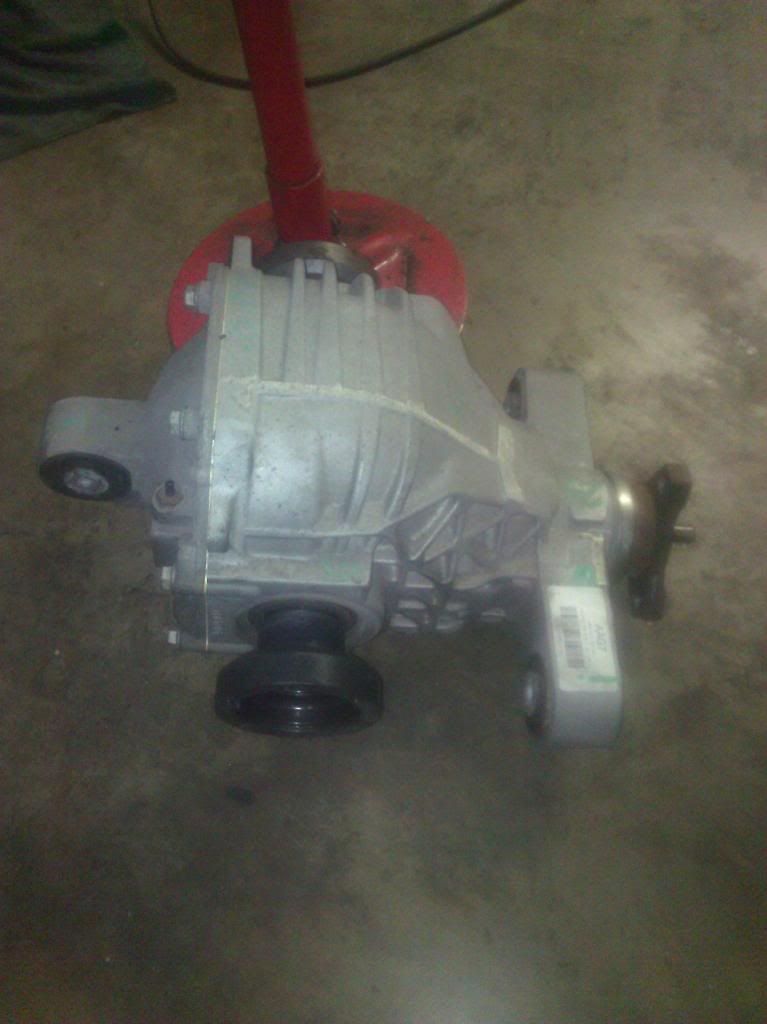 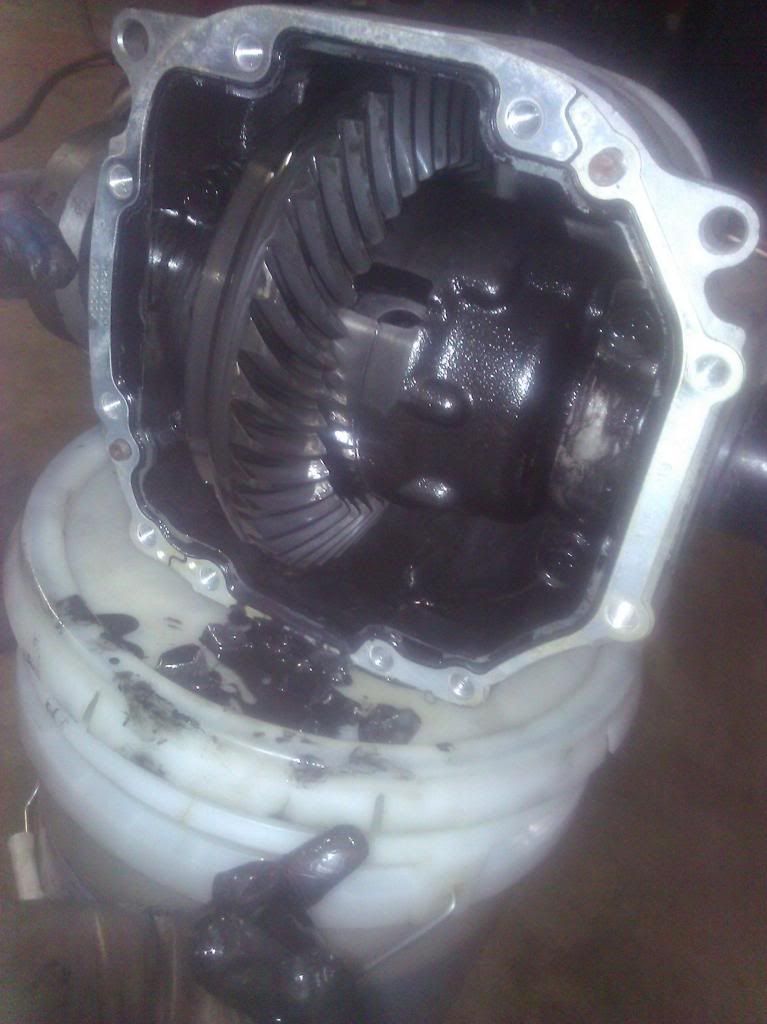 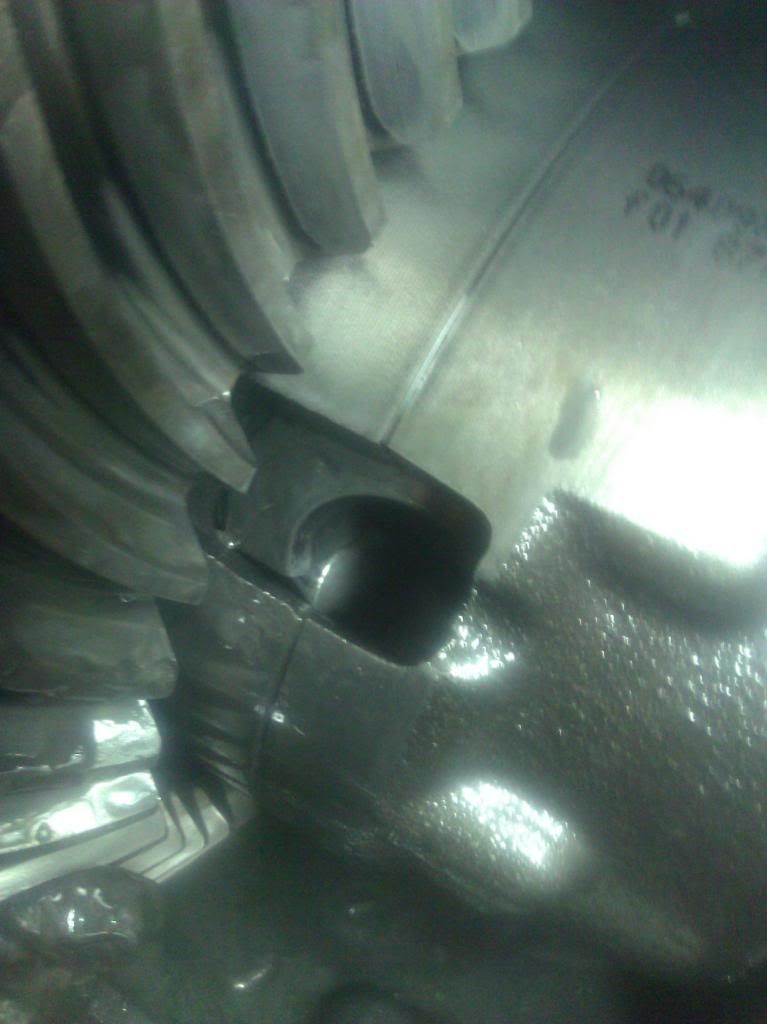 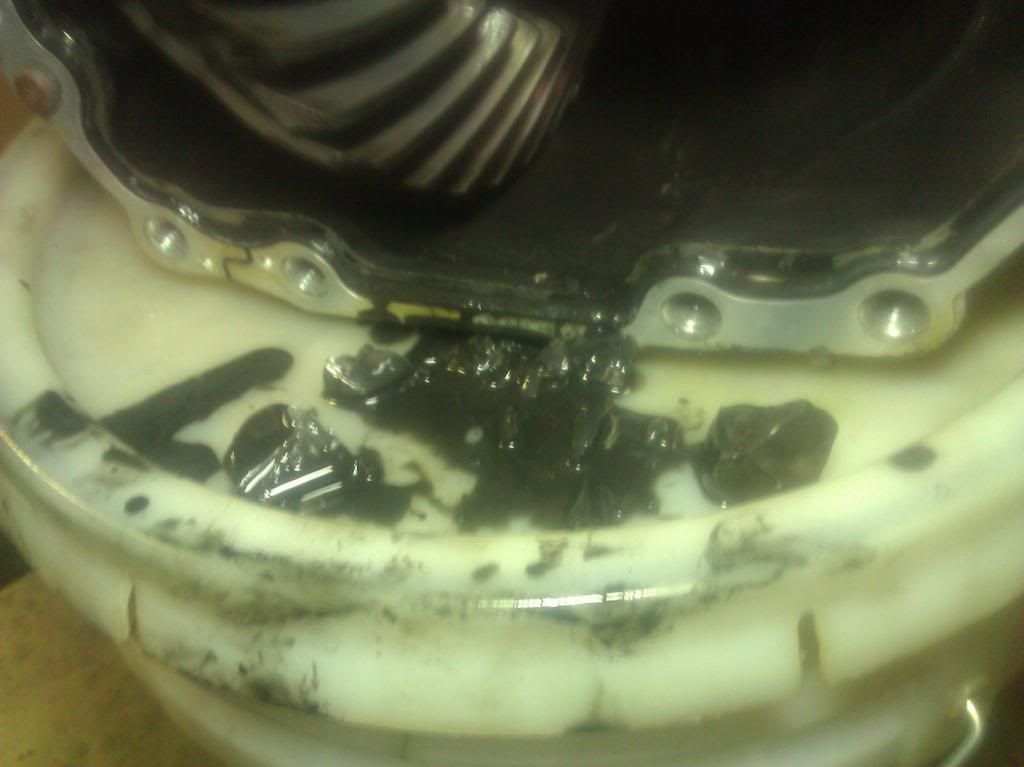 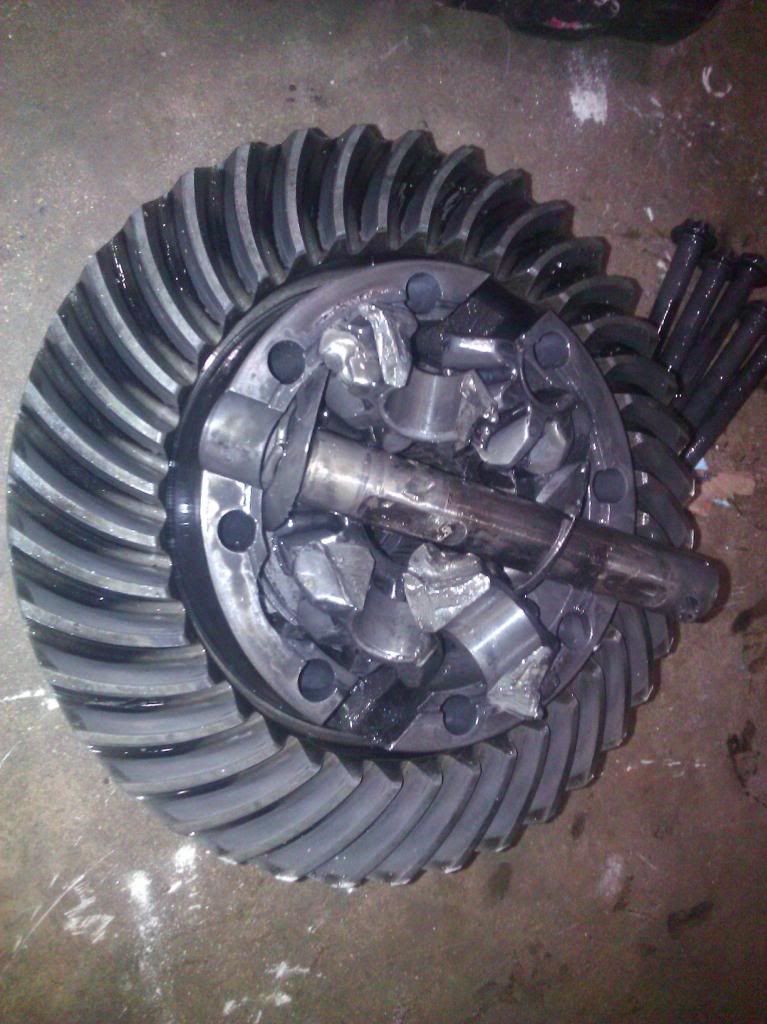 With the help and connections of Pro Stock John from here, i was able to locate and get a great deal on a fully assembled posi unit that should hopefully be here mid week. So there might be one last track trip in store!! stay tuned!
__________________
|
|

|

|
|
02-14-2013, 09:28 PM
|
#30 |
|
Drives: 2010 rs/ss black # 10,308 Join Date: Mar 2009
Location: hoffman estates, il
Posts: 914
|
just before i broke my rear last time :-(

__________________
Last edited by xjer22x; 02-14-2013 at 09:53 PM. |
|
|
|
|
02-14-2013, 09:28 PM
|
#31 |
|
Drives: 2010 rs/ss black # 10,308 Join Date: Mar 2009
Location: hoffman estates, il
Posts: 914
|
So this is the first year that Santa actually gave me car parts! i was so excited. Anyways here is what got! AEM Failsafe Wideband and pillar gauge pod.
 So today i went ahead and attempted the install. Always seems easier then what it is. You open the box and get attacked by wires haha. Removing the stock pillar was easy, so i popped that bad boy off and then set up the new Pod and gauge.  Took me about 2 hours total to get everything wired up and installed. It did make it easier that my Meth kit was installed on the drivers side so i was able to use a lot of the wire leads that were there and tap into those. And then it took about 30 min just to break the stock O2 sensor loose. (thank you justin for the tools and supplies) well after it was said and done this is how it turned out...   I will get some better pictures during the day, and yes there is only one gauge for now, just waiting to save up for another. sent from my galaxy s3. that would explain the errors.
__________________
|
|
|
|
|
02-14-2013, 09:42 PM
|
#32 |
|
Drives: 2010 rs/ss black # 10,308 Join Date: Mar 2009
Location: hoffman estates, il
Posts: 914
|
alrighty, i was keeping a more up to date journal on a different website, so i moved everything over to this one now, so there is a lot more detail on the entire journey. so start from the beginning to get the whole idea.
__________________
|
|
|
|
|
02-14-2013, 10:16 PM
|
#33 |

Drives: 1987 Corvette TPI Join Date: Mar 2012
Location: Littleton
Posts: 549
|
Very sweet car!
 I hope to have a 1SS someday! Just saving and dreaming for now. I hope to have a 1SS someday! Just saving and dreaming for now.
__________________
 |
|
|
|
|
02-14-2013, 10:30 PM
|
#34 |
|
Drives: 2010 rs/ss black # 10,308 Join Date: Mar 2009
Location: hoffman estates, il
Posts: 914
|
you keep working for it and it will happen. All in time. Took me 3 long years of budgeting and sacrificing a lot to be able to get mine. A lot of my friends would spend their money on going out, or buying random things, and i just stuck tight to my budget.
__________________
|
|
|
|
|
02-15-2013, 01:33 AM
|
#35 |

Drives: 2011er SS in black!...what else? Join Date: Nov 2011
Location: Germany
Posts: 715
|
Your Camaro is a monster
 
__________________
 |
|
|
|
|
02-15-2013, 06:22 AM
|
#36 |
|
HT5 COTW 9/3/2012

|
what a beast

__________________
 |
|
|
|
|
02-15-2013, 11:24 AM
|
#37 |
|
Drives: 2010 rs/ss black # 10,308 Join Date: Mar 2009
Location: hoffman estates, il
Posts: 914
|
Thanks guys!
sent from my galaxy s3. that would explain the errors.
__________________
|
|
|
|
|
02-15-2013, 11:45 AM
|
#38 | |
|
Drives: 1987 Corvette TPI Join Date: Mar 2012
Location: Littleton
Posts: 549
|
Quote:
 Lots of respect for you! And what an inspiration that it! Lots of respect for you! And what an inspiration that it!
__________________
|
|
|
|
|
|
02-15-2013, 12:33 PM
|
#39 |
|
Drives: 2010 rs/ss black # 10,308 Join Date: Mar 2009
Location: hoffman estates, il
Posts: 914
|
Well thanks man, see i don't have or make a lot of money at all. I just make a plan and stick to it. Took me 3 years to save up for the car, and i have had the car for going on 4 years now and i'm still working on it as a project. I am not able to get everything i want done all at once. But in time i will get it.
You will get it soon enough, it's worth the wait.
__________________
|
|
|
|
|
04-21-2013, 09:45 PM
|
#40 |
|
Drives: 2010 rs/ss black # 10,308 Join Date: Mar 2009
Location: hoffman estates, il
Posts: 914
|
Here was the the most recent upgrade i tackled today.
a ZL1 Fuel Pump and ADM FPCM. well after a few weeks of putting it off, i finally tackled the ZL1 fuel pump and module swap out. This is right after i removed the seats to see what room i had. Might just leave the seats out, havent decided yet.  So after a little more research i found a couple people that were able to cut a whole with a 10x10 size, so i gave it a shot with a whole about that big. I prefered this instead of cutting out an 18x18 inch square like discussed previously. so i measured it out and marked it off to cut her away. I plan on making a bracket that will bolt in place for future access just in case i ever need to do this again.  so i pulled out the tremel tool that had a nice 3 foot extension tool i could use to make it easier to maneuver. You can see it in this picture below. I started her up and touched her to the metal and saw a ton of sparks fly and then freaked out a little bit. There is just something about a bunch of sparks flying every where when there is a gas tank just below you. So i took a little break to swap out my FPCM. This stands for FUEL PRESSURE CONTROL MODULE, basically another computer that controls the fuel pump, voltage to the pump, and fuel pressure. The new one is the one without a label is a special unit made by ADM PERFORMANCE, and essentially is designed to keep voltage slightly higher to the pump which will raise my Fuel Pressure to around 63-63psi under boost to allow more fuel to be delivered.  this is where the FPCM is located. just under the back window on the passenger side. Not sure why this picture came out so dark lol  So i finally sucked it up and took to cutting, I was using small wheels to cut because i know how close the wires and lines are right under the floor so i didnt want to cut them. And it took about 5 wheels total to cut it out. I only cut three sides and then folded the metal back to gain access. I even had one wheel explode as soon as it touched the metal. It was pretty insane and i was glad i had the eye protection on. Here is the finished result after getting it cut.  so it honestly took me 20-30 minutes too cut the floor out and get access to the fuel pump. I was really excited as i thought it was really easy. But this is when it got hard. There is a ring seal they use to hold the fuel pump down in place. So i took a hammer and a flat blade screw driver, Wedged it into one of the openings on the the ring, and knocked it in a counter-clockwise direction... and the ring spun and popped right off. not too bad. Then i lifted up on the stock fuel pump and gas started pouring out everywhere. so i let it all drain a little before lifting it out more. There is a connection at the bottom of the pump that you have to disconnect and then angle the pump at a 45 degree angle to get the gas level floater out. But this was not bad at all, and only took about 10 minutes to disconnect the old pump and hook up the new one. Here is a picture of the ZL1 Pump sitting on the floor just before i did the swap.  so this is when it got difficult. I got the new pump all hooked up. Pushed it down into the puddle of gas still in the tank (which again poured out onto the floor lol) and then get to the point where i have to get the ring seal to click back in place. Seeing as how easy it was to pop out i figured it would be just as easy to get back in place... TOTALLY WRONG To make a long story short it took me about 5-6 hours to simply hammer the ring back in place. I even went out and bought 2 BIGGER HAMMERS it just would not budge. No matter what angle i attacked it at, it just wouldn't go back into place. So i finally had to reach out to a couple buddies. They came out to the house and we attacked this thing at the same time. So it took 2 heavy hammers and synchronized hitting to get it to just pop back in place. It was unreal. But i finally got everything back into place and will be making a bracket in the near future that will allow me to bolt and unbolt the door whenever i need to. Currently i just used some industrial duct tape to hole it in place for now. All i have left is the injectors and my re-tune. then 10's here i come!!!!! 
__________________
|
|
|
|
|
04-21-2013, 10:19 PM
|
#41 | |
    
Drives: 2012 45th Anniversary 2SS Join Date: Mar 2012
Location: West Chester Ohio
Posts: 1,845
|
Quote:
 awesome! oh and duct tape quite literally fixes everything. awesome! oh and duct tape quite literally fixes everything.
__________________
 |
|
|
|
|
|
04-21-2013, 10:31 PM
|
#42 | |
|
Drives: 2010 rs/ss black # 10,308 Join Date: Mar 2009
Location: hoffman estates, il
Posts: 914
|
Quote:
__________________
|
|
|
|
|
|
|
|
|
 |
|
|
 Similar Threads
|
||||
| Thread | Thread Starter | Forum | Replies | Last Post |
| FS: 2000 Twin Turbo Camaro SS | fredl11 | Autos For Sale / Wanted | 8 | 02-06-2012 02:11 AM |
| 2010 Camaro SS twin turbo for sale | AdamCzap | Autos For Sale / Wanted | 37 | 06-16-2011 08:54 PM |
| 2010 Nickey Super Camaro Twin Turbo edition. | NicKey | 5th Gen Camaro SS LS LT General Discussions | 134 | 07-03-2010 08:29 PM |
| 2010 ss LS3 (stickshift) turbo???? | Lo-Dogg | Camaro V8 LS3 / L99 Engine, Exhaust, and Bolt-Ons | 2 | 04-12-2010 08:39 AM |
| STS Twin Turbos | SupremacyCustoms | Forced Induction - V8 | 0 | 02-16-2010 01:35 PM |