You are browsing camaro5 
|
|
 01-19-2015, 07:39 PM
|
#1 |
|
Go Gators!

Drives: Camaro Jeep Abarth 944 325i Join Date: Jan 2013
Location: CT
Posts: 844
|
So, I've finally completely finished my stereo install. After a long and arduous battle with a few hiccups along the way I have all the pics and info you need to install a full system in your Non-BA cars and KEEP your awesome problem free stock radio (and not waste time with a Scosche or Metra kit).
Forewarning: There remains an amp-on thump and an amp-off thump. While annoying, from my online research the thumps do not actually do any damage. BUT, I wish there was a way to rid of it. The topic is floating around the forums and there are ways to mitigate it but unfortunately nothing seems to completely mute it. In my opinion it is totally worth it for the ability to keep the stock radio and to increase the sound quality. As always, in any DIY, I am not responsible for any adverse effects that result during your install. If you PM me I can do my best to answer any questions, but cannot cover damages caused by improper installation.  Materials Needed: -Screwdrivers (Stubby Phillips, Regular Phillips) -Drill w/ Drill Bits -Dikes -Heavy Duty Scissors -Wire Strippers -Wire Crimpers -Crimps, Blue and Red -Plastic Trim Removal Tools -1/4" Ratchet -1/4" drive 10 mm socket -3/8" Ratchet -3/8" drive -Torx T30 bit -Torx T50 bit -PAC AA-GM44 Harness -Front Component Speakers -Rear Speakers -Front Speaker Adapters -Rear Speaker Adapters -Speaker Wire -Speaker Wire to RAC Output Converters x4 -Amplifier Wiring Kit -Subwoofer -Subwoofer Enclosure -Amplifier IMPORTANT: Make sure to purchase an amp that will accept HIGH INPUT VOLTAGE, at least up to 7 Volts -Amplifer Enclosure My Speakers and Amp: Front: Infinity Kappa 60.11CS --- Great Mid-level/High End Components, comparable to the entry level Focal's in my opinion. I recommend them. Rear: Infinity Kappa 693.11i --- Also very good, but not as great as I expected, would consider others. Subwoofer: Polk MM1240 --- Very good mid-level/higher end quality subwoofer. Super slim and powerful! I recommend it. Amplifier: Power Acoustik Bamf4500/5d --- It puts out top level power for a very affordable price. I recommend it. Subwoofer/Amp Enclosure: Sub Thump Stealth Enclosure --- Definitely recommend for saving space and keeping the stock look. STEP 1: Unplug negative terminal from the battery. Always safer to remove power before working with any electrical components in the car. Remove Front Door Panels. Remove the trim pieces at the door grab area and behind the door handle. Remove 5 10 mm bolts and 1 T30 bolt. Carefully use a plastic trim removal tool to pry off the door from its clips. On the left door there are four harnesses to remove. On the right door, only three. Also remove the door unlock mechanism. Grab a buddy to hold the door while you remove all the electrical connectors. Remove the stock speakers. Remove one 10 mm bolt and detach the speaker from the harness. STEP 2: Remove the Tweeter panel by removing one phillips screw and the carefully unsnapping it.  Remove the factory tweeter by unlatching it.  I myself was able to pull out the factory tweeter from the bracket and shove the infinity tweeters in its place. Be careful as it takes some working to get the factory tweeters out of that bracket. 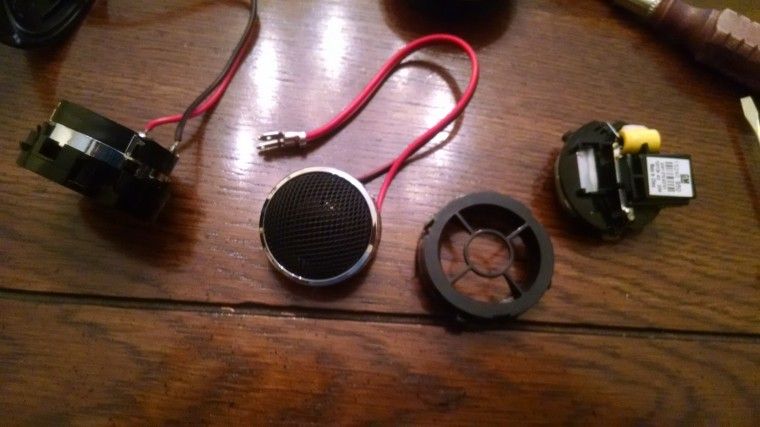   Install the Tweeter back in place. Attach the crossover unit somewhere nice in the door panel. Use some double sided tape to adhere it to the door panel. Wire up the crossover and tweeter and leave excess wire to attach to the factory speaker wire and the mid-woofer.  Lay down dynamat if you desire. You do not need to cover the entire door, just seal up some areas you seem fit. Dynamat works plenty good if placed sporadically as its main purpose is to dampen and increase the density of your door. Attach the front speaker adapter to the door. Bring the door panel to the car and grab a buddy. Attach all the electronics, including the speaker wires. I used crimps myself. 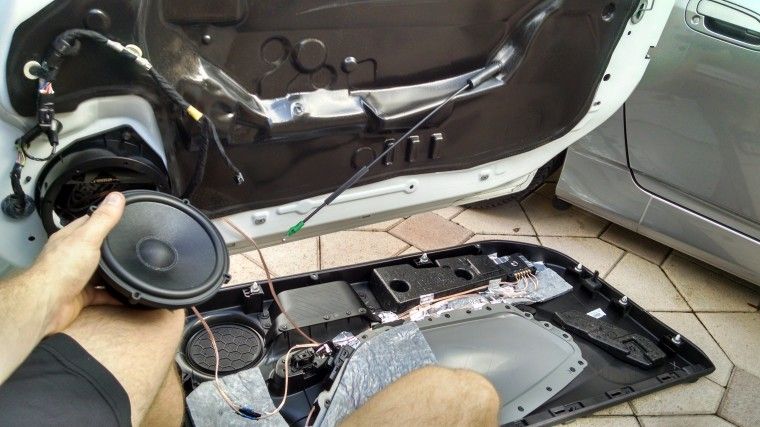 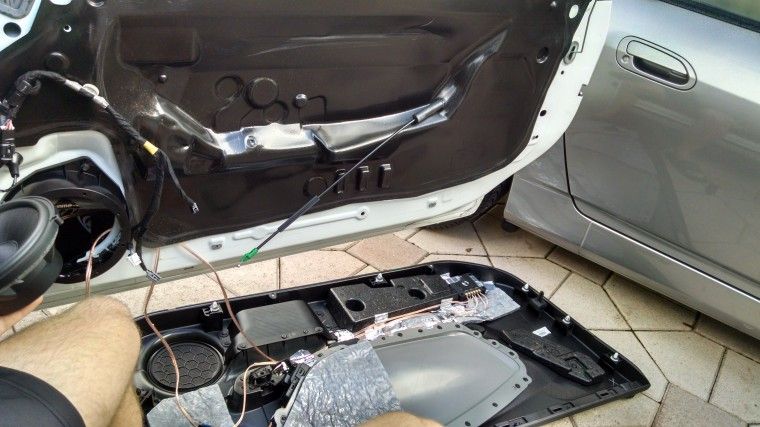 Repeat for each door. Since at this point you have not even touched the factory radio plug the negative terminal back to your battery and test your front speaker installation. Ensure it all works correctly, as even while not being powered by the amp yet the speakers should work if you installed everything correctly. Again remove the negative battery cable to work safely. STEP 3: Let's move to the radio harness now. Start with your AA-GM44 harness. For starters the color code is Green Left Rear Speaker (+) Green with Black Stripe Left Rear Speaker (-) White Left Front Speaker (+) White with Black Stripe Left Front Speaker (-) Purple Right Rear Speaker (+) Purple with Black Stripe Right Rear Speaker (-) Gray Right Front Speaker (+) Gray with Black Stripe Right Front Speaker (-). From the head unit you will want the front speaker signals and rear speaker signals. So attach the speaker to RCA converters so you have positive and negative of each speaker attached to the RCA. You will attach RCA cables to these adapters and route them to the back of the car. You will send the speaker wires from the output of the amp back to the front of the car for only the front speakers (this avoids routing wires into the door yourself). Snip the wires as in the following picture. IMPORTANT: Snip the blue/white wire for use as the amp-on wire, NOT the solid blue wire. 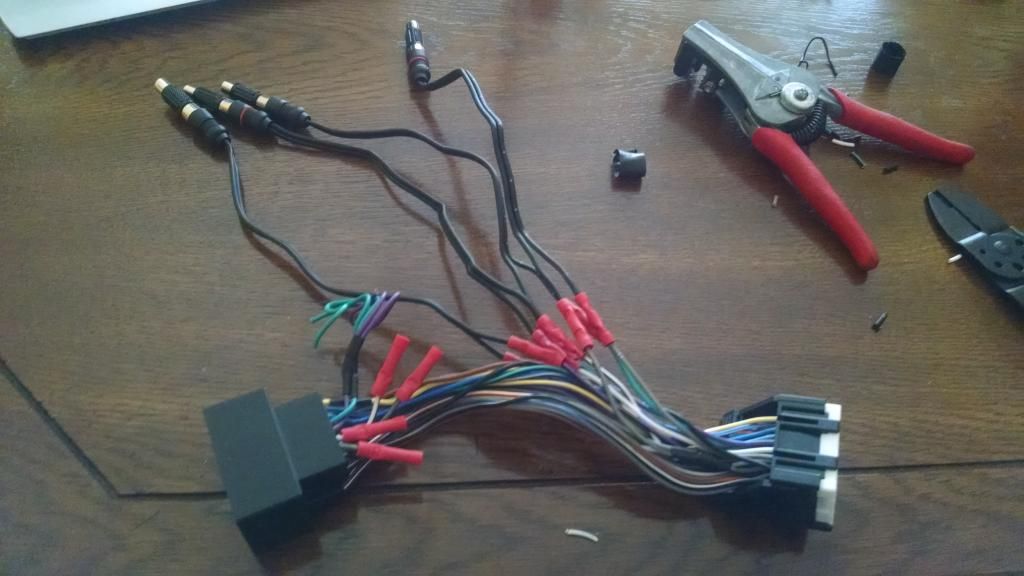 STEP 4: Now you will remove the stereo. Begin by prying up the panel around the shifter. Next remove the two 10 mm bolts below the stereo. Now pry out the radio display with the tools again. Remove the 4 10 mm bolts holding the radio din in place. Unattach the antenna and the GPS and unattach the radio harness. Remove the din radio. Set these articles in a safe place to avoid damage and scratches to the display.   STEP 5: Now to remove all the interior panels/seats. Start with the panel in front of the doors under the dash. It will provide access when routing the wires. Next pull up the side trim at the door entrance. Next pull down the seat backs. There is a hinge at both sides that needs to be pulled back. Use a buddy again to release both hinges at the same time and pull the seat back out. The bottom seats are removed by unhooking them from the rear metal clips first. Then pull up to unlatch them from the front plastic clips. Now, un-clip the airbag label in the back side trim. There is one 10 mm bolt to remove. Also remove the seat belt bolt with a T50 bit.   Everything else for that panel unclips. Be careful and take time removing the panel. Move to the back rear side panel (all the way at the back) and use a trim tool to unclip it. Now all is left is one side panel. There is a 10 mm bolt to remove at the rear portion. Also there is a special clip to unlatch. 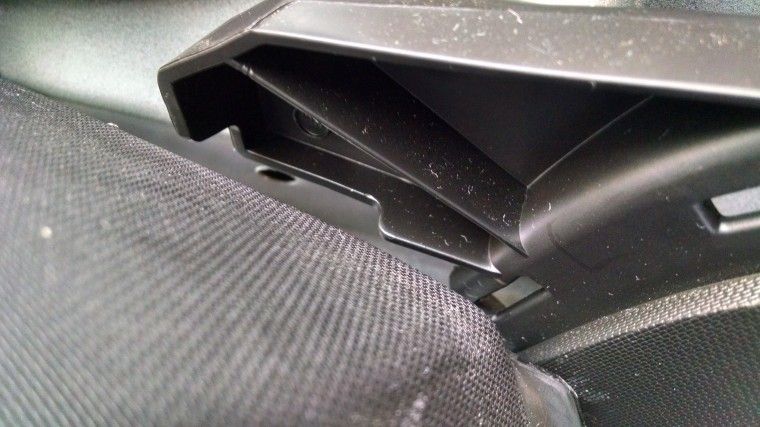  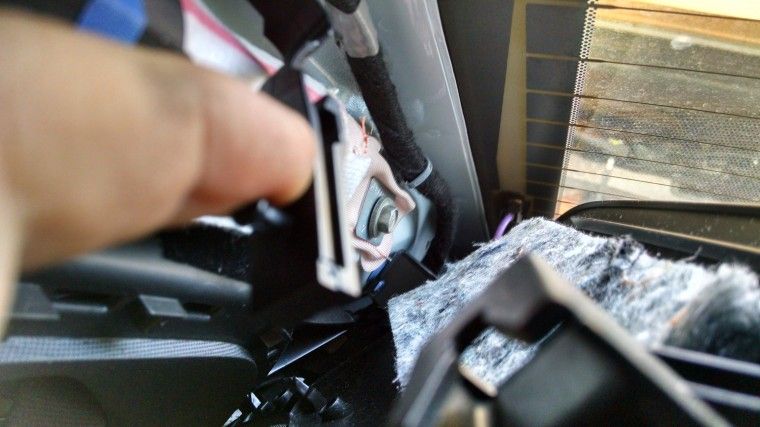  Repeat for the other side of the car. Finally remove the rear deck. Definitely need a buddy for this one. Remove the plastic trim screws that are attached behind where the seat back would rest against. There are 4 of them. Use the trim remover to get them off. Now Crawl under the deck and push the purple/metal clips up while your buddy pulls back and up. It is a real pain but requires some strength and patience to un-budge the felt plastic clips pictured below. Detach the brake light harness before taking out the deck.    STEP 6: Remove the rear speakers. Its one 10 mm bolt and then lift them out. Attach your new speakers to the rear speaker adapters. I used Sub Thump adapters which worked excellently!    Dynamat the rear deck at this time. Same rules as last time apply. Drop in the new speakers and secure them in with the provided screws.  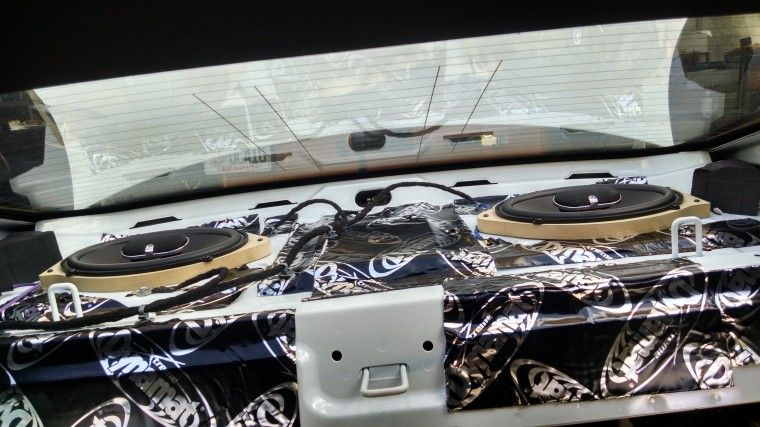 STEP 7: Now route wires! Send RCA's from the radio to the rear of the car on one side of the car. Send speaker wires from the back (where you plan to place the amp) to the front ON THE OTHER SIDE OF THE CAR to prevent RCA signal degradation. Use electric tape and tie-raps ONLY to secure the wires into place. Keep away from moving parts. IMPORTANT: Ensure to place electrical tape around the RCA/speaker adapters and the RCA cables you plug into them!!!!! DO NOT LEAVE ANY RCA METAL EXPOSED. YOU WILL SHORT OUT YOUR HEAD UNIT AND WILL HAVE TO SHELF OUT AT LEAST $50 FOR A NEW RADIO AND THEN AT LEAST $90 FOR A PROGRAMMING FEE AT THE DEALERSHIP. Reason I knew that.... it happened to me. Only route two pairs of speaker wire to the front because you will route for the rear speakers in the back. STEP 8: Prepare your enclosure at this time. I used the Sub Thump sub/amp enclosure so I will explain what I did to install it. First fill the box with Polyfill. Next wire up the sub and drop it in place. Attach a grill to the subwoofer as it will protect it from damage from items in the trunk. 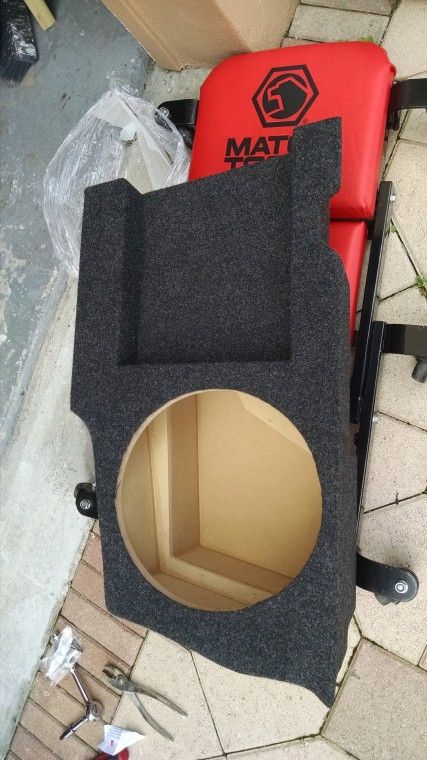  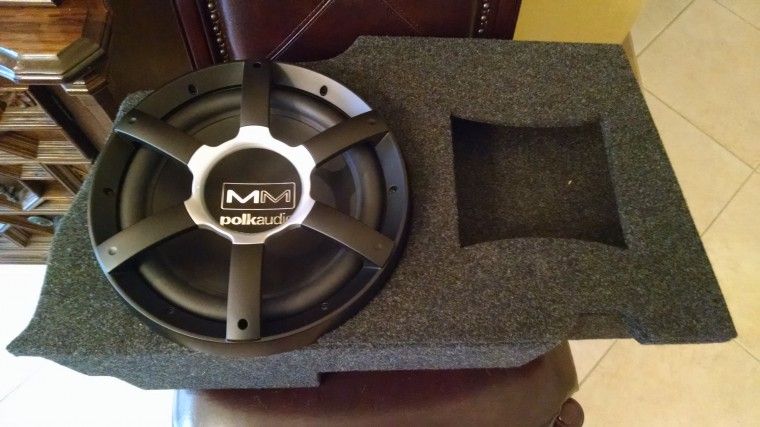 I had to dremel the bottom of my subwoofer grill because the Polk grills are a bit oversized. Once I did that it was easy to drop the box in place in the trunk. Cut away the rear section of the side carpeting to allow space for the box. You can keep the front half of the left side carpet as the box only needs the rear part to be removed. Cut it with some heavy grade scissors. I also modified some of the other carpet pieces to give it a factory look (okay maybe just a clean look). The Sub Thump box matches the factory carpeting perfectly. Looks like it was meant to be there from the start! Attach your amplifier to the side inset area of the box once you have a good idea of how and where you want to mount it. Install the amplifier wiring kit so that you have your power and ground cables ready to go. Wire up the speaker wires and RCA cables. Don't forget the amp on wire to the BLUE/WHITE wire! Connect it and route it to the front of the car to attach to your custom PAC harness. Dress it up as you like. Be creative, take your time and make it look as clean as you can as such....    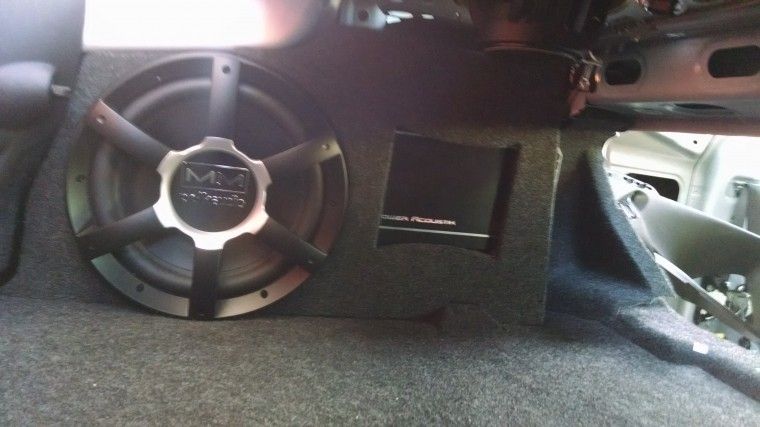  The Sub Thump enclosure worked GREAT, I honestly recommend it to anyone looking for a factory looking subwoofer and amp shelf combo box. Couldn't be happier with it. IMPORTANT: I utilized a 5 channel amplifier that had an option to utilize the rear signals to power the subwoofer so I did not need to make any adjustments to the RCA wires as far as splitting the signal, etc. STEP 9: Finally, install the stock radio back into place. Don't tighten everything just yet. Put the Battery cable back on and TEST the radio. Ensure every speaker works. Test everything and troubleshoot where necessary. STEP 10: Install everything back into place working in reverse. Take your time so as not to damage any of the trim or your wiring. STEP 11: ENJOY!  Steve @ Sub Thump helped me through some of the tricky parts of the install, so while his product was great his service was even better! Certainly recommend him and his products. Message me if I happened to forget anything important. Maybe this thread can become a STICKY 
__________________
'13 Camaro, '97 Wrangler, '12 500 Abarth, '85.5 944, '06 325i
 Suspension Mods: BMR and JPSS Sways, BMR Poly Bushings, BMR strut tower brace, BMR control arms, BMR toe arms, stock springs and struts Engine Mods: All bolt ons (haha) Brake Mods: Brembo SS caliper swap front and rear Last edited by Airmaster; 05-22-2016 at 09:45 AM. |

|

|
|
01-20-2015, 06:55 AM
|
#2 |
   Drives: 4 wheels Join Date: Mar 2014
Location: anyplace, USA
Posts: 1,177
|
You have my vote for this being made into a sticky. Nice writeup and install!

|
|
|
|
|
01-20-2015, 10:03 AM
|
#3 |
 
Drives: 2013 Blue Ray Camaro Join Date: Jun 2014
Location: Auburn AL
Posts: 150
|
Nice. I'll be doing this sometime in the summer. I'll be sure to refer back to this as s reference. Thanks!
|
|
|
|
|
01-20-2015, 12:23 PM
|
#4 |
|
Go Gators!
Drives: Camaro Jeep Abarth 944 325i Join Date: Jan 2013
Location: CT
Posts: 844
|
Thanks guys! I appreciate the compliments. Make sure to shell out a few days to get it done. Took me about 3 days (roughly 5 hours a day) working nice and slow to get everything completed. Probably could be done quicker but I STILL ran into the small issues I mentioned above while working slowly.
Have fun and feel free to ask questions. I'd like to see what other speaker/amp combinations people find to use! Just remember to get an amplifier that can accept the speaker level input (high input voltage)!
__________________
'13 Camaro, '97 Wrangler, '12 500 Abarth, '85.5 944, '06 325i
Suspension Mods: BMR and JPSS Sways, BMR Poly Bushings, BMR strut tower brace, BMR control arms, BMR toe arms, stock springs and struts Engine Mods: All bolt ons (haha) Brake Mods: Brembo SS caliper swap front and rear |
|
|
|
|
01-20-2015, 04:04 PM
|
#5 |
|
Drives: 4 wheels Join Date: Mar 2014
Location: anyplace, USA
Posts: 1,177
|
I just upgraded the tweeters and spliced into the rears with a cheap sub. It sounds so good I have zero itch to take it further, but the volume is limited to only ear piercing (since all the interior speakers are still being powered by the factory head). To make them bleed I'd need to do something along the lines of what you did.
 Maybe in my next car I'll take it up a notch, something I'll be keeping longer than 3-4 years. |
|
|
|
|
01-21-2015, 03:04 PM
|
#6 |
 Drives: 2013 Camaro ZL1 Convertible Join Date: Jan 2013
Location: Houston, Texas
Posts: 94
|
with regard to your "thump on" and "thump off", I had the same problem, and a buddy told me to change my the fuse that my remote turn on wire was connected to. He said the reason is because of the timing when the power goes off. I believe I changed it to the F18 fuse and that resolved my thump. He told me if I'm connected to a fuse that comes on with the door opening, then that could be the cause. The remote turn on needs to be on a fuse that powers the head unit so that they all come on at the same time. I don't know for certain is this is in fact the reason, but after I switched to a different fuse, no more thumping/popping, so I was happy.
|
|
|
|
|
01-23-2015, 07:03 AM
|
#7 |
|
Drives: 4 wheels Join Date: Mar 2014
Location: anyplace, USA
Posts: 1,177
|
You should contact staff or the original poster of the thread linked below to be included:
http://www.camaro5.com/forums/showthread.php?t=60650 |
|
|
|
|
01-23-2015, 09:43 PM
|
#8 | |
|
Go Gators!
Drives: Camaro Jeep Abarth 944 325i Join Date: Jan 2013
Location: CT
Posts: 844
|
Quote:
__________________
'13 Camaro, '97 Wrangler, '12 500 Abarth, '85.5 944, '06 325i
Suspension Mods: BMR and JPSS Sways, BMR Poly Bushings, BMR strut tower brace, BMR control arms, BMR toe arms, stock springs and struts Engine Mods: All bolt ons (haha) Brake Mods: Brembo SS caliper swap front and rear |
|
|
|
|
|
01-23-2015, 09:47 PM
|
#9 | |
|
Go Gators!
Drives: Camaro Jeep Abarth 944 325i Join Date: Jan 2013
Location: CT
Posts: 844
|
Quote:
Thanks for the DIY thread tip 
__________________
'13 Camaro, '97 Wrangler, '12 500 Abarth, '85.5 944, '06 325i
Suspension Mods: BMR and JPSS Sways, BMR Poly Bushings, BMR strut tower brace, BMR control arms, BMR toe arms, stock springs and struts Engine Mods: All bolt ons (haha) Brake Mods: Brembo SS caliper swap front and rear |
|
|
|
|
|
01-24-2015, 06:33 PM
|
#10 |
 
Drives: 2018 2SS M6 Redline Join Date: Oct 2014
Location: United States
Posts: 431
|
The speakers and sub is decent at most. I would have gone with a nicer amp but thank you for the write up.
|
|
|
|
|
01-27-2015, 12:30 PM
|
#11 | |
|
Go Gators!
Drives: Camaro Jeep Abarth 944 325i Join Date: Jan 2013
Location: CT
Posts: 844
|
Quote:
My entire install was right at $1000, a perfect budget, IMO, for a very nice system.
__________________
'13 Camaro, '97 Wrangler, '12 500 Abarth, '85.5 944, '06 325i
Suspension Mods: BMR and JPSS Sways, BMR Poly Bushings, BMR strut tower brace, BMR control arms, BMR toe arms, stock springs and struts Engine Mods: All bolt ons (haha) Brake Mods: Brembo SS caliper swap front and rear |
|
|
|
|
|
02-03-2015, 09:03 PM
|
#12 |
|
Drives: 2014 Camaro 1SS/RS/1LE 6M NPP Join Date: Jul 2014
Location: Ann Arbor, Michigan
Posts: 65
|
What was the make and model number of the tweeters and crossovers?
*edit - nevermind.. they're part of the front speaker package |
|
|
|
|
03-25-2015, 01:18 AM
|
#13 |
|
Drives: 2013 Camaro LT Join Date: Jun 2013
Location: CA
Posts: 51
|
Did you test the output voltage on your speaker wires leaving your headunit? I am getting different voltage on mine from the right ant left side. If you did what readings did you get?
__________________
 |
|
|
|
|
06-23-2015, 09:42 PM
|
#14 | |
|
Go Gators!
Drives: Camaro Jeep Abarth 944 325i Join Date: Jan 2013
Location: CT
Posts: 844
|
Quote:
__________________
'13 Camaro, '97 Wrangler, '12 500 Abarth, '85.5 944, '06 325i
Suspension Mods: BMR and JPSS Sways, BMR Poly Bushings, BMR strut tower brace, BMR control arms, BMR toe arms, stock springs and struts Engine Mods: All bolt ons (haha) Brake Mods: Brembo SS caliper swap front and rear |
|
|
|
|
|
|
|
|
 |
| Tags |
| mertra, non-ba, scosche, sound system, stock radio |
|
|


