You are browsing camaro5 

|
 09-20-2014, 10:02 PM
|
#15 | |
|
'It's an experiment'

Drives: [COTW 2/09/15] '11 GPI LSA SC Z/LE Join Date: May 2014
Location: Dallas TX
Posts: 8,694
|
Quote:
Several warnings are in the install guide -- especially about heat -- so I order a heat sleeve (1500 to 2000*). Second, where the bracket is supposed to mount (based on directions) will be covered by the strut bar -- so I'll need to relocate that. So, heat concerns and location has delayed this -- Once I have the heat sleeve, I'll find out where I can mount this and not have it interfered by the strut bar.... -Don Last edited by hammdo; 09-21-2014 at 11:54 PM. |
|

|
|
10-01-2014, 01:54 PM
|
#16 |
|
'It's an experiment'
Drives: [COTW 2/09/15] '11 GPI LSA SC Z/LE Join Date: May 2014
Location: Dallas TX
Posts: 8,694
|
Got this figured out. I'll be mounting in the area where the cabin air filter sits (I'll take pics).
Heat Sleeve came in so that will be #1 on the to do mod list this weekend... -Don |
|
|
|
10-02-2014, 06:28 PM
|
#17 |
|
Camaro Owner Since 1987

Drives: 2011 2SS/RS L99 RJT Join Date: Jun 2006
Location: Lawrenceville, GA
Posts: 2,185
|
Waiting on picture.
Thanks. Bill
__________________
2011 Camaro 2SS/RS L99 RJT
CAI, Inc. Cold Air Induction;ADM Scoop Rx Catch Can;Rx Breather;Roto-Fab Washer Container VMax Ported RJT Throttle Body XSPower Headers and XSPower 3" Exhaust System Elite Engineering Tunnel Brace, Gorilla Wheel Lock System; Bear Rotors, Hawk HPS Tinted Windows 35%;EFILive Tune |
|
|
|
10-02-2014, 08:29 PM
|
#18 |
|
'It's an experiment'
Drives: [COTW 2/09/15] '11 GPI LSA SC Z/LE Join Date: May 2014
Location: Dallas TX
Posts: 8,694
|
Starting on it tomorrow! There will be plenty!
-Don |
|
|
|
10-03-2014, 06:38 PM
|
#19 |
|
'It's an experiment'
Drives: [COTW 2/09/15] '11 GPI LSA SC Z/LE Join Date: May 2014
Location: Dallas TX
Posts: 8,694
|
OK, Installed this today. I'll do a DYI but I wanted to give my feedback before I do.
1) A TON OF WARNING throughout the directions -- watch out for headers, watch out for heat, etc -- I felt 'Do you really want me to install this?'. 2) WHY if you're worried about heat and headers, do you NOT supply a heat wrap? I bought one after all the warnings -- seriously, include it with the kit. 3) Called tech support as the dip stick just would NOT go in. I have pictures to show I routed this so it had the least amount of hard bends. The dip stick must be universal. Any way, tech support could not help me BECAUSE THEY DON"T HAVE THE INSTRUCTIONS'. I gave them the full part number again, etc. and he repeated NO INSTRUCTIONS. Wow, so tech support could not help out. Hey B&M, REALLY? I also felt the tech support probably never installed one of these either.  4) Product is great quality but I had to cut off 1/2" of the end of the dip stick so it would finally go in. Cleaned the edges, etc. FINALLY went in. 5) While I get I have to figure out where to mount them, I wound up having to build a rubber brace 'angled' so it would fit and avoid the headers. I feel, since B&M pretty much knows we probably have headers, someone there should know the best way to do this and have instructions for mounting -- I figured it out sure, but if someone before me did it, it would have saved me a lot of 'figure this out' time. 6) When you pull out the dipstick, some fluid is wiped off as it comes out -- even though the bends are only 3 very shallow ones -- hard to tell, I had to try a few times until I got a good reading. I'd paint the end a yellow or white so you can really tell the markings. So, for my 2011 2SS L99 A6 with headers, would I get this again -- sadly no. The instructions quality is lacking and detailed pictures are pretty much unusable. For $125, I'd expect better. If you folks want a DYI, I'll do it. Let me know. B&M -- if you log your tech support calls -- you'll see I called about it -- no kidding, your tech support had no instructions to help. He said 'you're the first person to call about issues'. Hummm, I wonder how many bought this and realized it was not what they though and returned it or kept it and did nothing with it? Not trying to be debbie downer, but you do need to step up your game a bit on this product. Now, I have the Hurst Shifter/Kit (it had issues) and I also bought your transmission pan for the 6L80 so I do like your stuff. Just THIS one is not what I would expect from B&M.. PM me if you want to discuss what I found and I'll be happy to help you out so the next version is more useful to install. -Don. Last edited by hammdo; 10-03-2014 at 10:24 PM. |
|
|
|
10-03-2014, 07:16 PM
|
#20 |
|
'It's an experiment'
Drives: [COTW 2/09/15] '11 GPI LSA SC Z/LE Join Date: May 2014
Location: Dallas TX
Posts: 8,694
|
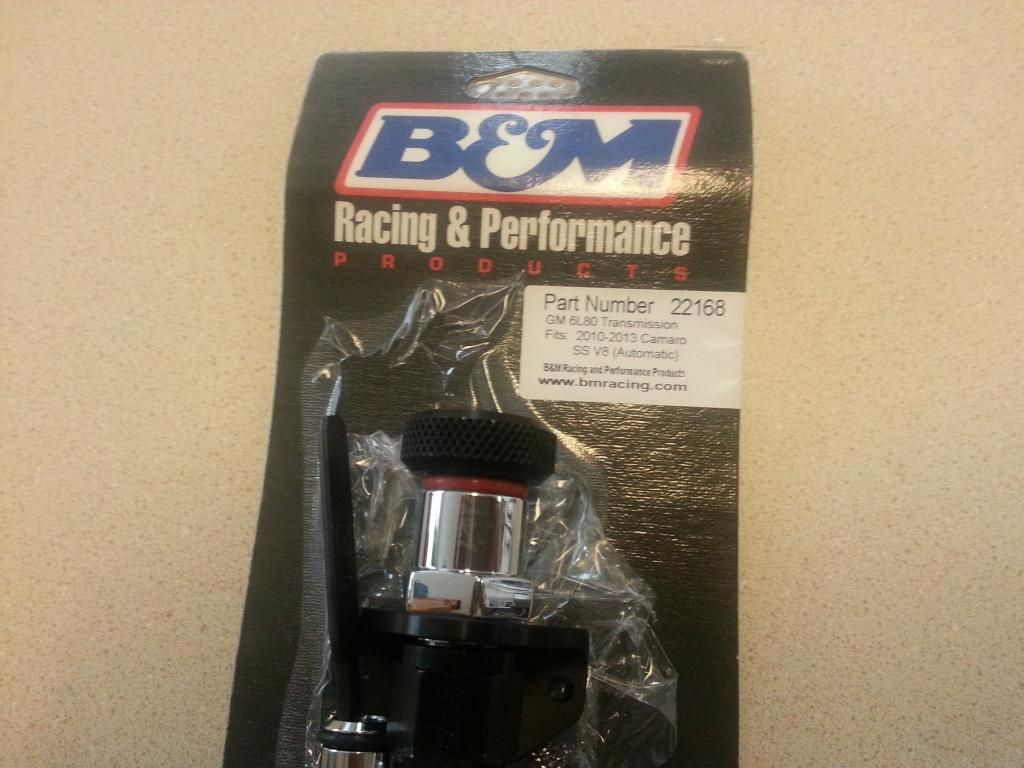
BTW, the picture @ the beginning is NOT the same as what I have. My dip stick end came out of the bottom about 2 1/2 -- the one pictured does not look like it even comes out.
And yes, the package I have says 22168 -- I have pictures to prove it ;o) -Don |
|
|
|
10-03-2014, 07:26 PM
|
#21 |
|
'It's an experiment'
Drives: [COTW 2/09/15] '11 GPI LSA SC Z/LE Join Date: May 2014
Location: Dallas TX
Posts: 8,694
|
Here is the pic to prove its not the same pic as above:
|
|
|
|
10-04-2014, 08:54 AM
|
#22 |
|
'It's an experiment'
Drives: [COTW 2/09/15] '11 GPI LSA SC Z/LE Join Date: May 2014
Location: Dallas TX
Posts: 8,694
|
|
|
|
|
10-06-2014, 01:40 PM
|
#23 |

Drives: 2016 Camaro SS Join Date: Jul 2014
Location: Santa Rosa, CA
Posts: 205
|
I apologize for the difficulty that you experienced when installing your B&M transmission dipstick. Your feedback is invaluable and we appreciate your effort in helping us to improve our product. I am sorry that our support line was not able to provide you with the assistance necessary to complete your installation. Our customer service representatives will now have access to the instructions for this part to better assist troubleshooting situations like this in the future. Unfortunately, our photos are not as clear as we would have liked them to be for these instructions (dark vehicle/dark garage). At the time, we were in a period of transition with cameras and lighting and have since vastly improved our equipment.
Although the actual packaging now differs from the image above, you do in fact have the correct dipstick for your transmission. Because it is not possible to account for all vehicle modifications in the design process, this part was engineered for a universal fit and installation in a stock vehicle. Heat shields were not included with this product in an effort to keep costs down. Since installs can vary greatly, we did not want the customer paying for something that they might not need. I understand that you were working with limited space, but after reading through your install, I believe that the location of the cap/port may have been the cause of your issues. If anyone has problems installing any of our products in the future, please feel free to PM me and I will do my best to find you the answers that you need in a timely manner. |
|
|
|
10-06-2014, 02:21 PM
|
#24 |
|
'It's an experiment'
Drives: [COTW 2/09/15] '11 GPI LSA SC Z/LE Join Date: May 2014
Location: Dallas TX
Posts: 8,694
|
Appreciate your input! I thought the location was the issue, but its @ the bottom where it hung up -- went all the way down to that end. I could tell where it was locking up. It is a very gradual curve. I had it go in as direct as possible so the actual 'mounting' location did not hinder it. If it was like the old TH400 path wise -- then it would have been no problem.
My main issue was tech support -- if I were the tech, I would have gone and found the product and opened it to get the instructions instead of saying 'I don't have the instructions'. I could only imagine what my customers would say if I had told them that. My suggestion for the stick is not to use the 'flat' tip. Many I've seen and used have a 'cylinder' type end with a 'bullet' tip to ease the transition. It does allow for easier movement in and out of the tube. It had graduated markings in different colors so one could id the fluid location. (orange on the bottom, yellow in the middle, white on top). It would also reduce the width of the stick end too. So, while I do have the 1LE bar, the install location had less to do, in my opinion, with the transition -- the angle of attack needed to get the tube into the transmission and how it curved would be pretty much the same -- as I noted, I move the wire harness so as to allow as little curve in the tube. Also, I tried it before mounting -- practically straight in -- the entry point into the fill location is where it kept hitting -- no matter how many times we rotated it. Once I trimmed off a bit of the end, then it would go in. After that, I looked for a location to mount it and made sure it still went in and out of the tube. Thanks! -Don Last edited by hammdo; 10-06-2014 at 03:53 PM. |
|
|
|
10-06-2014, 06:00 PM
|
#25 |
|
Drives: 2016 Camaro SS Join Date: Jul 2014
Location: Santa Rosa, CA
Posts: 205
|
Thank you, Don! We will take all of your suggestions into consideration. I would also like to mention that, although this was unintentionally omitted from the instructions, twisting the dipstick from the handle/knob while inserting or removing it also helps. Again, my sincerest apology for the lack of assistance or follow-up when contacting our tech line. I have since forwarded the install instructions to all members of our customer service team. The instructions will also be available for download on the B&M website in the next day or two. We appreciate your feedback and ingenuity!
|
|
|
|
10-06-2014, 06:15 PM
|
#26 |
|
'It's an experiment'
Drives: [COTW 2/09/15] '11 GPI LSA SC Z/LE Join Date: May 2014
Location: Dallas TX
Posts: 8,694
|
No problem! Like I said, the product is top notch! I did do the twisting and push/pull to make sure. Tried several ways until it finally setup correctly. I really believe a different type of end on the stick would really help.
PDF is a great idea! Many do that now. That will help everyone... I do have it working now and its doing what I needed it to do. Now, I'm going to put on that awesome B&M transmission pan -- after I get the transmission fluid first! -Don |
|
|
|
10-06-2014, 06:56 PM
|
#27 |
|
Drives: 2016 Camaro SS Join Date: Jul 2014
Location: Santa Rosa, CA
Posts: 205
|
Thanks again for your insight, Don. Don't forget to pick up an extra 1.8 quarts of fluid for that B&M transmission pan. Good luck with the install and please let me know if you have any questions.
Last edited by B&MRacing; 09-11-2015 at 02:51 PM. |
|
|
|
09-11-2015, 02:54 PM
|
#28 | |
|
Drives: 2016 Camaro SS Join Date: Jul 2014
Location: Santa Rosa, CA
Posts: 205
|
B&M Transmission Dipstick Overview Video
For additional application and product information, visit www.bmracing.com or contact our sales department at 707-544-4761. |
|
|
|
|
|
|
|
 |
| Tags |
| auto, b&m, dip stick, racing, transmission |
|
|


