You are browsing camaro5 

|
 10-03-2009, 08:54 PM
|
#85 |
    
Drives: "Bmblbee" 2010 RY 2SS/RS. VIN 12043 Join Date: Oct 2008
Location: Waldorf, Maryland
Posts: 1,266
|
Well, I got it in anyway. Took about 2 1/2 hours altogether. It would have gone faster if some of the instructions had more detail and more pictures were added (like Chilton manuals). Here's some of the issue with the instructions I had - please take it as constructive criticism. Oh, this is version 2.1. 3.1 and the "intake install download version" are constantly "being edited/updated by a User and is unavailable at this moment."
"7. Unplug the plastic PCV line going into intake tube by pulling hard on it at the Factory Air Intake that faces passenger side. Now remove the air box lid and filter with MAF sensor and 4 inch intake tube." This part's fine, but removing the PCV line from the valve cover isn't mentioned. It's obvious in Step 29 that it has to come off, but if you're instructing a noob (me) every step should be covered. "8. Remove the Factory air box: 2- 10mm nuts that hold it to the car body. Save the two nuts." Save both? You only use one in step 28. Creates unease that I've missed what the other nut was for. "12. Remove 1 rubber grommet/metal guide washer from the factory air box and set aside with the two nuts and MAF sensor." Since this is right after removing the MAF sensor, I kept looking for this grommet around the MAF housing on the factory tube. Suggest changing it to "from one of the factory air box mounting tabs. "15. Remove jumper-cable stud (10mm wrench) sticking out just forward of the clip you just removed. Save as it will be relocated." Relocating this stud isn't covered later. I ended up putting it next to another stud on the engine body. "16. Install factory air box grommet that was set aside into the ADM PLATE 1 angle bracket. Do not install metal guide washer yet." Without a picture, it took several minutes to figure out where this "angle bracket" was. There's no picture of plate 1 in the instructions or on the website installation picture page. "18. Take RUBBER edge guard 1 and install on the forward facing lip/edge of the shock tower (Plastic fender liner is loose below it). Make sure the notches line up with corresponding edges. Use a small mallet/hammer or blunt object to make sure this seal is installed all the way." Again took several minutes to figure out which way this went on. For clarification, notch side up and toward the top. "23. The housing has a small mark just forward of the tapped screw hole, the sensor will only fit the housing 1 way. Slide the sensor in the hole with the arrow on the sensor facing the small mark, it takes some force but will slide into the opening. See Picture." As mentioned, the MAF housing design has changed. The one I had had no "small mark just forward of the tapped screw hole." Doesn't matter in the end, the sensor only goes in one way but instructions should be changed. "24. Once you have the sensor mounted in the MAF housing it is time to put the sealing tape on the MAF housing. See Picture Sealing tape will be installed at the end that the arrow points towards and prevents the MAF housing from directly contacting the metal air box." Since the design change there is no need for the sealing tape? I suppose so since there's no where to put it. But I did put some electrical tape across the sensor pedestal where in contacts the air box since step 24 seems to say it's important. "29. Slide 4 air pipe into 4 silicone hose at air box, then slide 4 90 degree silicone hose onto the air pipe and join to the throttle-body all while routing the pcv hose to the valve cover(shortest distance is under the throttle-body). Tighten clamps snug." Some pictures here would help on how to best route the pcv hose. I ended up pulling it out of the 90" hose before I got it. At least I think I got it since I'm not sure if the hose is allowed to touch the engine under the throttle body, behind the top idler wheel - which it does the way I have it now. I'll throw some pictures up tomorrow. It was a hard, long job (considering I saw a youtube vid of an LMR CAI installed in 8 minutes) and I had tickets to go see Zombieland at 1300 (great flick!). But dynobutt and ear-o-meter likes it so far.
__________________
 |

|

|
|
10-03-2009, 09:42 PM
|
#86 | |
|
Pat @ ADM PERFORMANCE

Drives: CGM SS/RS M6 Join Date: Aug 2009
Location: Prosper, TX
Posts: 506
|
Quote:
Great you got it installed and your suggestions can and will be incorporated. Andy moves at the speed of light when he is putting all these things together and his mind is always thinking of how to build a better mouse trap. I with you do not always follow his pace so well. The instructions are a very CRITICAL part of this product and will adapt over time to better deliver the best instructions for those that do not do alot of their own work. The system is a snap for the accomplished shade tree gear head but there is a huge market that is buying these cars and not everyone has the time or desire to wrench on their own cars. Yet at the same time it is important that we allow for the instructions to be understood by everyone. Thanks for taking the time to help everyone that follows in your foot steps with the purchase of an ADM HIGHFLOW AIR BOX. We had a third person type them up to better allow for someone not in the design process to explain how to do it. The instructions came out great to us but that is with our complete understanding of the pieces and their places. You knew nothing of the design and pieces so your sole guide was the instructions. Your experience will help with this process. Again thanks your time in giving great feed back on how we can improve the instructions. Not everyone would bothered to make suggestions for clarification. Pat
__________________
"old age and treachery will always overcome youth and ambition" author unknown "There are two types of racers: cheaters...and losers." Smokey Yunick  |
|
|
|
|
|
10-03-2009, 10:12 PM
|
#87 |
|
Drives: "Bmblbee" 2010 RY 2SS/RS. VIN 12043 Join Date: Oct 2008
Location: Waldorf, Maryland
Posts: 1,266
|
No problem Pat, I fully understand where you're coming from. When you work with something day-in-day-out it becomes second nature so it's easy to overestimate the levels of expertise out there Truthfully, the LMR youtube vid helped a lot, even though it's a different system, in identifying how to take off the factory box and installing some of the hoses. ADM should put one together as well. Anyway, glad to help!
__________________
|
|
|
|
|
10-03-2009, 10:31 PM
|
#88 |
 Drives: Chevy 2500 Join Date: May 2009
Location: South
Posts: 97
|
I was at adm today ( thankfully enough cause there generally not open on Saturday ) and they still came in . I added adm race intake magnaflow exhaust n tune it was a awesome experience great people, great product n some sick cars around the shop .. Power was right around 23hp n almost 30tq it feels great ,too bad it rained most the day afterwards end numbers was 372/380 .. Intake is awesome , exhaust was on the mellow side but is really starting to open up and the car runs great
Thanks to adm . Andy , pat I really appreciate it great people to deal with |
|
|
|
|
10-03-2009, 10:35 PM
|
#89 |
|
Pat @ ADM PERFORMANCE
Drives: CGM SS/RS M6 Join Date: Aug 2009
Location: Prosper, TX
Posts: 506
|
Glad you and your Bride are home safe brother.
That exhaust seasons up really nicely over time. Enjoyed getting you dialed in and TUNED UP, 1 more RACE VERSION on the roads  ! !
__________________
"old age and treachery will always overcome youth and ambition" author unknown "There are two types of racers: cheaters...and losers." Smokey Yunick |
|
|
|
|
10-03-2009, 10:54 PM
|
#90 | |

|
Quote:
__________________
|
|
|
|
|
|
10-04-2009, 11:12 AM
|
#91 |
|
Drives: "Bmblbee" 2010 RY 2SS/RS. VIN 12043 Join Date: Oct 2008
Location: Waldorf, Maryland
Posts: 1,266
|
Okay, here's some pics of the install. First the whole engine bay.
 Next is the MAF wire harness. Ended up very taut. Oh, you can also see where I relocated the jump-start lug - it's right above the power steering cap. There was an empty slot for it and one already there a few inches toward the rear. 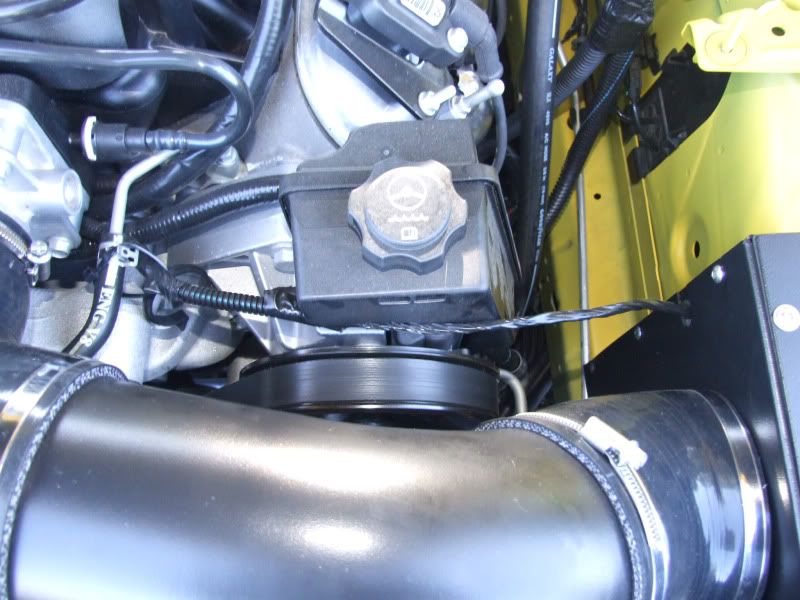 Next is the PCV tube. Note how it touches the block between the two pulleys. Not sure if that's ok or not; instructions didn't say clearly. 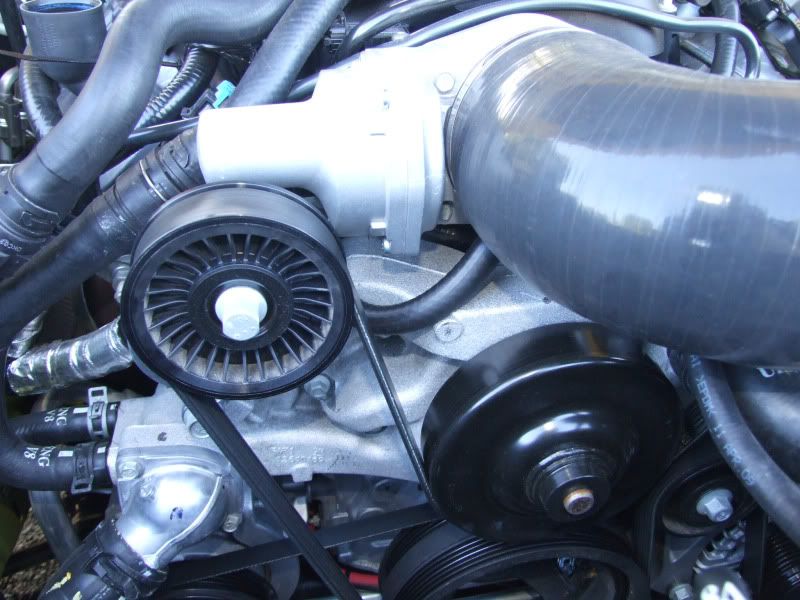 Lastly the PCV tube routed under the wiring harness to the manifold. 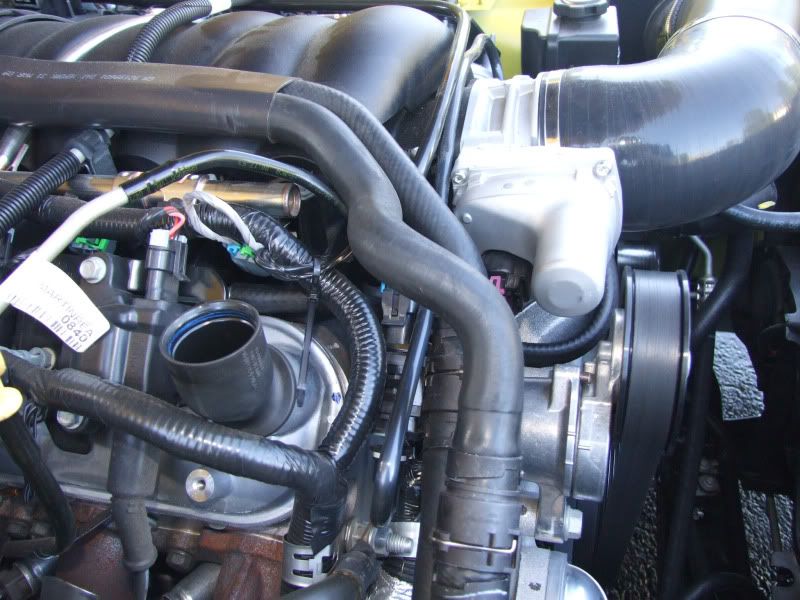 The MAF wiring and the pcv tube are was concerns me the most. If the way I've got needs to be adjusted please let me know.
__________________
|
|
|
|
|
10-04-2009, 01:58 PM
|
#92 |
 Drives: 95 bbb impala ss Join Date: Apr 2009
Location: md
Posts: 332
|
i routed my maf wire behind the powersteering pump seemed to fit and look better back there and had some slack i pulled the clip off the water pump neck also and put it around the other wires running behind the p/s pump also onthe pvc hose before connecting the 90*elbow to the tb i pushed the hose under the tb in your picture its right below the lowerleft tb mounting bolt and it will come out behind the round part sticking out of the tb away from the belt tensioner hope this helps you any
|
|
|
|
|
10-04-2009, 04:26 PM
|
#93 |
|
Drives: 2010 Camaro SS Join Date: Oct 2008
Location: Smithfield,NC
Posts: 1,203
|
Here is a pictures of mine installed........
This is by far the best CAI I have seen...... |
|
|
|
|
10-04-2009, 05:58 PM
|
#94 | |
|
Drives: "Bmblbee" 2010 RY 2SS/RS. VIN 12043 Join Date: Oct 2008
Location: Waldorf, Maryland
Posts: 1,266
|
Quote:
__________________
|
|
|
|
|
|
10-04-2009, 08:25 PM
|
#95 | |
|
Drives: Anything I want Join Date: Oct 2008
Location: DfW - Texas
Posts: 5,407
|
Quote:
Excellent pictures guys. I want to make a couple changes to both your Installs. The N/A car(car with no supercharger) needs to loosen all the hose clamps ans rotate the 45 degree hose more straight up and down not more toward the radiator hose like the pic shows.You will notice the 4" powder coated pipe will want to find its way into the 90 and 45 degree slightly more. Also on this car I will have to agree with the s/c owners reply on running the maf wires on the backside of the power steering pump as it is a better idea. (you will need to remove the tye wrap) Also I like to see the 3/8 valve cover vent hose tyed to the Throttlebody Wiring just aft of the connector by .1-.2 inches.This will hold that hose better away from the pulleys and what not. The valve cover is not a ground(it is completely rubber isolated).Here is were we like to put the ground stud.  ON THE S/C CAR I would also rotate the 4" powder coated pipe and 45 elbow a bit more aft away from the upper radiator hose. All these items will be added to our instructions as they are very helpful. Andy Last edited by ADM PERFORMANCE; 10-04-2009 at 08:48 PM. |
|
|
|
|
|
10-04-2009, 09:38 PM
|
#96 |
|
Drives: Anything I want Join Date: Oct 2008
Location: DfW - Texas
Posts: 5,407
|
A pic of the install completed
 Andy |
|
|
|
|
10-05-2009, 12:44 AM
|
#97 |
|
R6P Marketing Lab Rat

Drives: sometimes Join Date: Feb 2009
Location: Texas
Posts: 339
|
Thanks Andy. When I was trying to find a place for the stud I was going to break out my drill and Nut-Sert tool till I rememberd I need a metric thread adapter......
__________________
 |
|
|
|
|
10-05-2009, 07:46 AM
|
#98 |
|
US Army Retired
Drives: IOM 2SS-RS - A6 (L99) Join Date: Aug 2009
Location: Northern Virginia
Posts: 655
|
Zombie,
Have you had a chance to drive the car with the ADM installed? Would like to know your impressions. I am seriously considering the ADM. Thanks, |
|
|
|
|
|
|
|
 |
|
|
 Similar Threads
|
||||
| Thread | Thread Starter | Forum | Replies | Last Post |
| LS3 engine specifications | Tran | Wiki | 3 | 10-06-2010 11:56 PM |
| ADM Performance CAI Installed and Rocking! | Number_9 | Camaro V8 LS3 / L99 Engine, Exhaust, and Bolt-Ons | 3 | 09-13-2009 09:50 AM |
| Teaser pics of the TVS 2300 and ADM Street Intake | Crowley | Camaro Photos | Spyshots | Video | Media Gallery | 9 | 08-22-2009 11:44 PM |
| Hardcore racers rejoice!! GM Performance Parts to offer new Camaro body in white | radz28 | 5th Gen Camaro SS LS LT General Discussions | 23 | 12-22-2008 10:57 AM |
| existing LS3 tuners | themossman | Camaro V8 LS3 / L99 Engine, Exhaust, and Bolt-Ons | 7 | 10-30-2008 01:53 AM |


