You are browsing camaro5 

|
 08-01-2013, 04:35 PM
|
#911 |
  
Drives: RY 2011 2SS A6 Join Date: Jul 2010
Location: Virginia
Posts: 997
|
Phase 1 of install done.
Popped tail lights out - easy. I've been in there a few times before so know where everything is and how it hooks up. Ground off the outer lenses - a bit of a PITA. Tried a utility knife first and would NOT suggest this option. Cracked the edge of one outer lens a bit. Can't really tell but it looks as though one wrong slip and you might badly crack your lens. Not worth it. Grinding takes a bit but by the 4th one my lines were much cleaner and it was easy. First one kinda looks like hell but nobody will ever see those lines. Ground out welds holding inner lens in - also a bit of a PITA. Ended up using a drill instead - faster and easier for me. Once you're close to done, you can pry a bit with a screwdriver and if there are just a few strands of plastic left hanging in there, the inner lens just pops right off. Drilled hole for flicker wire - did not need to. My OEM housing had pre-drilled holes in it with blue stickers covering them up. Just popped the stickers off. Mounted new light modules - a little tricky to keep them from sliding around in the caulking. But, didn't take long. All sitting on my shelf now for 24 hours waiting for the silicone to dry. Caulked the hell out of the flicker wire hole and the places where I had ground through to release the inner lens. Pix below. Will finish up tomorrow. Might wire up my switch tonight - I am going to be able to control the flicker option from driver's seat with a little toggle switch. Would rather be on my way to C5Fest, but oh well. Next year.
__________________
 Dry sump LS7, cage, JPSS suspension, Wilwood brakes, fire suppression, ARH 3" headers/exhaust, Z/28 DSSV coilovers, Kirkey seats, TeamTech 6-point harnesses, 19" Forgeline GA3R, 325/30R19 Re11 tires, oil cooler, monster JPSS splitter/wickerbill, CAI, brake ducts. |

|

|
|
08-01-2013, 09:27 PM
|
#912 | |
|
Account Suspended
Drives: 2010 Camaro 2SS/RS 6MT Join Date: Apr 2010
Location: Westchester, New York
Posts: 3,715
|
Quote:
And SSon howd you get the flicker? I thought it wasnt ready yet...l |
|
|
|
|
|
08-02-2013, 07:32 AM
|
#913 | |
|
Drives: RY 2011 2SS A6 Join Date: Jul 2010
Location: Virginia
Posts: 997
|
Quote:
Caulked the outer lenses on last night. Pic below. The silicone attaching the new inner LED units only takes a few hours to dry enough to handle, so did not have to wait 24 hours. Will add heat shrink connectors to the flicker wires this morning, but won't wire them up today. Don't think I will have time, and then won't be able to work on the car again till after vacation mid-August. But will get the load resistors on and get the tails reinstalled so at least I can drive the car again. More advice: Number your tails (housings and lenses) when they are still one unit so that after you grind them apart you can easily tell which goes with which. I am very glad I did this.
__________________
Dry sump LS7, cage, JPSS suspension, Wilwood brakes, fire suppression, ARH 3" headers/exhaust, Z/28 DSSV coilovers, Kirkey seats, TeamTech 6-point harnesses, 19" Forgeline GA3R, 325/30R19 Re11 tires, oil cooler, monster JPSS splitter/wickerbill, CAI, brake ducts. |
|
|
|
|
|
08-02-2013, 07:56 AM
|
#914 |
       
Drives: '16 2SS Join Date: Apr 2011
Location: Chicago Suburbs
Posts: 2,271
|
Good notes!
For those picking up, we'll be at the Showstopper booth later this AM. Last edited by sjmautoprod; 08-02-2013 at 08:07 AM. |
|
|
|
|
08-03-2013, 05:20 AM
|
#915 |
|
Drives: RY 2011 2SS A6 Join Date: Jul 2010
Location: Virginia
Posts: 997
|
Well, all done and looking great. A few other pieces of advice:
1. After you get the tails out, put some paper towels or shop rags in the openings under where the tails go. That way when you drop small electrical connector pieces they won't roll down faster than the blink of an eye into the unreachable depths of your rear bumper. Ask me how I know. 2. When you are reassembling, place the tails back in their housings and plug everything in to test before putting the nuts back onto the tails. Getting the nuts on is a PITA and you don't want to do that until you know everything works and won't have to be removed. 3. If you are testing one side at a time, note that the harness on the other side needs to be connected. If you unplug the main harness on the right side, the left side won't work. 4. One of the inner foam reflectors on one of my tail lights did not have enough angle on it after I got it in and so had some shadow. I did some laproscopic surgery through the rear opening with a long wooden skewer that had a dab of silicone on the end, and got some silicone between the foam and the plastic housing. That kept the corner of the foam reflector up against the housing and solved the problem (it is the far right corner on the last pic below, under the SS logo). If I had to do it again, I would probably put a dab of silicone behind both outer corners on each foam reflector, just to keep it in place, before I re-sealed the tail light units. But because positioning of the reflectors is key, please don't do this unless you are really, really sure where everything goes. I don't want you to caulk it in place into the wrong place. Did not get the flicker wire connected but will when I get back from vacation in a few weeks. All in all a terrific product and I am really happy with the outcome. Thanks Tony!
__________________
Dry sump LS7, cage, JPSS suspension, Wilwood brakes, fire suppression, ARH 3" headers/exhaust, Z/28 DSSV coilovers, Kirkey seats, TeamTech 6-point harnesses, 19" Forgeline GA3R, 325/30R19 Re11 tires, oil cooler, monster JPSS splitter/wickerbill, CAI, brake ducts. |
|
|
|
|
08-03-2013, 07:14 AM
|
#916 |

Drives: 2017 Camaro SS1LE 2000 Trans Am WS6 Join Date: Jul 2008
Location: Portland, TN
Posts: 2,952
|
Looks good SSSoon. Are those the dark diffusers?
__________________
2017 Krypton Green SS 1LE
Magnacharged 2000 Trans Am WS6 manual trans 2002 Trans Am 2015 Ram Crew Cab Cummins |
|
|
|
|
08-03-2013, 01:05 PM
|
#917 |
|
Drives: '16 2SS Join Date: Apr 2011
Location: Chicago Suburbs
Posts: 2,271
|
Someone spotted with their bonus!
|
|
|
|
|
08-03-2013, 01:12 PM
|
#918 |
|
Treasure Coast Camaro 5

|
How long will the bonus be around?
__________________
 |
|
|
|
|
08-03-2013, 02:02 PM
|
#919 |
|
E.B.A.H.

Drives: you wild... Join Date: Mar 2007
Location: In the happy padded room wearing a jacket that makes me hug myself...
Posts: 18,420
|
That looks GREAT SSSoon. I can't wait to order my set of these.
|
|
|
|
|
08-03-2013, 04:35 PM
|
#920 |

Drives: 2017 RS convertible Join Date: May 2009
Location: New Kent, Virginia
Posts: 837
|
Looks awesome, Pete! low cuss factor install for the most part, it seems...are you going to be around Richmond area with your car at all? I'd like to see these in person...
__________________
Camaros I've owned:
1969 RS/SS Z10 Indy Pace Car - Hardtop 1 of 250 1970 Camaro 2010 2LT RS 2013 2SS RS Current ride: 2017 Camaro 2LT RS convertible |
|
|
|
|
08-05-2013, 09:43 AM
|
#921 |
|
Drives: '16 2SS Join Date: Apr 2011
Location: Chicago Suburbs
Posts: 2,271
|
Not sure about the bonus. It was a last-minute idea, but, I really like how they turned out.
|
|
|
|
|
08-05-2013, 04:44 PM
|
#922 | |
 
Drives: VR 2010 2SS Join Date: Nov 2011
Location: Northeast Ohio
Posts: 30
|
Quote:
But on Friday I got to check out the example taillights you had set up at the Showstoppers booth, and saw the tails you have installed on your own car. Going in, I really thought I was going to end up with the dark diffusers, but in real life both my son and I liked the light diffusers a little better. Both look great, but I found I actually liked seeing the diffusers even when the tails were off (it gave the three-dimensional look even then). The dark diffusers completely disappeared when the lights were off (which some "blacked-out" people might like, but I'm not sure even they will prefer the dark diffusers over the light ones...). And the light diffusers showed up the afterburner effect much brighter than the darks. Thanks Tony for developing these. Brad Ferrell |
|
|
|
|
|
08-05-2013, 07:36 PM
|
#923 |
|
Drives: '16 2SS Join Date: Apr 2011
Location: Chicago Suburbs
Posts: 2,271
|
Thanks to the air-force couple that was admiring the tails at the 'fest and let me know that the diffusers have the look of a jet's turkey feathers! Mission accomplished!
 Edit: Added pic... 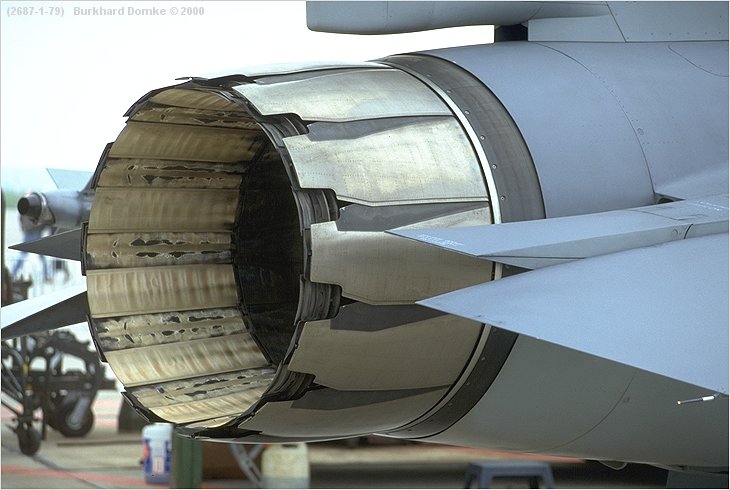 Last edited by sjmautoprod; 08-06-2013 at 07:21 AM. |
|
|
|
|
08-06-2013, 04:15 AM
|
#924 | |
|
Drives: VR 2010 2SS Join Date: Nov 2011
Location: Northeast Ohio
Posts: 30
|
Quote:
Per Yahoo Answers: What is the purpose of the Turkey Feathers on the back of Military fighter plane jet engines.????? Best Answer - Chosen by Asker The Turkey feathers expand to allow for extra exhaust emissions when an aircraft is travelling at hi speed eg. supersonic. As more air and fuel is sucked into the engine to allow the aircraft to travel faster so must the "turkey feather" exhaust panels expand to allow for the extra exhaust emissions. Otherwise the engine exhaust pressure would build up and the engine would blow. |
|
|
|
|
|
|
|
|
 |
|
|
 Similar Threads
|
||||
| Thread | Thread Starter | Forum | Replies | Last Post |
| AAC afterburner tail lights | Berryp | Cosmetics and Lighting Modification Discussions | 28 | 01-28-2012 04:18 PM |
| AAC's Afterburner Tail Lights | The Stig | Cosmetics and Lighting Modification Discussions | 32 | 05-17-2011 02:42 PM |
| AAC Afterburner Tail Lights! PICS! | TXGooch21 | Cosmetics and Lighting Modification Discussions | 23 | 10-20-2010 09:47 AM |
| New tail lights? | 2000v6 | 4th Generation Camaros | 40 | 03-17-2010 03:07 AM |


