You are browsing camaro5 

|
 01-17-2014, 11:43 AM
|
#1 |
|
Drippin' Wet Auto Detail

|
Scosche Dash Kit and Pioneer Receiver
Hey guys,
I am installing the scosche dash kit with a pioneer DVD receiver tomorrow morning. I am somewhat new to installing these types of kits and radios and looking for some advice. When I install, do I need to disconnect the battery? The instructions state to disconnect the negative terminal only. Is this accurate? Any advice from someone who has installed this before? Thanks! |

|

|
|
01-17-2014, 11:49 AM
|
#2 |
  Drives: '12 2SS/RS 45th vert, '14 2SS/RS Join Date: Nov 2013
Location: Claremore, Oklahoma
Posts: 840
|
You are probably safest by disabling power. Taking the negative off will accomplish that.
You may have to do the windows roll up and down thing after reestablishing power but the DIC will give you a message. That said, I have never disconnected power to a vehicle for a stereo install. I am not familiar enough with the Scosche electronics though to say if I would or not. |
|
|
|
|
01-17-2014, 11:57 AM
|
#3 | |
 
Drives: SOLD/2SS/RS Painted Rally Stripes Join Date: Apr 2009
Location: Oregon
Posts: 324
|
Quote:
my $.02 |
|
|
|
|
|
01-17-2014, 12:03 PM
|
#4 | |
|
Drives: '12 2SS/RS 45th vert, '14 2SS/RS Join Date: Nov 2013
Location: Claremore, Oklahoma
Posts: 840
|
Quote:
|
|
|
|
|
|
01-17-2014, 01:02 PM
|
#5 | |
|
Drippin' Wet Auto Detail
|
Quote:
The instructions never really mention when to do that. |
|
|
|
|
|
01-17-2014, 01:23 PM
|
#6 |
       
Drives: Evil Eva, 2010 2SS LS3 Join Date: Aug 2013
Location: Falls Church, Virginia
Posts: 3,600
|
Once you have it all wired up, gently place the kit in the hole in the dash. reconect the power and test functionality. If all works, then finish install, enjoy
__________________
"You simply cannot trust quotes found on the internet." -Abraham Lincoln
|
|
|
|
|
01-17-2014, 01:47 PM
|
#7 | |
|
Drippin' Wet Auto Detail
|
Quote:
|
|
|
|
|
|
01-17-2014, 01:49 PM
|
#8 | |
|
Drives: Evil Eva, 2010 2SS LS3 Join Date: Aug 2013
Location: Falls Church, Virginia
Posts: 3,600
|
Quote:
__________________
"You simply cannot trust quotes found on the internet." -Abraham Lincoln
|
|
|
|
|
|
01-17-2014, 02:10 PM
|
#9 |
|
Drippin' Wet Auto Detail
|
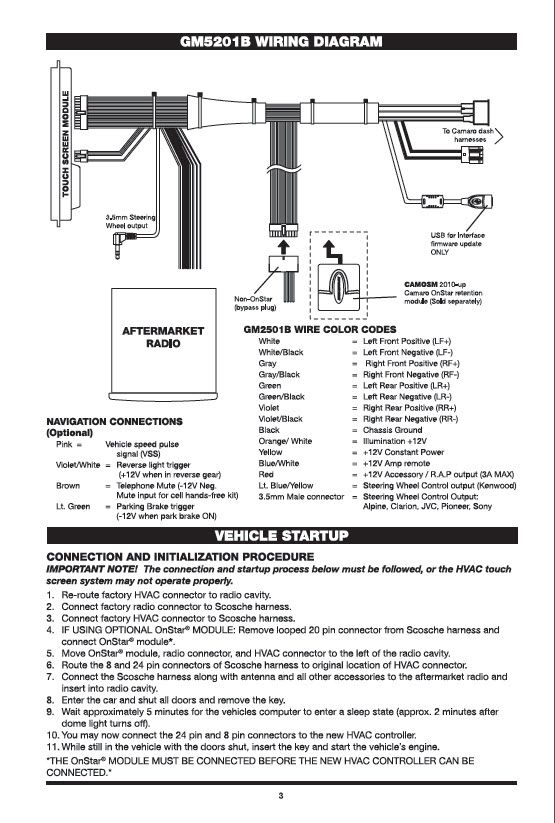
That's not my question though. At the very beginning, it states to leave the key in the ON position and disconnect the battery, it never states when it should be re-connected. In the picture above, it talks about letting the computer go into a sleep mode, wouldn't the battery need to be re-connected at this part?
|
|
|
|
|
01-17-2014, 04:07 PM
|
#10 | |

Drives: 2011 RJT Camaro LT2 RS auto shift Join Date: Dec 2011
Location: Washington state
Posts: 1,861
|
Quote:
The instructions doe not say to leave the ignition in the on position and disconnection the battery. So I will tell you this way. On your work bench make all of your wiring connections and onstar module that you can. 1 disconnect the negative side of the battery. 2 take the wiring harness and connect it to the radio and all other connections to the radio. Except for the the 8 pin and 24 pin going to the Scoshe kit. 3 now connect the battery and check the the window indexing and correct if need be. 4 Now turn off the car and remove the key. stay inside the car and wait 5 min(I waited 10) 5 Now connect the 8 pin and 24 pin connector to the Scoshe kit. 6 Now you can start the car up and check the operations of the radio and HVAC.
__________________
 Caddy Caddy |
|
|
|
|
|
01-17-2014, 05:00 PM
|
#11 | |
|
Drippin' Wet Auto Detail
|
Quote:
Thanks again! |
|
|
|
|
|
01-17-2014, 05:35 PM
|
#12 | |
|
Drives: 2011 RJT Camaro LT2 RS auto shift Join Date: Dec 2011
Location: Washington state
Posts: 1,861
|
Quote:
The instructions are in the owners manual.
__________________
Caddy |
|
|
|
|
|
01-17-2014, 06:31 PM
|
#13 | |
|
Drippin' Wet Auto Detail
|
Quote:
|
|
|
|
|
|
01-17-2014, 06:46 PM
|
#14 | |
|
Drives: SOLD/2SS/RS Painted Rally Stripes Join Date: Apr 2009
Location: Oregon
Posts: 324
|
Quote:

|
|
|
|
|
|
|
|
|
 |
|
|


