You are browsing camaro5 

|
 03-16-2017, 01:19 PM
|
#1163 | |
|
'It's an experiment'

Drives: [COTW 2/09/15] '11 GPI LSA SC Z/LE Join Date: May 2014
Location: Dallas TX
Posts: 8,709
|
Quote:
-Don
__________________
747 RWHP 794 RWTQ
"Horsepower sells cars, torque wins races." - Enzo Ferrari See My Build: http://www.camaro5.com/forums/showthread.php?t=385577 |
|

|

|
|
03-16-2017, 05:47 PM
|
#1164 |
|
'It's an experiment'
Drives: [COTW 2/09/15] '11 GPI LSA SC Z/LE Join Date: May 2014
Location: Dallas TX
Posts: 8,709
|
More cleanup on the lower manifold -- while I was removing the rivets on the old gasket, the damn drill bit broke -- in the hole! Fortunately, I have patience and hemo-stat clamps, and there was enough bit still just about to the top that I could 'reverse' the bit. Now, I always drill very slowly and 'back' out when it hits a snag -- its during the back out that it broke. 30 minutes later, I had the bugger out... just went 'Slow an Easy'...
Anyway, here is the 'locator' ground off. Notice I ground it down quite a bit WHILE the old gasket was on, then, taped the area after the gasket was off and ground it down 'near' smooth with the manifold: .jpg) .jpg) .jpg) After gasket removed, ground down the rest of the way: Before final: .jpg) Final grind down (after removing gasket, I covered the openings with tape to be safe): .jpg) Rivets Removed (damn drill bit ;o) .jpg) .jpg) .jpg) Cleaned out the intake manifold bolt holes in the heads -- chased a clean bolt and then used Brake-Kleen/Q-Tip -- ready to install! Did a bit of cleanup, cleaned out the injector holes, covered up. Next, new gaskets and the injectors/fuel rail! -Don
__________________
747 RWHP 794 RWTQ
"Horsepower sells cars, torque wins races." - Enzo Ferrari See My Build: http://www.camaro5.com/forums/showthread.php?t=385577 Last edited by hammdo; 03-16-2017 at 08:03 PM. |
|
|
|
|
03-18-2017, 01:18 PM
|
#1165 |
       
|
Looking good Don!
__________________
2014 Camaro SS L99, Ashen Grey w/Black Leather - Build thread - http://www.camaro5.com/forums/showthread.php?t=491561
GPI 416 w/GPI S/C Cam, GPI Ported Heads & Tuned by Ben, Holley Dominator ECU, Mag Heartbeat, ZL1 Fuel Pump/DSX Aux Pump, NW 103 TB, FIC 1650's, Alky Meth, Rossler T400 w/t-brake, Circle D Converter, Kooks Headers, Viking Coil Overs & all the BMR Goodies in the rear, Zl1 3.23 Diff, DSS Axles, Wiles Racing Driveshaft, Hendrix Offset Diff Bushings, AFE Solid Subframe Bushings, 875HP/843TQ 5FDP |
|
|
|
|
03-18-2017, 05:04 PM
|
#1166 |
|
'It's an experiment'
Drives: [COTW 2/09/15] '11 GPI LSA SC Z/LE Join Date: May 2014
Location: Dallas TX
Posts: 8,709
|
MSD 2351 Setup
Thanks! I'm very close to getting it all back together -- running the MSD 2351 right now...
So, in prep for the MSD BAP, I created connectors to make the install easier: .jpg) Vacuum hose I need to run from the trunk to the engine: .jpg) My MSD 2351 Settings (Ryan may change those): 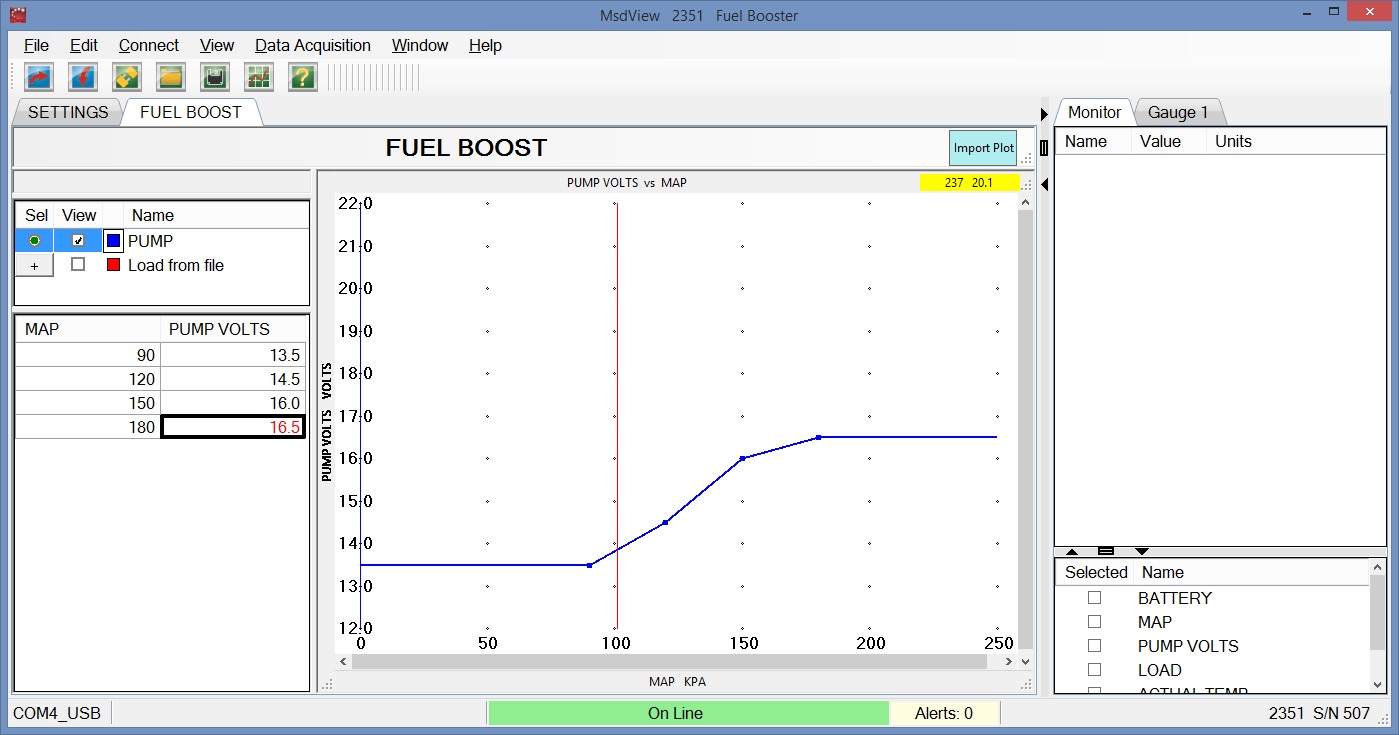 I also have a 'bypass' connector just in case Andy feels the BAP is not necessary when using the twins. Starting the install of MSD! -Don
__________________
747 RWHP 794 RWTQ
"Horsepower sells cars, torque wins races." - Enzo Ferrari See My Build: http://www.camaro5.com/forums/showthread.php?t=385577 |
|
|
|
|
03-18-2017, 10:31 PM
|
#1167 |
|
'It's an experiment'
Drives: [COTW 2/09/15] '11 GPI LSA SC Z/LE Join Date: May 2014
Location: Dallas TX
Posts: 8,709
|
Continuing on the MSD setup, I mounted it in the trunk here:
.jpg) I used 2 screws and velcro (just to hold it in place while I drilled the holes). I also used rubber hose to keep the unit from rattling: .jpg) Routed the wires and the hose this way: .jpg) .jpg) I then took off the rear fuse box (WHAT a pain to get off, especially if you're 'round') and located the fuse and the 'right' red/white wire to splice into: .jpg) .jpg) I'll cut the 'right' red/white wire and then solder in the connector! I'll then add the 'inline' 30 amp fuse for the 'battery' side, and finally, get the vacuum line ran to the front! -Don
__________________
747 RWHP 794 RWTQ
"Horsepower sells cars, torque wins races." - Enzo Ferrari See My Build: http://www.camaro5.com/forums/showthread.php?t=385577 |
|
|
|
|
03-18-2017, 10:35 PM
|
#1168 |
|
'It's an experiment'
Drives: [COTW 2/09/15] '11 GPI LSA SC Z/LE Join Date: May 2014
Location: Dallas TX
Posts: 8,709
|
I also had time to install the ID-850s. Pretty simple. I did notice there is no 'notch' on the ID-850s like the LSA had:
ID-850s: .jpg) LSA: 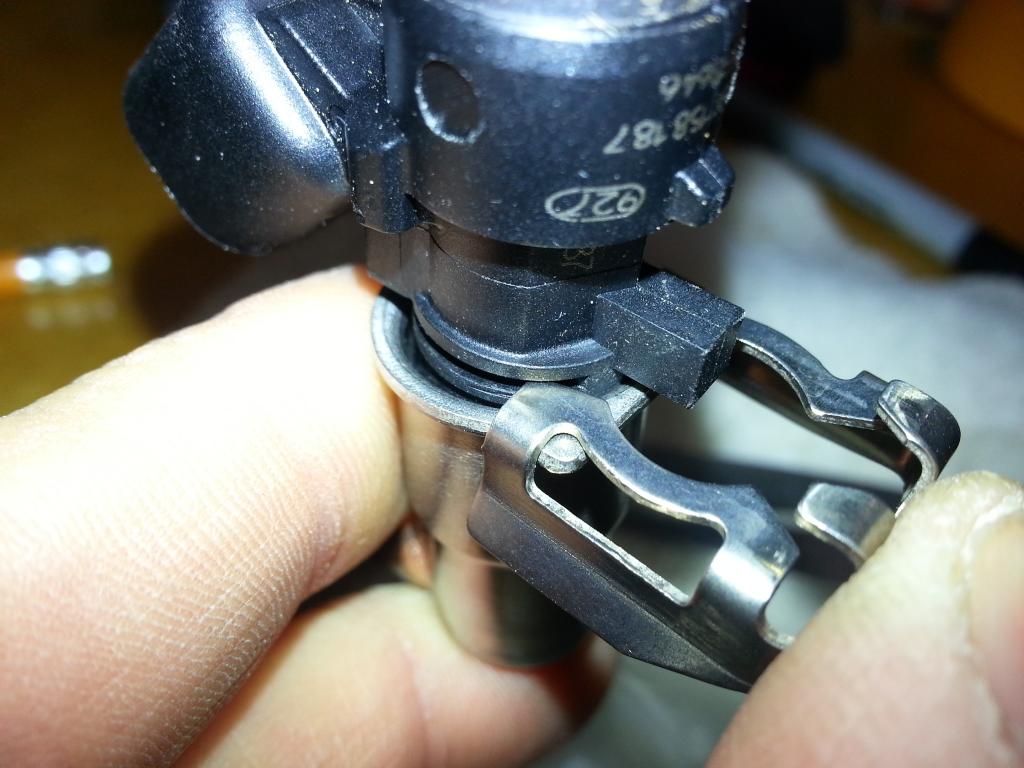 And, while I was at it, I prepped the boost valve using the tool Lingenfelder sells: .jpg) .jpg) Once the MSD is done, I'll install the new Jokerz ported manifold! -Don
__________________
747 RWHP 794 RWTQ
"Horsepower sells cars, torque wins races." - Enzo Ferrari See My Build: http://www.camaro5.com/forums/showthread.php?t=385577 Last edited by hammdo; 07-02-2017 at 07:21 PM. |
|
|
|
|
03-19-2017, 02:46 PM
|
#1169 | |
|
'It's an experiment'
Drives: [COTW 2/09/15] '11 GPI LSA SC Z/LE Join Date: May 2014
Location: Dallas TX
Posts: 8,709
|
So, after reviewing the routing of the wires, I decided to take a different route -- I used the 'back' area where the wires were already routed, and flow the wires that way:
.jpg) .jpg) I then spliced into the FPCM wire (noted by the fuse location) and spliced the MSD into the circuit -- a bit of cleanup: .jpg) .jpg) .jpg) .jpg) .jpg) Did a test to see what the MSD 2351 is doing with ignition off. Before I hooked up the charger, the MSD flashed 21 and 31 codes. Once the voltage got up to 13.7 (above the 13.5 I had set in the programmer), it flashed 13 -- which is normal for ignition off. Here is a youTube of the '13' flashing: Next, routing the vacuum line to the front and then, the lower manifold... -Don
__________________
747 RWHP 794 RWTQ
"Horsepower sells cars, torque wins races." - Enzo Ferrari See My Build: http://www.camaro5.com/forums/showthread.php?t=385577 |
|
|
|
|
|
03-19-2017, 09:13 PM
|
#1170 |
|
'It's an experiment'
Drives: [COTW 2/09/15] '11 GPI LSA SC Z/LE Join Date: May 2014
Location: Dallas TX
Posts: 8,709
|
So, wanted to show how I'm routing the vacuum line. I'm following the 'fuel' line routing and when I get close to the rear O2 sensor, I'll route it up the O2 harness and up to the engine:
.jpg) .jpg) .jpg) .jpg) .jpg) .jpg) .jpg) How I hooked up the battery connections (soldered in a 30 amp fuse to be same per instructions): Diagram for hookup: 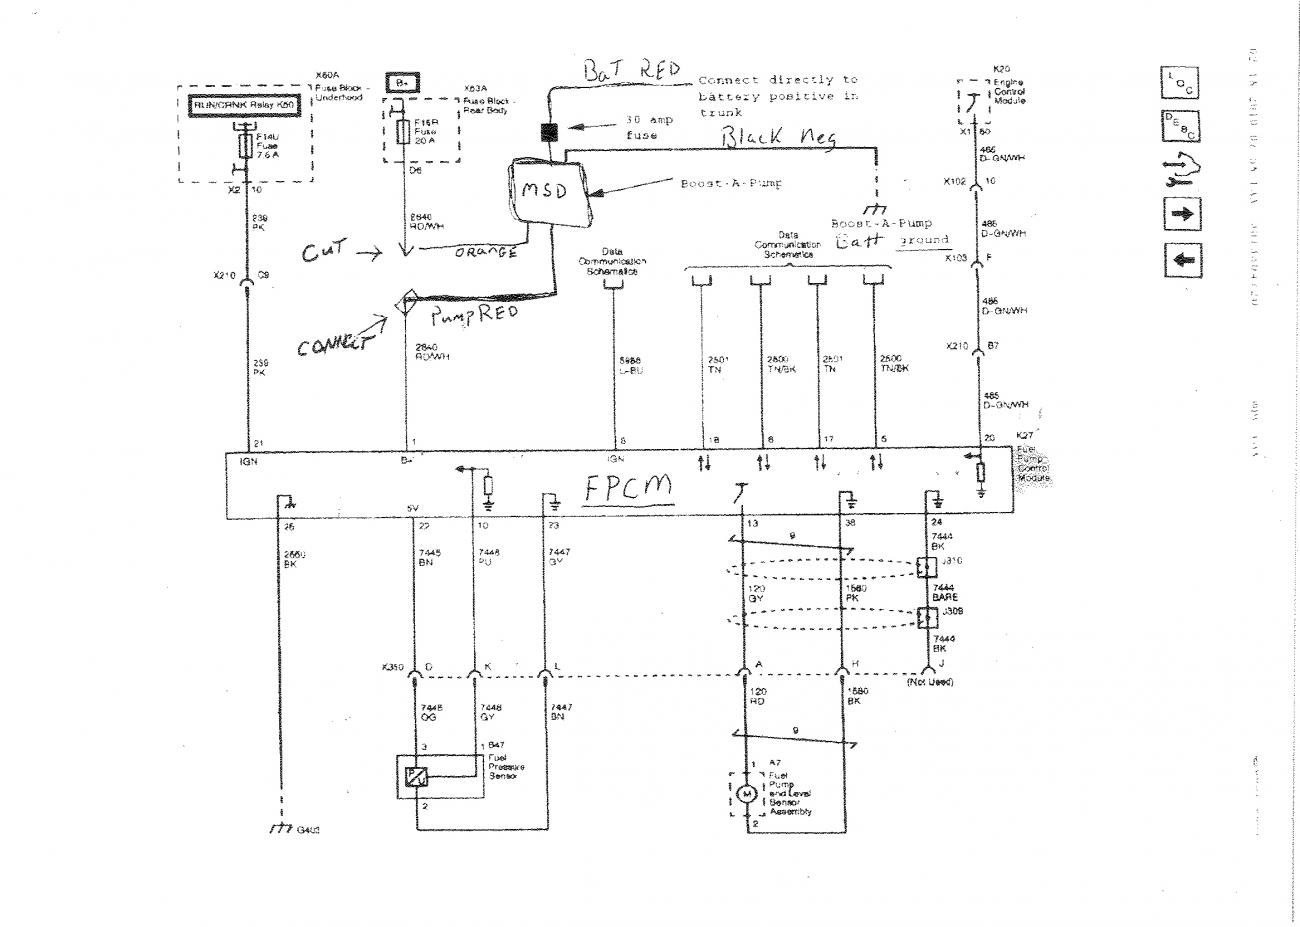 Battery Setup: .jpg) .jpg) Next I'll route the vacuum hose to the engine and then, finally, get the lower sc manifold on! -Don
__________________
747 RWHP 794 RWTQ
"Horsepower sells cars, torque wins races." - Enzo Ferrari See My Build: http://www.camaro5.com/forums/showthread.php?t=385577 Last edited by hammdo; 06-24-2017 at 12:02 AM. |
|
|
|
|
03-20-2017, 03:56 PM
|
#1171 |
|
'It's an experiment'
Drives: [COTW 2/09/15] '11 GPI LSA SC Z/LE Join Date: May 2014
Location: Dallas TX
Posts: 8,709
|
Finally finished the routing of the vacuum hose and routed the USB cable to the inside of the car under the rear seat -- good to go for tuning.
Vacuum hose routed up the trans and into the engine bay: .jpg) .jpg) USB cable routed with the positive battery cable and under the rear seat: .jpg) With that done, I can finally get back to the manifold! -Don
__________________
747 RWHP 794 RWTQ
"Horsepower sells cars, torque wins races." - Enzo Ferrari See My Build: http://www.camaro5.com/forums/showthread.php?t=385577 |
|
|
|
|
03-20-2017, 07:13 PM
|
#1172 |
|
'It's an experiment'
Drives: [COTW 2/09/15] '11 GPI LSA SC Z/LE Join Date: May 2014
Location: Dallas TX
Posts: 8,709
|
Jokerz ported lower is on!
OK, got the lower manifold on! Installed the new manifold gaskets (used vacuum grease to hold them in place and provide a great seal):
.jpg) .jpg) Fuel Injectors and Fuel Rail (NO bolt on the front rail location this time around): .jpg) .jpg) Boost Valve (18 ft lbs) and Sensors (EVAP and plug 89 in lbs): .jpg) Prepped the head (vacuum grease) and installed the manifold (44 in lbs first pass, 89 in lbs second pass): .jpg) injectors connected: .jpg) .jpg) Because of the extra work on the snout, I had to 'push down' the valley cover outlet to allow the manifold to fit -- I'll have to use a 'hose' this time and not a hose connector for the vent tube. Next, the lid (I have a new gasket for the lid and the throttle body). I'll also leave off the spacer, as I want to know what these changes did first. Finally, I'm on the home stretch! -Don
__________________
747 RWHP 794 RWTQ
"Horsepower sells cars, torque wins races." - Enzo Ferrari See My Build: http://www.camaro5.com/forums/showthread.php?t=385577 |
|
|
|
|
03-20-2017, 08:32 PM
|
#1173 |
|
'It's an experiment'
Drives: [COTW 2/09/15] '11 GPI LSA SC Z/LE Join Date: May 2014
Location: Dallas TX
Posts: 8,709
|
Well, Brett from Jokerz Performance sent me a belt for the LSA and not the LSA Conversion, so I'm ordering 2 belts to try:
K061000HD K060997HD 997 might be a bit tight - we'll see! -Don
__________________
747 RWHP 794 RWTQ
"Horsepower sells cars, torque wins races." - Enzo Ferrari See My Build: http://www.camaro5.com/forums/showthread.php?t=385577 Last edited by hammdo; 03-21-2017 at 08:03 PM. |
|
|
|
|
03-21-2017, 08:00 PM
|
#1174 | ||
|
'It's an experiment'
Drives: [COTW 2/09/15] '11 GPI LSA SC Z/LE Join Date: May 2014
Location: Dallas TX
Posts: 8,709
|
Jokerz Blower Installed and Running!
She's running again! I went and purchased locally the K061000 belt and that was a perfect fit!
Finished installing the rest of the items (lid, hoses, connectors, throttle body, CAI intake tube) and after refilling the SC coolant, uploaded the GPI ECM 850 tune that Ryan (Rhino79) did for me. NOTE: THIS tool made it EASY to tighten up the back lid bolts -- wow, what a difference this made: Lid install: .jpg) .jpg) .jpg) .jpg) .jpg) Taking shape: .jpg) .jpg) .jpg) .jpg) .jpg) .jpg) .jpg) Once I did a check over, she fired right up! Ready to go!: .jpg) I have 2 videos -- the very first start (break-in) and the second after everything finally settled: Break-in of SC (first start): After Break-in of SC: Got some 'whine' with my 'scream' ;o) Next, dyno tune -- when Ryan is freed up... -Don
__________________
747 RWHP 794 RWTQ
"Horsepower sells cars, torque wins races." - Enzo Ferrari See My Build: http://www.camaro5.com/forums/showthread.php?t=385577 Last edited by hammdo; 03-21-2017 at 08:19 PM. |
||
|
|
|
|
03-21-2017, 11:05 PM
|
#1175 |
|
'It's an experiment'
Drives: [COTW 2/09/15] '11 GPI LSA SC Z/LE Join Date: May 2014
Location: Dallas TX
Posts: 8,709
|
Took the car out for a good long drive -- first drove it close to make sure nothing was out of order, then, took it out on the highway -- nice and easy -- did excellent!
IAT2 temps are exactly the same difference as before -- no change 16° above ambient (80° so the IAT2 temps were 96°). Car moved and drove like it should -- not bad for a base ID850 tune! Can't wait to see how it does on the dyno... I'll do a check-over tomorrow to make sure nothing came loose, but it sure was fun to hear that blower whine ;o)... Let Brett from Jokerz Performance know its up and running and doing great! Dyno will tell the story... -Don
__________________
747 RWHP 794 RWTQ
"Horsepower sells cars, torque wins races." - Enzo Ferrari See My Build: http://www.camaro5.com/forums/showthread.php?t=385577 Last edited by hammdo; 03-22-2017 at 02:00 AM. |
|
|
|
|
03-22-2017, 09:19 PM
|
#1176 |
|
|
Congrats and can't wait to see how it does on the dyno!
__________________
2014 Camaro SS L99, Ashen Grey w/Black Leather - Build thread - http://www.camaro5.com/forums/showthread.php?t=491561
GPI 416 w/GPI S/C Cam, GPI Ported Heads & Tuned by Ben, Holley Dominator ECU, Mag Heartbeat, ZL1 Fuel Pump/DSX Aux Pump, NW 103 TB, FIC 1650's, Alky Meth, Rossler T400 w/t-brake, Circle D Converter, Kooks Headers, Viking Coil Overs & all the BMR Goodies in the rear, Zl1 3.23 Diff, DSS Axles, Wiles Racing Driveshaft, Hendrix Offset Diff Bushings, AFE Solid Subframe Bushings, 875HP/843TQ 5FDP |
|
|
|
|
|
|
|
 |
|
|


