You are browsing camaro5 

|
 10-24-2011, 04:01 PM
|
#15 | |
            
Drives: 2010 Camaro 2LT/RS ABM Join Date: Sep 2009
Location: Sugar Land, TX
Posts: 13,075
|
 --- Sent from my iPhone 4 using Tapatalk
__________________
2LT, RS, AT6 ABM, Gray Leather
Quote:
1100 Order accepted at dealer: 9/15/2009 - NPGV41. 2000 Order accepted by GM: 9/29/2009 3000 Accepted By Production Control: 9/30/2009 - TPW 10/26/09 3100 Sequenced:10/12/09 3300 Scheduled For Production:10/13/09 3400 Broadcast:10/22/09 3800 Produced:10/27/09 4000 Available To Ship:10/28/09 4200 Shipped:10/29/09 5000 Delivered To The Dealer:11/09/09 6000 Delivered To Customer:11/12/09 |
|

|

|
|
10-24-2011, 04:03 PM
|
#16 |

Drives: 2014 Z/28 #82+#192, 18ZLE 66Nova Join Date: Oct 2008
Location: By the lake in AZ
Posts: 15,728
|
Have my second set in apart now and have 20 pics of them, But i will not take pics of how to open the headlight, its been done on youtube.
|
|
|
|
|
10-24-2011, 04:08 PM
|
#17 |
 
Drives: 2011 2LT RS Join Date: Apr 2010
Location: Kansas
Posts: 331
|
I've seen the video. The only issues I'm foreseeing are with how to wire them up so they come on white like they're supposed to then control them with my controller to shift them. Then where to run the wires,etc. Thanks for your invaluable insight in this and so many of your other posts. They've helped me, and got me in trouble with the wife, countless times!
|
|
|
|
|
10-24-2011, 10:32 PM
|
#18 |
|
RIDING ON AIR

Drives: 2010 2LT/RS Summit White Join Date: Dec 2009
Location: Long Island NY
Posts: 964
|
subscribing
__________________
--John--2010 Camaro 2LT/RS, Summit White Air Ride Suspension, BBK Longtube Headers, Hi-Flo cats, Doug Thorley catback exhaust, Elite Catch-Can, Airraid CAI, Trifecta tune, ZL1 front end with Phantom grille, ZL1 side skirts, MRR228 graphite wheels |
|
|
|
|
10-24-2011, 11:22 PM
|
#19 | |
|
Drives: 2014 Z/28 #82+#192, 18ZLE 66Nova Join Date: Oct 2008
Location: By the lake in AZ
Posts: 15,728
|
Quote:
That is why if you are using a RGB LED you need the controller it will have pre mixed colors set. |
|
|
|
|
|
10-27-2011, 07:29 PM
|
#20 |

Drives: 2011 2SS/RS M6 VR Join Date: Aug 2011
Location: Chicagoland
Posts: 1,536
|
I might have missed something, but where are you buying the parts to do this project?
|
|
|
|
|
10-27-2011, 07:43 PM
|
#21 | |
|
knows 2 facts about ducks

Drives: ...and they're both wrong Join Date: Aug 2009
Location: The HMS Invincible
Posts: 25,072
|
Quote:
__________________
 |
|
|
|
|
|
10-29-2011, 12:56 AM
|
#22 |
|
Drives: 2011 2LT RS Join Date: Apr 2010
Location: Kansas
Posts: 331
|
Any chance on getting the second half of the write up this weekend? I ended up getting an actual day off!
|
|
|
|
|
10-29-2011, 11:23 AM
|
#23 |
|
Drives: 2014 Z/28 #82+#192, 18ZLE 66Nova Join Date: Oct 2008
Location: By the lake in AZ
Posts: 15,728
|
Here you go more pics and info.
In this pic you see what i did is cover the light pipe with some silver tape,( its used for AC ducts in your home at the time of the build) 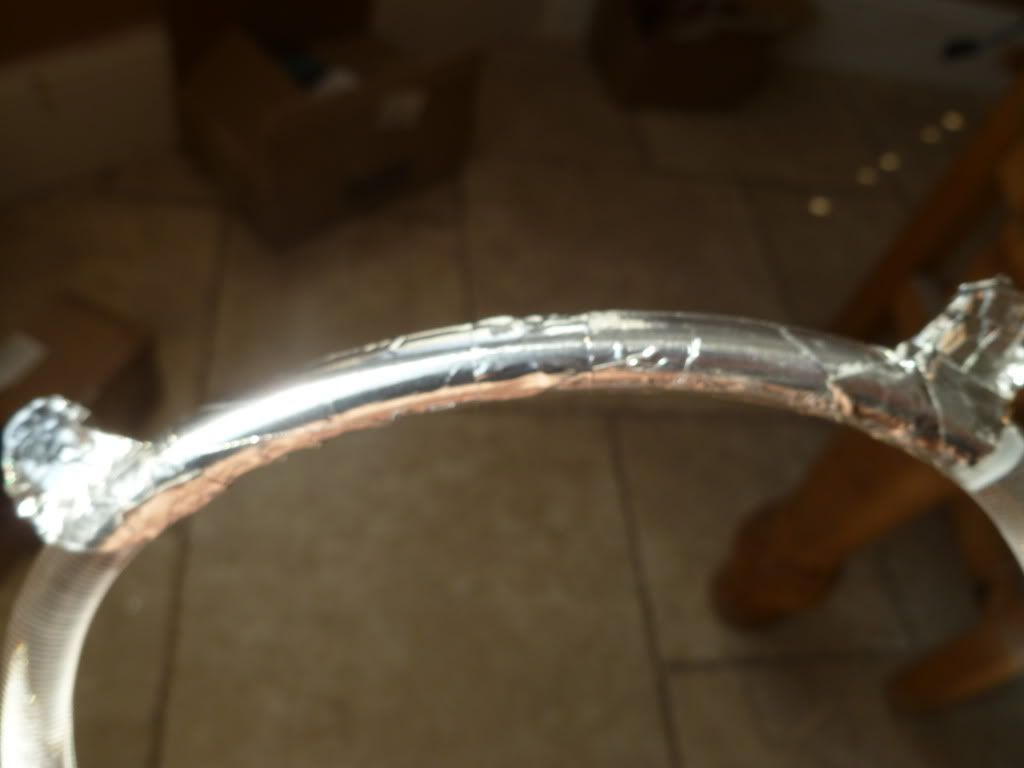 You need to add it so you will not see it ones you but the head light back together, so after you get the area between the screw's done lay it back to see how much more you need to do. 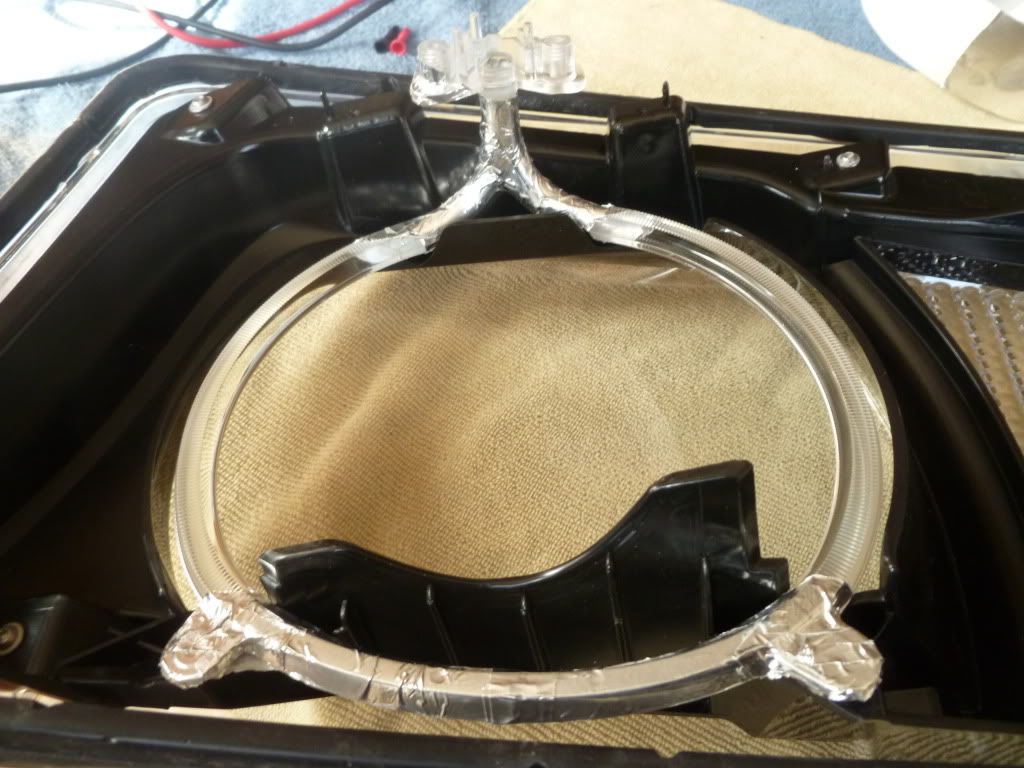 So you can see i add the tape to the 2 sides that can not be seen, this helps to not loss any light out the sides, Do not add any tape on the top of the LED Mount this tape lets electricity pass and it will burn out your LED's, If you want to know how i know, I have lots of burn out LED's if any one wants a good deal on them let me know. LOL 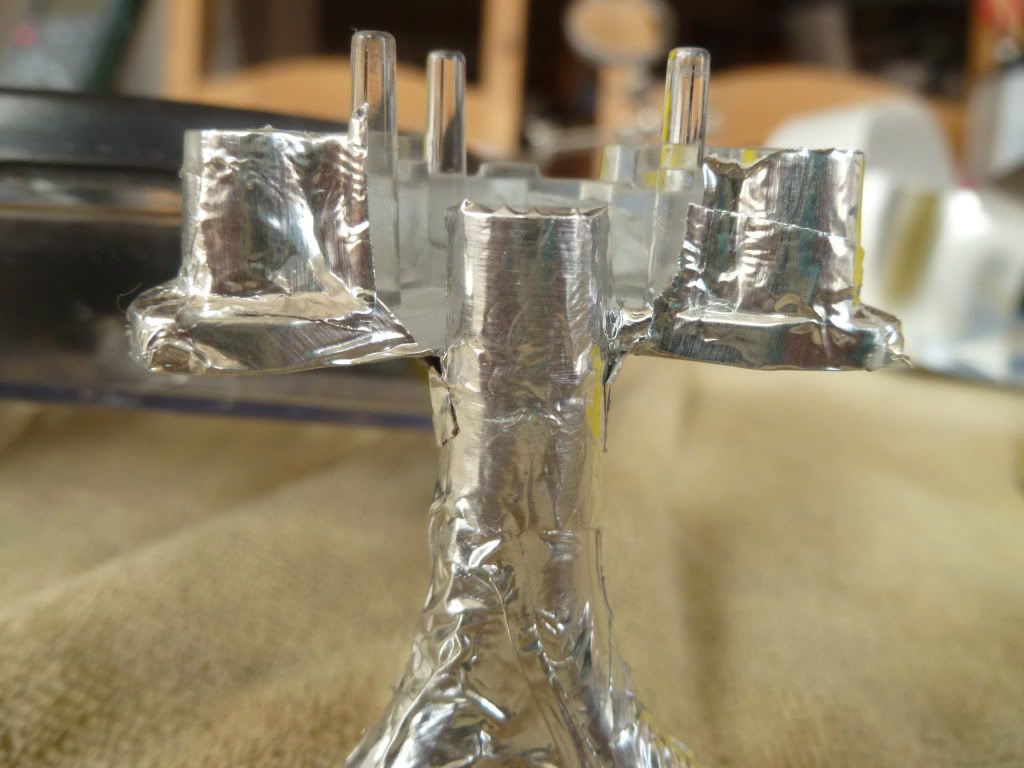 This is as far is you tape so the led can sit in the pad and not touch the tape, Now test if your LED will sit fat on the light pie. 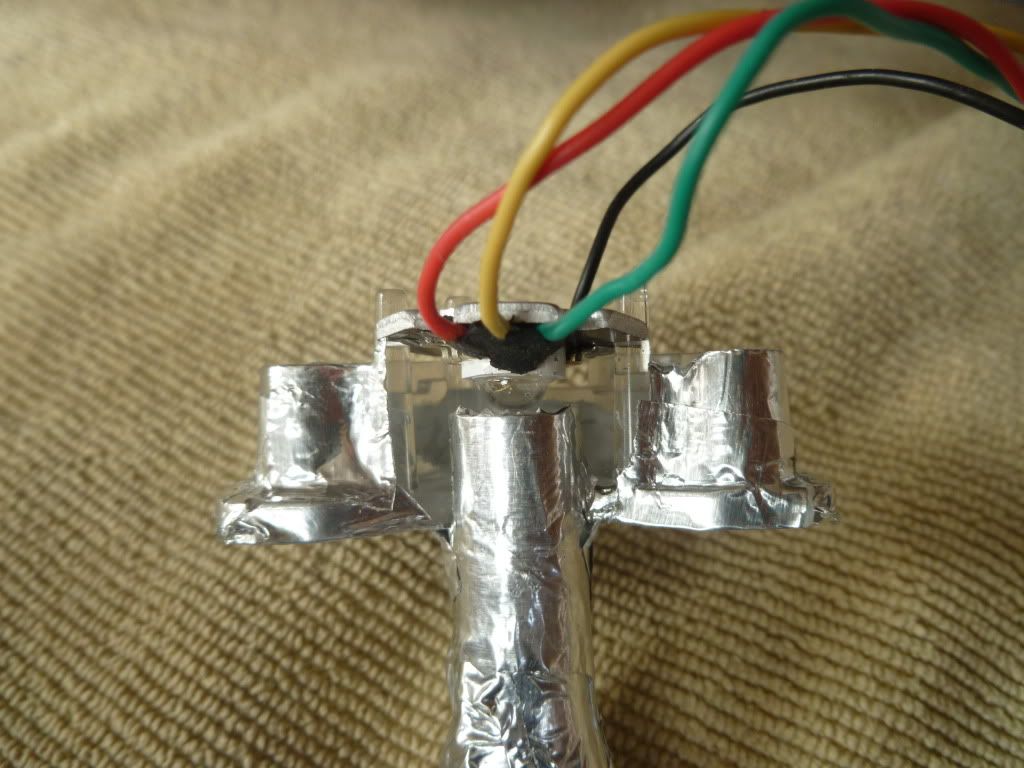 So you see in this pic my led does not sit flat on top so we need to make it di so. 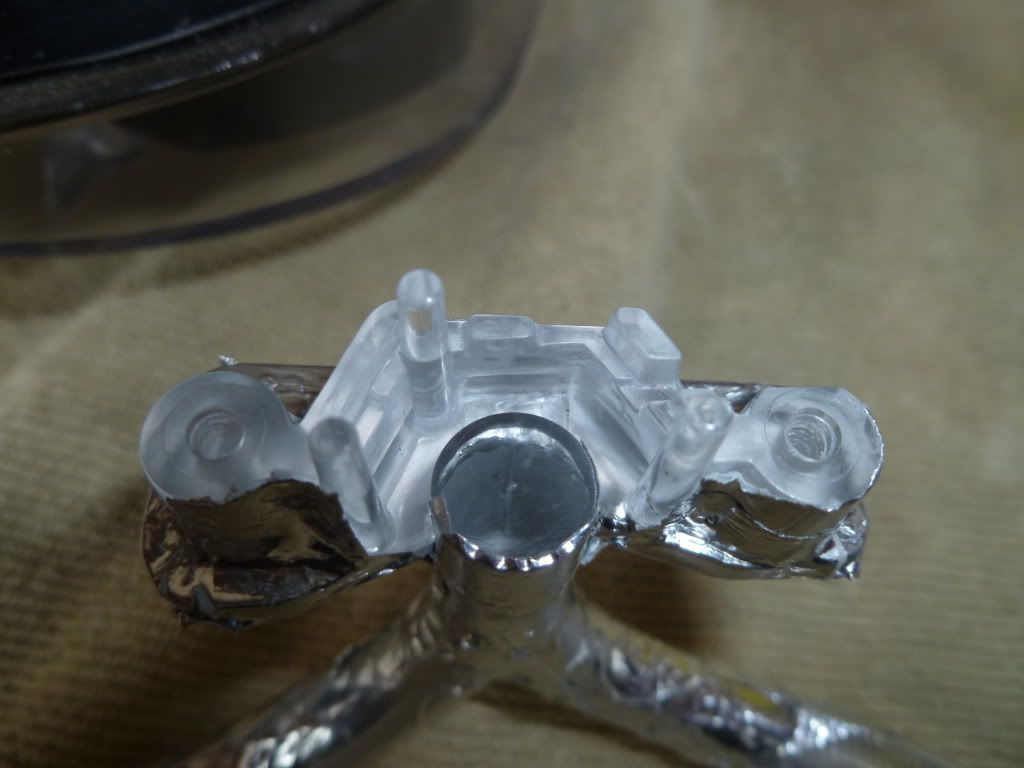 here is what to do get a drill bite that you can drill a crown in to it. 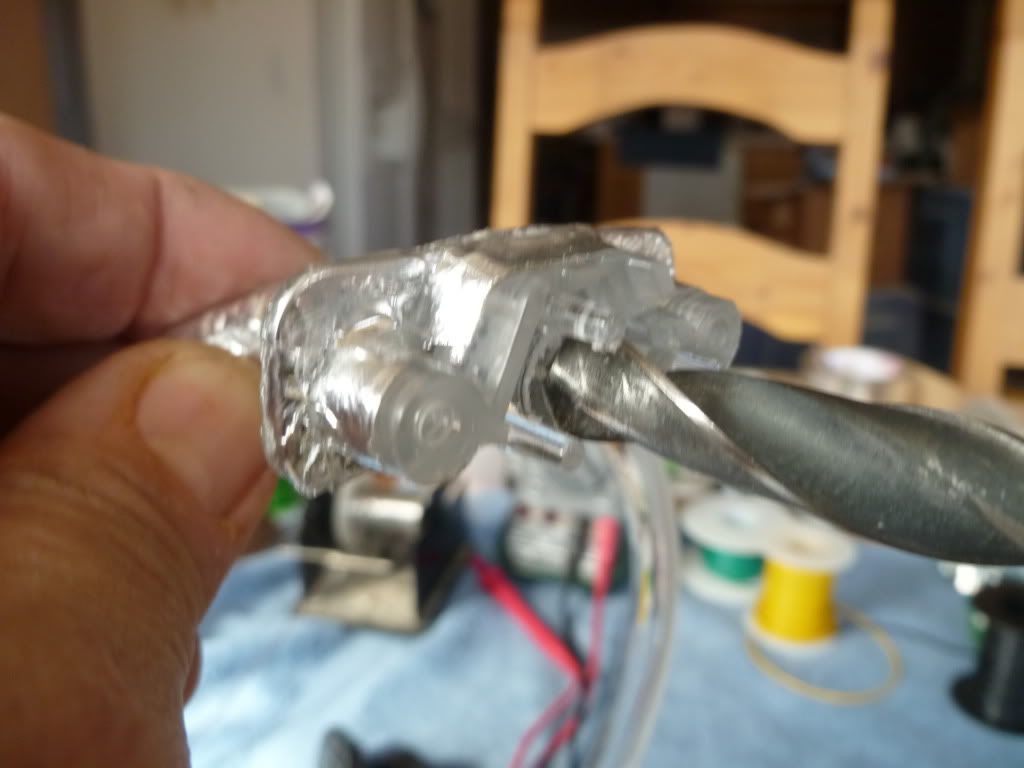 ones you do that and its as deep as it needs to be to set the led in to it you will have to do one more step.  As you can see it looks like crap,LOL this is where a wife or girl friend comes in handy, you need to borrow there clear nail polish add a drop and work it around the crown we made in the light pipe. ( For you guys if you do some of the mods i do ask your girl to get you your own bottle clear nail polish you will need it)  Now set the new LED in place and set the heat sink on and set the bolts back slowly if its not going down all the way see why, you may have the wires in the way or the crown is not set deep as you think it was, do not over tighten and brake the parts, now set it all up and drill to the housing so you can pull the new wires and your done, all you need to do is seal the headlight housing. Good luck. |
|
|
|
|
10-31-2011, 10:01 PM
|
#24 |
|
Drives: 2014 Z/28 #82+#192, 18ZLE 66Nova Join Date: Oct 2008
Location: By the lake in AZ
Posts: 15,728
|
One last thing, If you do this remember to tape the end of the old power wires from the stock LED's.
|
|
|
|
|
11-01-2011, 01:16 AM
|
#25 |
|
it's mind bottling..

Drives: SGM Join Date: Apr 2011
Location: miami floirda.
Posts: 5,392
|
if i send you my lights would you be able to get it all done ? i dont have any tools and no trusted shops to do it for me.
__________________
 |
|
|
|
|
11-01-2011, 08:17 AM
|
#26 | |
|
knows 2 facts about ducks
Drives: ...and they're both wrong Join Date: Aug 2009
Location: The HMS Invincible
Posts: 25,072
|
Quote:
__________________
|
|
|
|
|
|
12-16-2011, 09:45 AM
|
#27 |
|
Drives: 2014 Z/28 #82+#192, 18ZLE 66Nova Join Date: Oct 2008
Location: By the lake in AZ
Posts: 15,728
|
So i am trying to remove the LED with out opening the head light,i want to see if i can do it, So far i have spent 20 Min with out too much luck, I removed the bulb cover and bulb, Then the Ballast, Now the new part that i never tried to remove before, and that is the adjuster, If you turn it 1/4 turn it will come out but then you need to pop it off the projector, That will give you room to remove the 2nd screw that holds the projector cover and heat sink.
But at this point you can get the LED to come out, But not the wire on that LED, GM put the wires over 1/2 the heat sink, so you will need to cut that wire or i need a way to remove the heat sink from the headlight and that may take me some more time. For me its still faster to open the headlight, as i cant find one screw that is in the headlight as i type. LOL Last edited by 2SSRS@Gen5diy; 03-15-2012 at 11:23 PM. |
|
|
|
|
12-16-2011, 09:58 AM
|
#28 |

Drives: 1997 30th Ann. Z28 & 2010 2LT RS Join Date: Jan 2010
Location: Suffolk Virginia
Posts: 1,933
|
Glad to see you at least tried to do the install without opening the headlights up . Makes me wonder how that other vendor is doing this ...
Anyway great DIY and boy did we learn a few things doing this project !! Learned a few tips and tricks as we went along .
__________________
 |
|
|
|
|
|
|
|
 |
|
|
 Similar Threads
|
||||
| Thread | Thread Starter | Forum | Replies | Last Post |
| New RS Headlights | ArmoSS | Cosmetics and Lighting Modification Discussions | 10 | 06-16-2011 08:41 AM |
| RS headlights and DOT markings? | mattbaer | USA - Mid-Atlantic | 7 | 05-15-2011 12:05 AM |
| to all people who want OEM RS headlights on a non-RS | khabboub | Cosmetics and Lighting Modification Discussions | 23 | 02-27-2011 06:02 PM |
| Anybody heard of a fix for non RS HID headlights "not aftermarket" yet?? | DFS88 | Cosmetics and Lighting Modification Discussions | 33 | 02-27-2010 04:49 PM |


