You are browsing camaro5 

|
 06-01-2012, 03:23 PM
|
#15 |
|
Account Suspended
Drives: 2012 Camaro RS, RX supercharged Join Date: Dec 2009
Location: Bradenton, FL
Posts: 6,063
|
Very nice work!! Looksgreat.

|

|

|
|
06-01-2012, 03:24 PM
|
#16 |
    
Drives: 2010, 2LT, RS, 6M, ABM (#1893) SOLD Join Date: Mar 2011
Location: Willits, CA
Posts: 1,437
|
thank you.
|
|
|
|
|
06-01-2012, 08:59 PM
|
#17 |
 
Drives: White M6 1LT RS Join Date: Mar 2010
Location: Canton, MI
Posts: 1,676
|
Nice work.. Love that painted/polished combo!!!
__________________
Pfadt Sway Bars - FE3 Suspension - Barton Shifter - IdealG's Clutch Master Cylinder - Trifecta - Vmax TB - Vararam Intake - MACE 25mm Insulator - Plenum Insulator - Ported/Gasket Matched Intake Manifold - Rx Catchcan - AAC DRL's - 4 Pack Aux Gauges - Steering Controls - AAC Afterburners - DIY Led Sidemarkers - ZL1 Front End
Next mod: Done! |
|
|
|
|
06-02-2012, 02:44 PM
|
#18 |
|
Drives: 2010, 2LT, RS, 6M, ABM (#1893) SOLD Join Date: Mar 2011
Location: Willits, CA
Posts: 1,437
|
thanks Mach,
today i match ported the spacers. takes about 30 min/port, took me 3 hrs incl pictures and a couple quick breaks. first of all, safety gear!!! i went a little overboard, i am sure a dust mask would be fine, but i had the respirator handy!  and the tool, dremel with 60 grit sanding drums. i used 1 drum per port.  went pretty well, i started on one end, and got the opening close to the line, then slowly worked it to about 1/2 the line, then i flipped the spacer over and did the other end of the port just the same way. i then started leveling between the ends, being careful not to hit the ends anymore. go slowly and check often. the pattern and dust will help you judge when it is close to flat. first port;  i then checked in a few places with a straight edge, and evened a few spots out, until i was happy with the surface.  after 3 hours or so, all done; compare the before; to the after; hopefully it will have been worth the effort!!! tomorrow i'll start on the heads!!! wish me luck!!! |
|
|
|
|
06-02-2012, 05:16 PM
|
#19 |

Drives: Silver Bullet Join Date: Sep 2010
Location: DFW
Posts: 845
|
Nice work Sleez , cant wait to see the end result.
|
|
|
|
|
06-02-2012, 05:51 PM
|
#20 |
|
Drives: 2010, 2LT, RS, 6M, ABM (#1893) SOLD Join Date: Mar 2011
Location: Willits, CA
Posts: 1,437
|
thank you.
|
|
|
|
|
06-02-2012, 06:10 PM
|
#21 |
|
Account Suspended

Drives: camaro Join Date: Aug 2011
Location: east coast
Posts: 570
|
soo you just used a dremel? and files?
|
|
|
|
|
06-02-2012, 06:41 PM
|
#22 |
|
Drives: 2010, 2LT, RS, 6M, ABM (#1893) SOLD Join Date: Mar 2011
Location: Willits, CA
Posts: 1,437
|
the file was just a gauge to make sure the sides were straight, only used the Dremel with drum sanding wheels.
|
|
|
|
|
06-03-2012, 05:03 PM
|
#23 |
|
Drives: 2010, 2LT, RS, 6M, ABM (#1893) SOLD Join Date: Mar 2011
Location: Willits, CA
Posts: 1,437
|
just went out and marked the head ports, there is not a lot of material to worry about.
some of the ports are 50% dead on, and the largest ledge is .065". don't think the risk to reward is quite worth it. i am not too worried about getting the last HP out of it. maybe if i was planning a FI install. so, i think i am going to install my IM and spacer as is, no head porting. 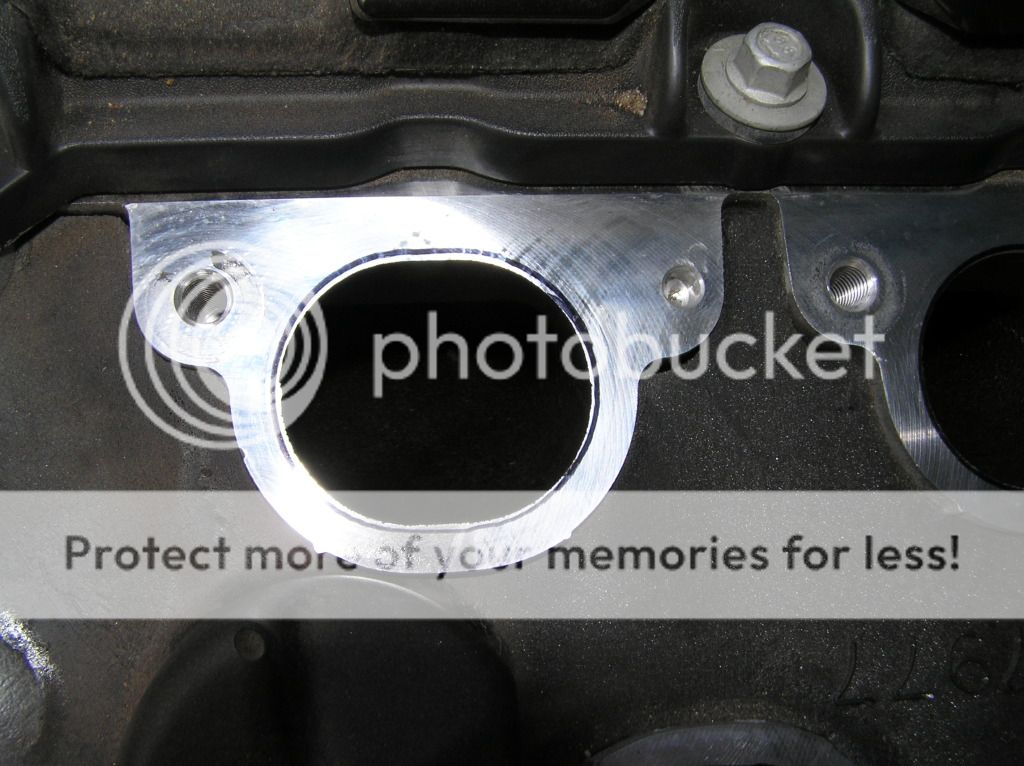 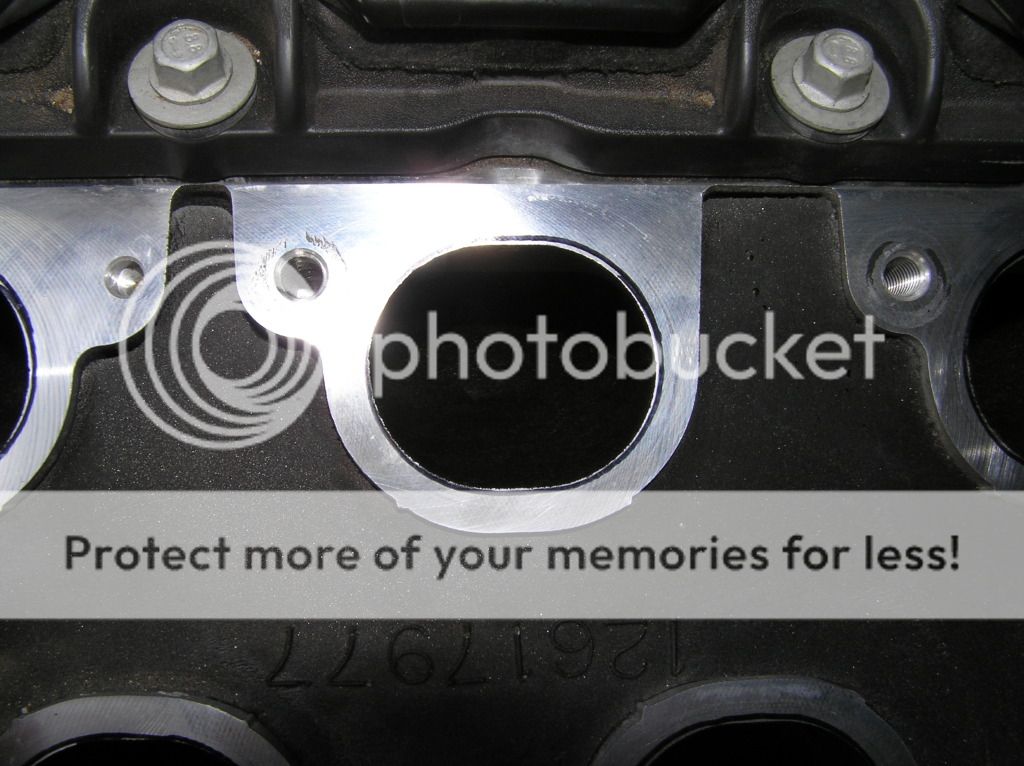   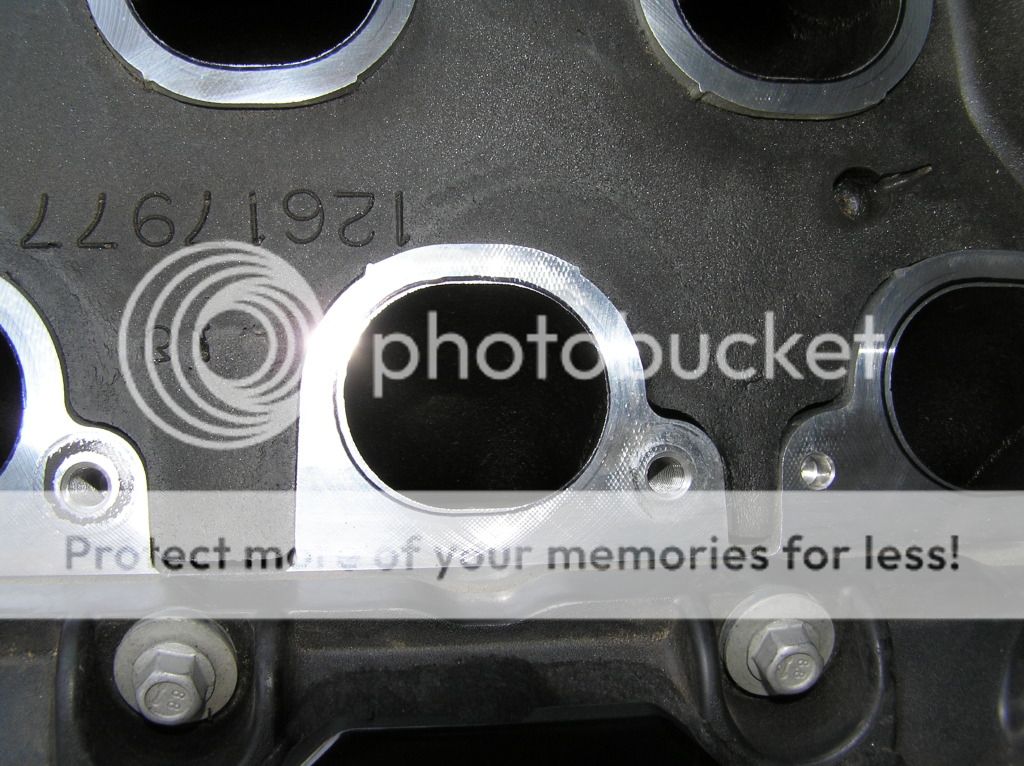 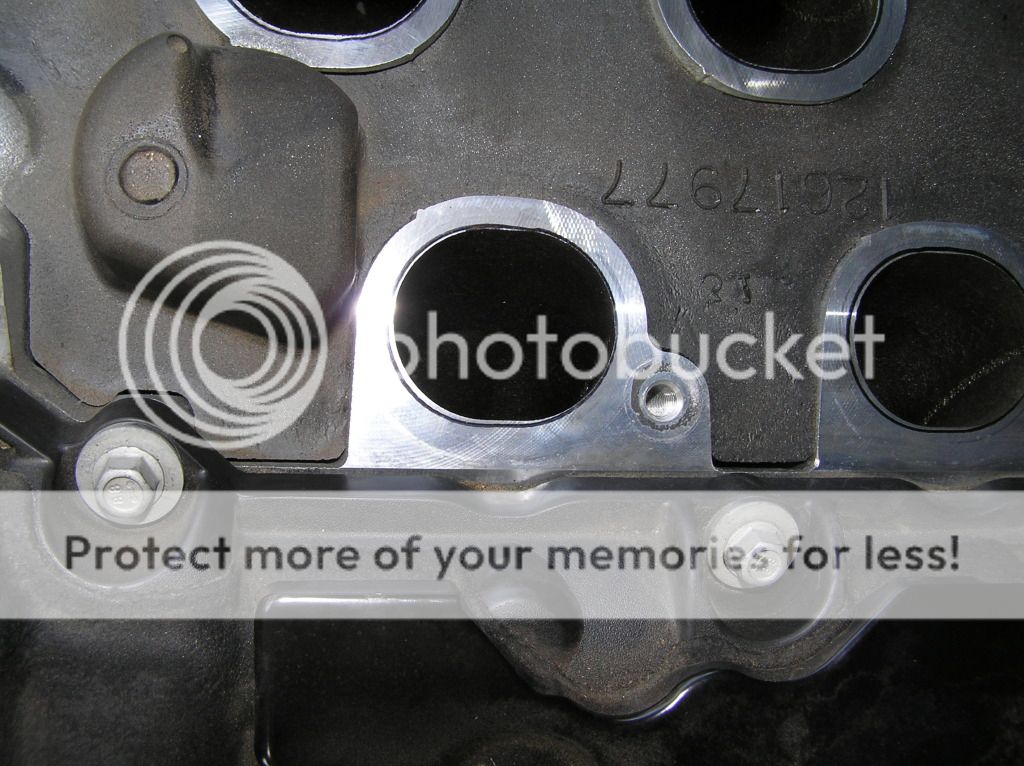 the spacers were in more need of porting than the heads. |
|
|
|
|
06-03-2012, 08:57 PM
|
#24 |

Drives: 2010 Camaro 2LT VR/RS CGM Rally's Join Date: May 2009
Location: Palmyra, PA
Posts: 5,675
|
soo when u ported the 25mm did u put the gasket on first with rtv?
__________________
|
|
|
|
|
06-03-2012, 10:29 PM
|
#25 | |
|
Drives: 2010, 2LT, RS, 6M, ABM (#1893) SOLD Join Date: Mar 2011
Location: Willits, CA
Posts: 1,437
|
Quote:
no, i just used the bolts to align the gasket so i could mark it, then ported it. i don't think i am going to use RTV when installing the spacers and IM, since i am using oem gaskets top and bottom. the IM is dry, and not FI so it should be fine. |
|
|
|
|
|
06-04-2012, 01:26 PM
|
#27 | |
|
Drives: 2010, 2LT, RS, 6M, ABM (#1893) SOLD Join Date: Mar 2011
Location: Willits, CA
Posts: 1,437
|
Quote:
that's why i decided to paint mine. i polished some headers on my motorcycle, 14 hrs it took me!! and that was fairly smooth stainless steel to begin with. and for a two cylinder!! |
|
|
|
|
|
06-05-2012, 03:38 PM
|
#28 |
|
Drives: 2010, 2LT, RS, 6M, ABM (#1893) SOLD Join Date: Mar 2011
Location: Willits, CA
Posts: 1,437
|
ok, got the IM and spacers installed today!!! woo frikkin' hoo!!!!
made a couple brackets yesterday for the rear horiz bolts. i found some "T" brackets at the hw store that had hole spacing close to 1". i drilled the holes out to fit the bolts. then cut the un-needed part off, and deburred with the dremel. sprayed with some hi-temp black i had laying around. and installed with some SS hw. make sure to check the spacing between the holes before tightening everything down. since i am using oem gaskets above and below the spacers without using RTV, i laid the bottom gasket down, then set the spacers on top. i did put a small amount of silicone lube (Super Lube) on all the rubber surfaces to keep them from tearing as i tightened down the bolts.  more to come.....gotta run to town. |
|
|
|
|
|
|
|
 |
| Tags |
| llt, mace, manifold, ported intake, spacer |
|
|


