You are browsing camaro5 

|
 06-30-2012, 05:20 PM
|
#1219 | ||
|
Drives: G5.R Join Date: Sep 2010
Location: SoCal
Posts: 2,377
|
Quote:
Quote:
Speaking of time, I spent this morning working on the engine. Starting to see the light at the end of the tunnel. After I'm done, I'm going to sand blast the whole engine. Started the front of the engine inside the timing cover area today, almost finish! |
||

|

|
|
06-30-2012, 10:15 PM
|
#1220 |
   
Drives: 2010 2SS/RS M6 Black on Black Join Date: Jan 2010
Location: Global Citizen
Posts: 1,243
|
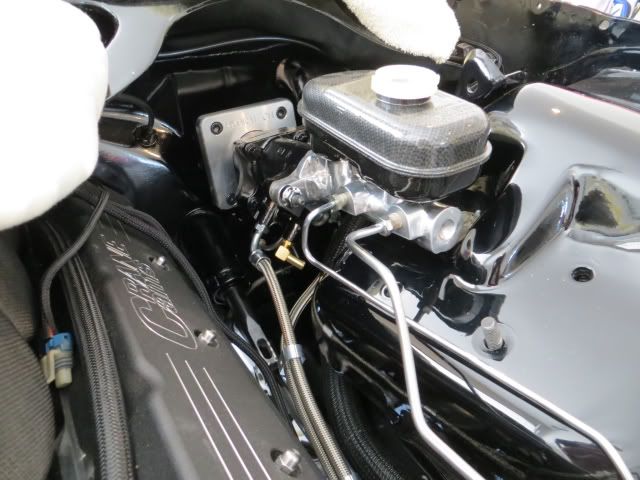
My Modest Engine Bay
Nathan, as requested here are some shots of my engine bay--still a work in progress. Going to change out some of the hoses, change the fittings and clamps on the catch can, add a carbon fiber piece in front of the radiator and move the evap solenoid nearer to the fuse box.
What I have in the pics below is Showstopper covers in Carbon Flash Metallic with matte black inserts, billet caps from Chevy Mall, Holley valve covers powder coated in carbon flash metallic, Roto-Fab radiator cover powder coated satin black, 2012 heater hoses, Cold Air Inductions black CAI, MSD spark plug wires, Elite Engineering catch can, flipped fuel rail, minor clean-up on coil and injector wiring harness, and billet strut caps from SLP.
__________________
Meh
Last edited by My 5th; 06-30-2012 at 10:18 PM. Reason: Add strut caps |
|
|
|
|
06-30-2012, 10:27 PM
|
#1221 |
|
ou mai gad

Drives: SW 2SS x2 Join Date: Feb 2010
Location: MX
Posts: 643
|
Well you sure have a problem when you polish the valley...
__________________
 |
|
|
|
|
06-30-2012, 11:13 PM
|
#1222 | |
 
Drives: 01SS Join Date: Nov 2011
Location: Michigan
Posts: 258
|
Quote:
__________________
'01SS - RHS 460....fed by 8 little throttle bodies
Kinsler / Fikse / RHS / Mast / MWC / Kooks  |
|
|
|
|
|
07-01-2012, 10:53 AM
|
#1223 | |||
|
Drives: G5.R Join Date: Sep 2010
Location: SoCal
Posts: 2,377
|
Quote:
 Quote:
The pictures I posted were not of the finished look (forgot to but didn't take good pics. It looks really clean. I'm not going to polish as to get a really good finish, you need heat from friction. It's Quote:
By the way, these are a couple of 69 Camaro projects I've been following with killer bays. Thought you guys get a kick...... this takes it to a whole new level of what I called a killer bay!!!! The metal workmanship is simply amazing. |
|||
|
|
|
|
07-01-2012, 11:41 AM
|
#1224 | ||
|
Original Bumblebee Owner

Drives: 265hp ZX-14, 500hp Silverado, V-ROD Join Date: Apr 2009
Location: Arizona
Posts: 1,378
|
Nice !!!
Images remind me of the Concept Camaro Engine Bay. Albeit, the plastic shroud is not as nice as the metal shrouds. (Old 2007 concept car with a LS2) 
__________________
Quote:
|
||
|
|
|
|
07-01-2012, 05:55 PM
|
#1225 | ||
|
Drives: 01SS Join Date: Nov 2011
Location: Michigan
Posts: 258
|
Quote:
 Quote:
 . Might be posting a few updates over there later in the week.... . Might be posting a few updates over there later in the week....
__________________
'01SS - RHS 460....fed by 8 little throttle bodies
Kinsler / Fikse / RHS / Mast / MWC / Kooks |
||
|
|
|
|
07-02-2012, 03:21 PM
|
#1226 |
 
Drives: 2011 CGM 2SS/RS Join Date: Apr 2011
Location: Louisville
Posts: 368
|
So, still beating a dead horse
 , but I need some info regarding changing out the heater hoses. I'm probably just over-thinking it but looking at the Tech AFX instructions (I just have the JDP heater hose relocation set, no instructions included), if I'm just doing the heater hose replacement, I can skip the steps regarding moving the fuel lines/rails? If I still need to do this I think I tackled a project I'm not able to finish , but I need some info regarding changing out the heater hoses. I'm probably just over-thinking it but looking at the Tech AFX instructions (I just have the JDP heater hose relocation set, no instructions included), if I'm just doing the heater hose replacement, I can skip the steps regarding moving the fuel lines/rails? If I still need to do this I think I tackled a project I'm not able to finish  . . Specifically, I do the steps on pages 1-35, then pick up again for pages 82-92(As well as the part about bleeding the radiator)? http://www.techafx.com/sites/techafx.com/files/Camaro_hose_instructions.pdf Thanks in advance! |
|
|
|
|
07-02-2012, 06:40 PM
|
#1227 |

|
http://www.camaro5.com/forums/showthread.php?t=183191
Here ya go. JDP wrote up a DIY that is just for their 2012 hoses. |
|
|
|
|
07-02-2012, 09:34 PM
|
#1228 | |
|
Drives: G5.R Join Date: Sep 2010
Location: SoCal
Posts: 2,377
|
Quote:
Little update: Doing the research on parts for the 418 stroke rotating assembly. also the saga continues........ everything in the circles was smooth out. The areas that are smooth I had already grinded down but forgot to take before pics. Next will be sand blasting the whole thing before sending it to get machined. I tossing the idea of powder coating the block........., just a thought right now. These pictures give an idea of rough the factory casting is. And here is the after.... still need a little more attention before my OCD is satisfied, LOL Notice the lines running under the cylinder are no longer there. I thought this was kind of funny, as was grinding, the "A1" emerged from under the rough casting. I would had never known it was hiding under there. Last edited by Moreno1; 07-02-2012 at 09:53 PM. |
|
|
|
|
|
07-02-2012, 11:47 PM
|
#1229 |
|
Drives: 2010 2SS/RS M6 Black on Black Join Date: Jan 2010
Location: Global Citizen
Posts: 1,243
|
OK Mr. OCD, here's what you do next...
When you get that block all polished, machined and cleaned install one or more video cameras inside so you can see all that polishing you just did.  LOL (actually that might be kinda cool). LOL (actually that might be kinda cool).Seriously, I think you are actually making the block a little stronger, as well as oil drain-back friendly. Just make sure they clean it really well, you don't want any grit or metal dust inside your oil passages. And I don't think there's any way you can polish inside there! Oh, and I'd be careful about grinding those raised pads by the crank journals--they might require a certain tolerance for proper torque and fit of the crank end caps/girdles. I hope I'm still this side of the daisies when you get your car finished.
__________________
Meh
Last edited by My 5th; 07-02-2012 at 11:51 PM. Reason: add text |
|
|
|
|
07-03-2012, 06:16 PM
|
#1230 |
|
Drives: '15 Z06, '01 NBM SS, '97 SS Join Date: May 2009
Location: Rio Rancho, NM
Posts: 12,170
|
Nathan is a MONSTER!
Dang brotha! Ivan
|
|
|
|
|
07-03-2012, 06:23 PM
|
#1231 |
 
Drives: 2010, 2LT, RS, 6M, ABM (#1893) SOLD Join Date: Mar 2011
Location: Willits, CA
Posts: 1,437
|
did you weigh it before?
|
|
|
|
|
07-03-2012, 10:29 PM
|
#1232 |

Drives: white 2010 ss and 2011 6.2 silvy Join Date: Jan 2011
Location: dfw
Posts: 316
|
This project just entered a whole new dimension of crazy. Ive seen guus debur engine blocks before but this is insane, your next purchase should be a straight jacket to keep your hands off the grinder. Lol
__________________
2010 RS2SS, XS POWER HEADERS AND FULL EXHAUST, ROTOFAB COLD AIR AND ENGINE COVERS, MSD PLUG WIRES. PFADT DROP SPRINGS, SPORT SWAY BARS, TRAILING ARMS, TOE LINKS. HURST SHIFTER, BILLET PEDALS.
BLACKOUT TAIL PANEL, TINTED TAIL LIGHTS, MAIL SLOT BLACKOUT, WHITE BOWTIES |
|
|
|
|
|
|
|
 |
|
|
 Similar Threads
|
||||
| Thread | Thread Starter | Forum | Replies | Last Post |
| Roto-Fab | Engine Covers - S/C | Fuse Relay Cover | Radiator Cover | Billet Oil Cap+ | AutoAgenda | Exterior Parts & Accessories | 14 | 02-06-2013 08:43 PM |
| New Texas Speed & Performance Engine Machining Center! | Trevor @ Texas Speed | Camaro V8 LS3 / L99 Engine, Exhaust, and Bolt-Ons | 18 | 01-16-2013 03:46 PM |
| Hawk Performance Brake Pads part HB247Z.575 $85.00 | Rogan | USA - Florida | 2 | 10-07-2011 12:10 PM |
| Acronyms? | KEEP RT | Camaro V8 LS3 / L99 Engine, Exhaust, and Bolt-Ons | 20 | 03-11-2011 08:57 PM |
| Great Read and Info on Oil Weight | Banshee | Mechanical Maintenance: Break-in / Oil & Fluids / Servicing | 1 | 11-23-2009 09:03 PM |


