You are browsing camaro5 

|
 07-02-2012, 02:08 AM
|
#1 |
 Drives: 2012 1LT/RS Join Date: Sep 2011
Location: Northridge, CA
Posts: 58
|
Rough spot on paint...
Hello all,
Today I did my first wash an wax on my 12 Camaro RS. After I was finishing the removal of the dried wax ( meguiars deep crystal carnauba wax) I noticed a rough patch on the driver side that wouldn't wipe off. It feels like hardened specs are on the paint, I tried to use compound to get them off with no luck. These specs are not visible, I can only feel them when rubbing over the area with my hand. Any ideas or tips on how to get this off or what it might be? Thanks in advance for any help. |

|

|
|
07-02-2012, 02:12 AM
|
#2 | |
           
|
Quote:
Probably be into the wetsanding phase at that point Sent From My Bertie Botts AXI0M Flavored Nexus
__________________
[B]
 |
|
|
|
|
|
07-02-2012, 02:16 AM
|
#3 |
|
Drives: 2012 1LT/RS Join Date: Sep 2011
Location: Northridge, CA
Posts: 58
|
Yea I compounded by hand with meguiars scratch X... Would you suggest I clay bar it first?
|
|
|
|
|
07-02-2012, 02:18 AM
|
#4 |
|
|
Yes. Clay bar first. If that doesn't do it, polish by hand, then compound, then polish by machine, then compound by machine.
You might want to try some megs 105/205 as your polish. Clay it and let us know what happens and we'll go from there. Sent From My Bertie Botts AXI0M Flavored Nexus
__________________
[B]
|
|
|
|
|
07-02-2012, 02:51 AM
|
#5 |
|
Drives: 2012 1LT/RS Join Date: Sep 2011
Location: Northridge, CA
Posts: 58
|
I'm not to familiar with clay barring... Any specific brand I should be looking for?
|
|
|
|
|
07-02-2012, 08:04 AM
|
#6 |
 
Drives: 1965 Chevelle Malibu Join Date: Jan 2012
Location: San Antonio, Tx
Posts: 472
|
Mothers or Meguires are both fine. Mothers is a little less expensive, and performs the same as any of the other brands.
__________________
 |
|
|
|
|
07-02-2012, 10:26 AM
|
#7 | |
|
Drives: 2014 Ford Focus ST Join Date: Jun 2009
Location: Tampa Bay
Posts: 939
|
Quote:
Sometimes this comes from transportation of your vehicle from the factory and a good clay should remove this for you. Here is some inform for you to read up on claying. When it actually comes to claying your paint the first thing you should do is tear up your clay bar into 4 pieces and then check that they are soft enough to work with. This is a bit of a judgement call, but ideally you should be able to mould the pieces into balls and be able to roll them up into sausage shapes with relatively little effort, the consistency of blue-tack is what you are aiming for. Take one piece of your clay and flatten it into an easy to hold patty shape. The next step is to work from the top of your car down, panel by panel. Working on an area of no more than 2 ft x 2 ft at a time, spray the work area thoroughly with the spray lubricant and then using light pressure and pace rub the clay backwards and forwards across the surface of the panel, following the lines of the car. Using insufficient lubricant is the second reason why many people have a bad experience with clay and end up damaging their paint; be generous with it, it doesn't matter if it runs everywhere, it won't do anything any harm. If the paint is relatively clean the clay will glide across it very easily, if it is heavily contaminated the clay will be much harder to move around. Usually, between one to two dozen passes will be enough to clean the work area, but in time you will become able to judge whether all of the contaminants have been removed by the way the clay moves over the surface. Another way to tell is to run your fingertips over the panel when you think you are done, it should be perfectly smooth. If it isn't, repeat the process. Once the work area is clean, wipe up any residual lubricant using a microfibre drying towel and then move on to the next area or panel. As you progress, remould and reshape your clay after every panel. This ensures that the face of the clay in contact with the paint remains relatively clean. If after doing the first area you realise you are working on a heavily contaminated surface, remould the clay more frequently. As your confidence grows, you will find that it is often easier to work on really stubborn areas using a thinner piece of clay and more pressure, but don't rush this; get some experience first, as marring can be caused if too much pressure is used. The final rule for using clay safely and effectively is always to throw it away if you accidentally drop it on the floor. The final step in your cleaning process is to pack away all of the tools you have used, making sure everything is clean and ready for next use. Check the condition of your clay pieces; if they are totally soiled discard them if it was me, but if they are only partially soiled then place them in a zip lock freezer bag and save them for future use. But if you can any pictures will help us in seeing what it is. __________________ |
|
|
|
|
|
07-02-2012, 01:22 PM
|
#8 |

Drives: 2010 Mazdaspeed 3 Join Date: Mar 2012
Location: Orlando/Stuart, FL
Posts: 1,161
|
Autopia Guide To Detailing
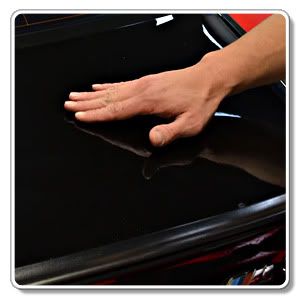
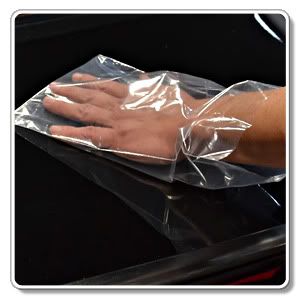
Detailing 101- How To Use Detailing Clay On Your Car Every car finish shares a common enemy. This enemy, usually invisible, is relentless in its purist. It surrounds us in the air we breath and your paint is engaged in it's battle from the time it rolls out of the factory gate until it meet's it's ultimate demise. The enemy is air-borne pollution and fall out. Regular washing cannot remove it and paint polishing is highly inefficient at attacking it. The solution is Detailing Clay. Detailing Clay is perhaps one of the most innovative and effective do-it-yourself product innovations in the car care industry, despite being overlooked by many detailers and enthusiasts. Invented in Japan in the late 1980's, automotive Detailing Clay is a paint cleaning system designed to safely and effectively remove bonded surface contamination that is not removed with normal car washing. Claying your paint with Detailing Clay is not a substitute for polishing your car. Claying is a process to be done prior to the polishing process to remove contaminants that have adhered to your paint. The polishing process removes paint defects such as scratches, swirl marks, oxidation, and staining while improving overall paint clarity to enhance gloss and prepare your paint to accept car waxes, paint sealants, or coatings. For those who have never done it, rubbing detailing clay on your car does sound a little strange but it is actually very effective, quick, super easy and extremely safe! If you have never clayed your paint you will quickly see what you have been missing within the first few passes. It's actually kind of fun! This article will walk you through the claying process step-by-step to remove the bonded surface contamination and prepare your car for polishing and/or protection. Does My Car Need to be Clayed? First of all, age does not matter! Many people think that a new car does not need to be clayed. This is not necessarily true! Contamination doesn’t care if your car is new or old. If your car is subjected to airborne contamination and it has bonded to the surface it needs to be clayed. Just remember, even a new car has been subjected to many types environments prior to the salesman handing you the keys. Your car started at the factory, sat on a lot waiting for transport via ship, train or truck or a combination of transports, then it sat on the lot waiting to be bought. Who knows what was floating around the air on the long journey between the factory and your driveway??? Surface Contamination Test New or old, there is a way to tell if it is time to clay your car. The contamination that clay removes can often be felt by touch. Paint should feel smooth. If you feel a gritty, a sandy, or a pebble like texture on the paint then it needs to be clayed.
Do you feel the difference? The plastic bag basically amplifies the surface contamination bonded to your car. Even if you don’t feel much, it is best to remove it before moving on to your polishing and protecting processes. Types of Bonded Surface Contamination Bonded surface contaminants make your paint feel rough leaving your paint more prone to oxidation and premature aging. If your paint is not slick and smooth, dirt and grime tend to stick to the surface of your car, which can lead to instilling that dreaded swirl during your car wash process.
How Does Detailing Clay Work 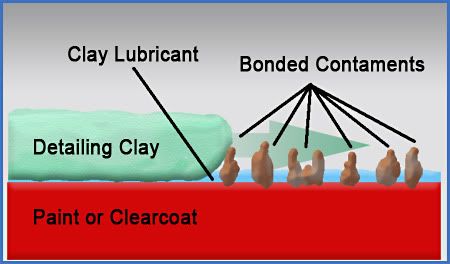 Surface contamination, as shown by this magnified illustration , won’t budge when you wash the surface through your normal car wash procedure. The contamination is even difficult to polish off. Detailing Clay will quickly and easily remove this contamination as it glides across your paint surface without the worry of damaging your paint.  Detailing Clay works by hydroplaning (gliding) over the surface of your paint on a thin layer of clay lubricant. The contamination sticks through the surface where the clay is free to remove it. The clay lubricant also helps to keep the clay from sticking to the surface of the paint while the clay removes the bonded contamination. Many fear that they will harm their car’s paint as Detailing Clay is an abrasive but it is actually only abrasive to the contamination, not your paint. The Detailing Clay actually safely shears the bonded surface contamination without the fear of harming your paint. 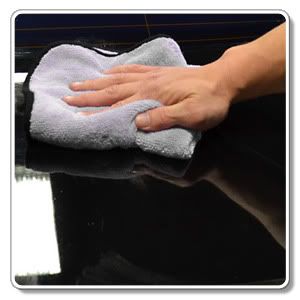 Types of Detailing Clay There are many brands of clay with different levels of aggressiveness. The more aggressive Detailing Clays are used in body shops to remove difficult contaminates like heavy paint overspray. The medium to ultra-fine grade Detailing Clays are formulated for professional detailers, serious enthusiasts and average consumers. Meguiar's Professional Red Detailing Clay is an aggressive detailing clay that will quickly cut through heavy contamination. However the abrasives in this synthetic bar are aggressive enough to lightly mark or scratch the paint, requiring some machine paint polishing to remove. This bar is recommended for professionals or serious enthusiasts who have machine paint polishing experience. BLACKFIRE PolyClay II is a medium grade of synthetic clay that is malleable and gentle to the paint but tough on paint contamination. This is a consumer grade clay that many professionals use for it's quick cleaning action. Sonus SFX Ultra-Fine Detailing Clay is an extremely fine clay that will remove light contamination quickly with almost zero risk of damaging the softest paints. This fine clay is well suited to regular use and is so gentle in it's action that it will not remove most waxes and paint sealants. The Ultima Elastrofoam Paint Cleaning System is a new take on the clay bar. With the Ultima System the clay bar is replaced by a specially lined Elastrofoam Foam Block. The special lining on the block allows it remove contamination just like a clay bar, yet it can be rinsed and re-used many time. Clay Lubrication 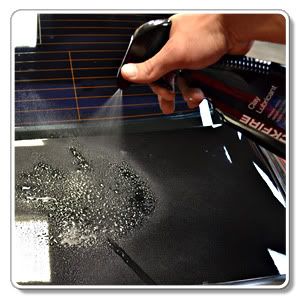 Without proper lubrication Detailing Clay will simply not work. Instead the clay would stick or skip across the paint and likely cause some marring. Lubrication such as a detail spray or proper clay lubricant, like BLACKFIRE Clay Lubricant, Sonus Glyde Clay Lubricant, or Meguiar's M34 Final Inspection will help the Detailing Clay to properly glide across the paint surface. Detailing Clay Procedure IMPORTANT! If you drop your detail clay bar on the ground you MUST throw it away as it will pick up dirt from the ground which will scratch your car!
Increase The Life Of Your Clay Bar As your Detailing Clay Bar works by lightly abrading and removing contamination it becomes contaminated itself. A fine gray or brown film will begin to cover the surface of the clay. Traditionally the clay the contaminated side is folded onto itself to expose a clay side. While this works well and you can get considerable life from your Detailing Clay, the question remains? What what just happened to the contamination that was pressed into the center of the clay. 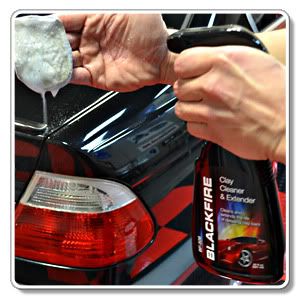 Over time the contamination will become so heavy that the clay bar will loose it's abililty to work or create scratching. BLACKFIRE Clay Cleaner & Extender is a formula designed to clean the contamination from the surface of the clay with out drying it out or damaging it. Mist a couple of squirts of this cleaner on the contaminated side, massage into the clay with your thumbs, and rinse off. The contamination will rinse away as well. Now you can fold clean clay onto itself and prevent once of the main causes in clay loosing its effectiveness. This solution pays for itself after the first car. Storage: Be sure to lubricate your detail clay bar with your clay lubricant to keep it from sticking and store it in its original box or plastic bag. Do not let your detail clay freeze or reach temperatures above 120 degrees. |
|
|
|
|
|
|
|
 |
|
|