You are browsing camaro5 

|
 08-21-2012, 09:35 AM
|
#1 | |
|
Philippians 4:13

Drives: SLP Supercharged LS3 Join Date: Aug 2009
Location: The Motor City - Michigan
Posts: 2,902
|
DIY - Afterburners Tail Light Kit (Part II)
The purpose of this write up is to supplement the information that was provided by AAC for their Afterburner Tail Light Kit. When you purchase the kit you are provided with a DVD that contains an install video and a PDF doc that show a step by step. The video does walk you through the steps; however, it does what I feel was an unrealistic timeframe for the individual attempting this for the first time. There is also no audio instructing you as the steps are being performed. As for the PDF doc, I felt it was good right up to the step where they tell you to separate the lens from the housing. Here you are instructed to use a box cutter which in my opinion is an accident waiting to happen.
The PDF I am providing is a detailed write up on the separation of the lens from the housing in more detail. I hope this is a help to you guys. Doc Provided by AAC AAC Afterburners Install 2010 Camaro.pdf My Supplimental Information DIY - AAC Afterburner kit by newagemuscle.pdf Results: Here is my buddies car I did...
__________________
 Last edited by newagemuscle; 11-05-2012 at 03:09 PM. |
|

|

|
|
08-21-2012, 11:20 AM
|
#2 |
|
Top Down Fun
Drives: 11 2SS/RS IOM Vert Join Date: Jun 2009
Location: Washington Twp, MI
Posts: 457
|
Good Write-up.
I usually adjust my Dremels' RPM though 
__________________
2011 Chevrolet Camaro Convertible 2SS RS M6 IOM Vert! IO Interior, Factory Hurst, Painted GFX, Black Rally Stripes, Front/Rear/Bowtie Blackouts, QTP Cutouts, Extra Cupholders!
LED Tails, LED DRL's (always on!), Ghosted "Concept" LED Side Markers, LED Tag Lights, Tinted LED Reverse Lights, Chrome Front Turn Signal Bulbs! My Build Thread Daily Driver: 2016 Ford Fusion Titanium with 2 car seats in the back! |
|
|
|
|
08-21-2012, 11:24 AM
|
#3 | |
|
Philippians 4:13
Drives: SLP Supercharged LS3 Join Date: Aug 2009
Location: The Motor City - Michigan
Posts: 2,902
|
Quote:
__________________
|
|
|
|
|
|
08-22-2012, 10:23 AM
|
#4 |
|
45TH 2SS VERT --> WINNING

Drives: 2012 45th Anniversary 2SS Vert. Join Date: Jun 2012
Location: Shelby Twp, MI
Posts: 41
|
Fantastic write up dwayne

__________________
 |
|
|
|
|
08-27-2012, 07:41 AM
|
#5 |
|
@fabSSbuild on IG

Drives: 2012 Twin Turbo Super Sport Join Date: Aug 2011
Location: Arlington, VA
Posts: 864
|
Excellent write up man! Wish i had your directions when installing mine (it would have saved me from buying a replacement lense lol)
__________________
 AGP Twin Turbo, FAST lsxR manifold, ID850's, Squash Return Style Fuel System, ZL1 Bumper/Side Skirts/Hood/Carbon Insert, Havoc Rear Diffuser, PFADT Coilovers/Sway Bars/Adj. Tie Rods/Solid Subframe Bushings/Trailing Arms, Eboost2, SW Retro Chambered 3" Catback, R1 Concept Drilled/Slotted Rotors, 360 Forged Straight 5's, Matte Metallic Purple Wrap, Anvil Carbon Spoiler, Full AAC Lighting, etc |
|
|
|
|
08-28-2012, 06:24 PM
|
#6 |
         
|
Nice job
|
|
|
|
|
10-16-2012, 04:26 PM
|
#7 |
 |
Here are some pictures of mine (hope this isn't thread jacking). It's pretty amateurish and you can kinda see how bad I am with the dremel, but the upcoming blackout tail light tint should hide all that.
Thanks to newagemuscle and The Stig for all their help!  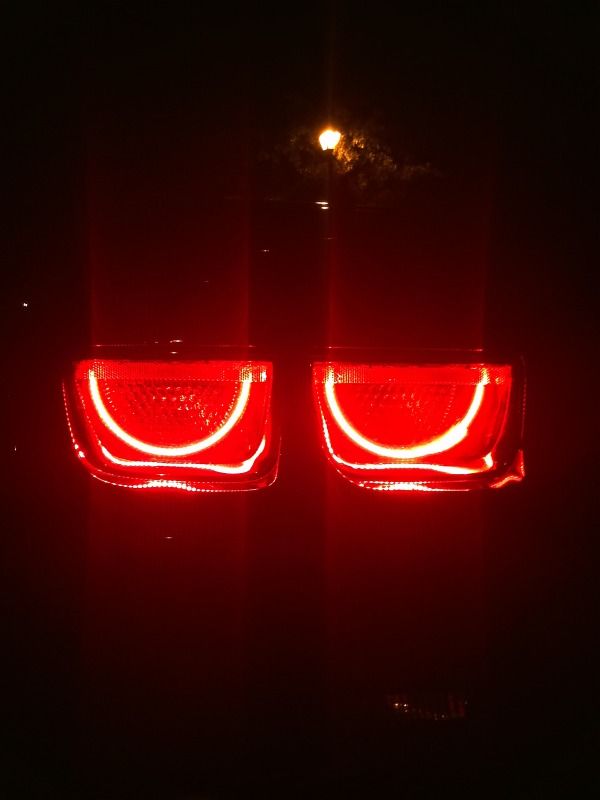 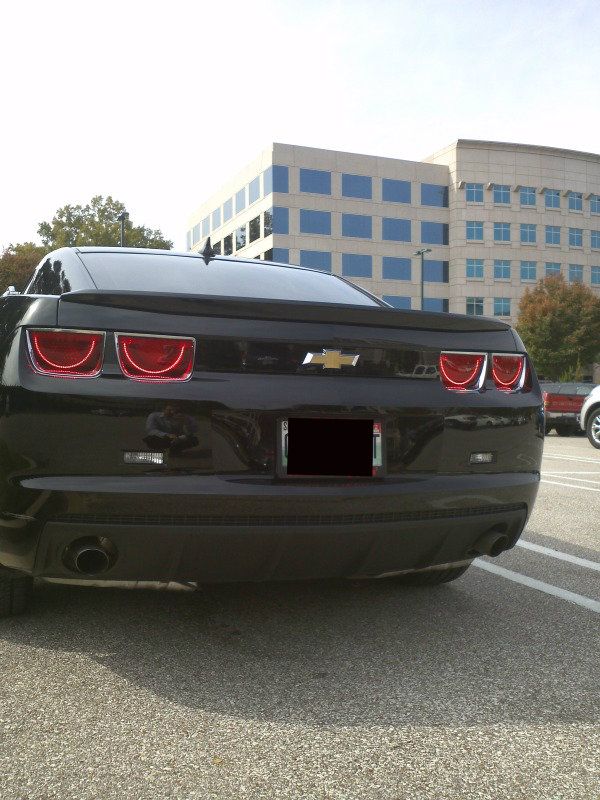
|
|
|
|
|
10-16-2012, 04:31 PM
|
#8 | |
|
Philippians 4:13
Drives: SLP Supercharged LS3 Join Date: Aug 2009
Location: The Motor City - Michigan
Posts: 2,902
|
Quote:

__________________
|
|
|
|
|
|
10-16-2012, 11:07 PM
|
#9 |

Drives: 2010 SS L99 Inferno Orange Join Date: Apr 2012
Location: Texas Coast
Posts: 1,167
|
Newagemuscle, Good job! You and your buddies car looks great!! Wish I had this info back when I done mine about 8 mo ago! I would like to share with you what a PITA that I went through!(hope this ain't thread jacking,not sure what that means,lols! I apoligize if so!) 1st, I received no instructions in my kit,and no DVD. I looked at the install on u tube and got part of instructions somewhere on net. I bought a cheap dremmel and some diamond disc,but decided to use the box cutter method.(afraid I was gonna cut something I wasn't posed to) The first light I did was the hardest,by the time I got to the 4th light,it only took a couple mins.(got better each time) I had to call AAC to find out what wires to splice into! I got lights installed and I let sit overnight then turned them on next day! WTF!! one halo came loose resting against lens, one halo had about 3 or 4 LEDs out!! I had to take apart again,(dropped 1 of the nuts down in never never land)scrape off all silicone(no solvents remove silicone) and installed new halo that AAC sent me! Kinda pita, but I sure like them,they really look good!! Gonna figure out one day how to post pics!

|
|
|
|
|
05-01-2013, 02:15 AM
|
#10 |
|
Drives: 2011 V6 Join Date: Nov 2012
Location: Jacksonville, Fl
Posts: 70
|
Are there cheaper alternatives for the led strip?
|
|
|
|
|
02-16-2016, 04:53 PM
|
#11 |
 
Drives: 63' chevy impalaSS , 12'Cam89'Cam Join Date: Feb 2013
Location: Memphis, TN, to Brunswick, GA
Posts: 301
|
Can I not just bake them in the oven like I did my headlights ?
|
|
|
|
|
|
|
|
 |
|
|


