You are browsing camaro5 
|
|
 04-05-2013, 11:48 PM
|
#15 |
 Drives: 2013 2SS 1LE Join Date: Mar 2013
Location: United States
Posts: 134
|
All focal in general sound a little bright to me, but that's just my opinion...
as for the Mosconi's, I do have 2 AS 300.2's I'm trying to unload right now. Let me know if you are interested... if you build is anything like the pic in your signature... it looks tight 
|

|

|
|
04-06-2013, 03:45 PM
|
#16 |
|
Drives: 2013 2SS 1LE Join Date: Mar 2013
Location: United States
Posts: 134
|
alright, afternoon break right now, while i'm letting things cure.
started out the morning by masking the passenger side quarter panel and insert, so I can fiberglass the rest of the back of the mold. before doing that, I took some 3M Spray 77 and lined the edges and back of the insert with 1/8" ccf. this is to create a soft resting place for the insert and to keep vibrations and noises in the even that it comes in contact with metal.  then taped up the passenger side..  i taped up the driver side quarter panel plastic, since the other insert is still curing. apparently I didn't add enough MEKP. I'll be glassing around the edges here as a start to the grill panel that I'll be putting in place to hide the midbasses and ports.  I did the same for the passenger side, but will wait to glass it until I can install it in the car, to make sure that the form is right.  after a number of layers of chop 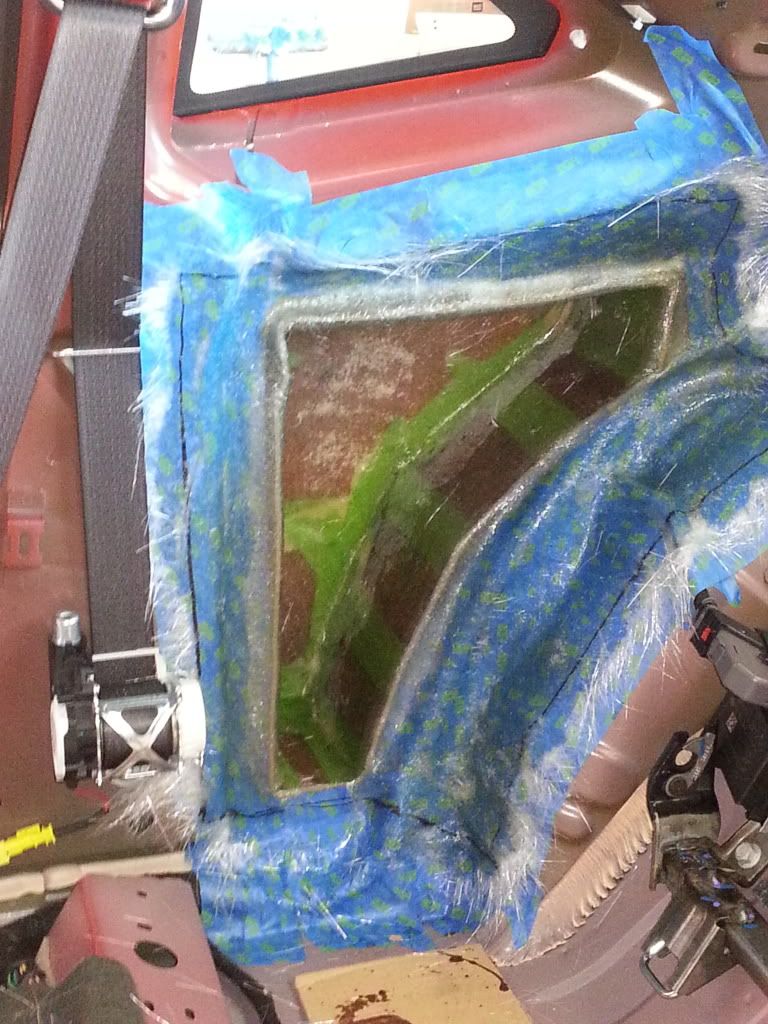 and after a few layers of cloth 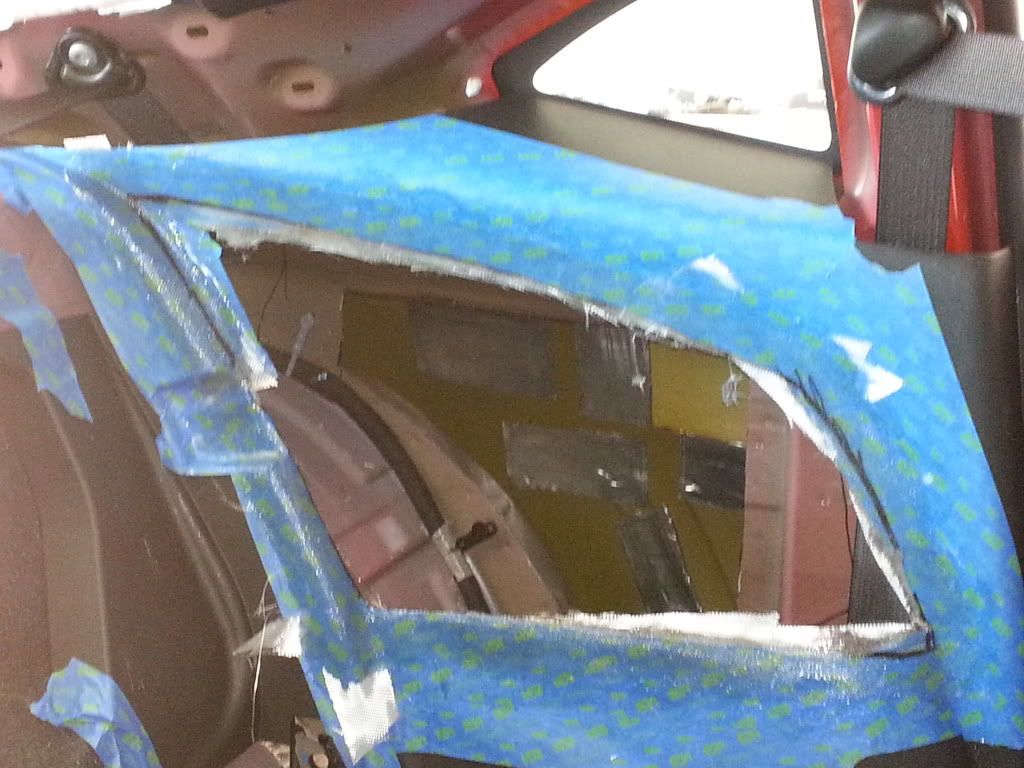 i also took to the central command unit, scored the plastic parts that the filler will be adhering to 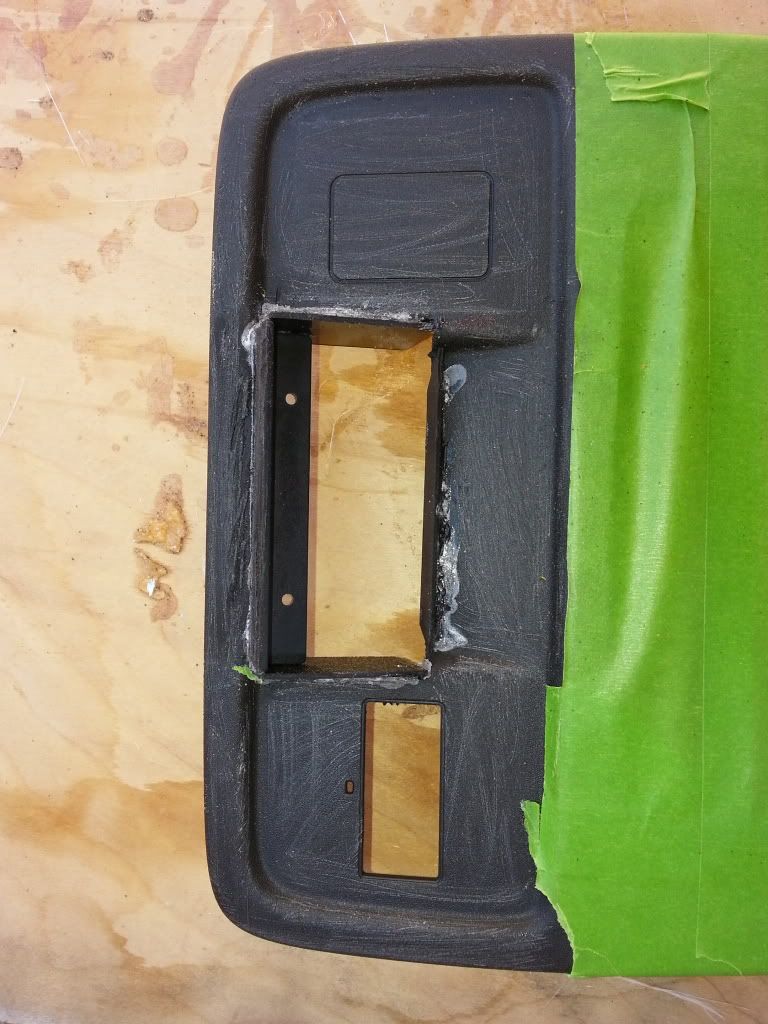 Then laid down some filler, and will be forming the rest of that when it fully cures. 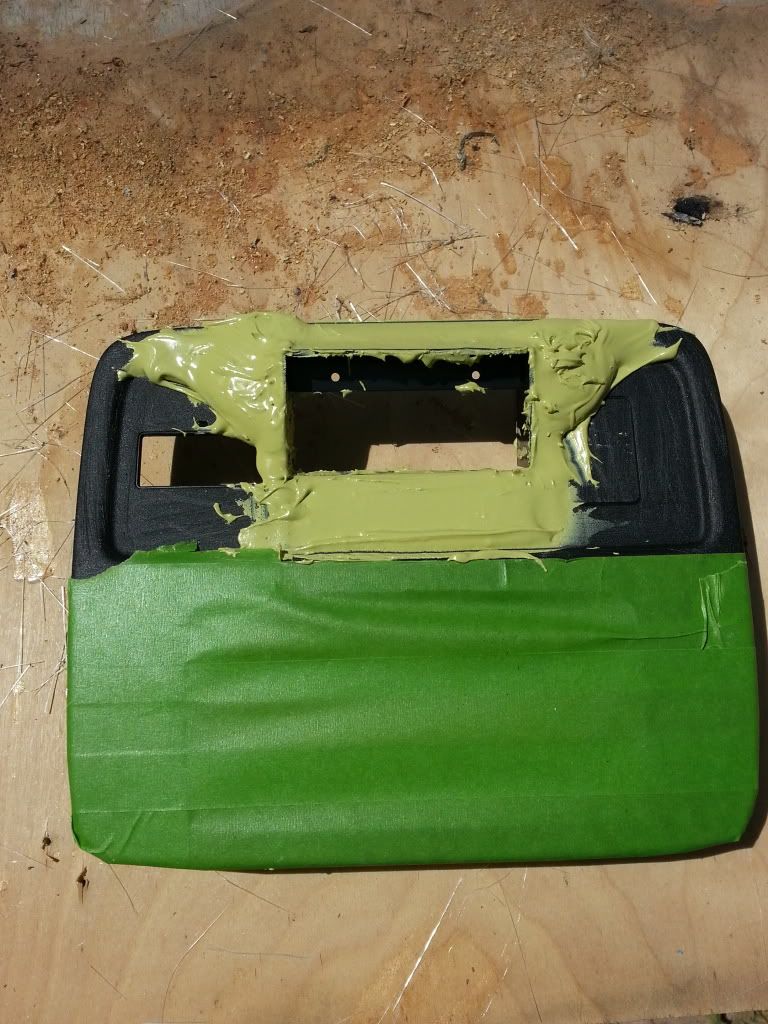 getting the shape in place:  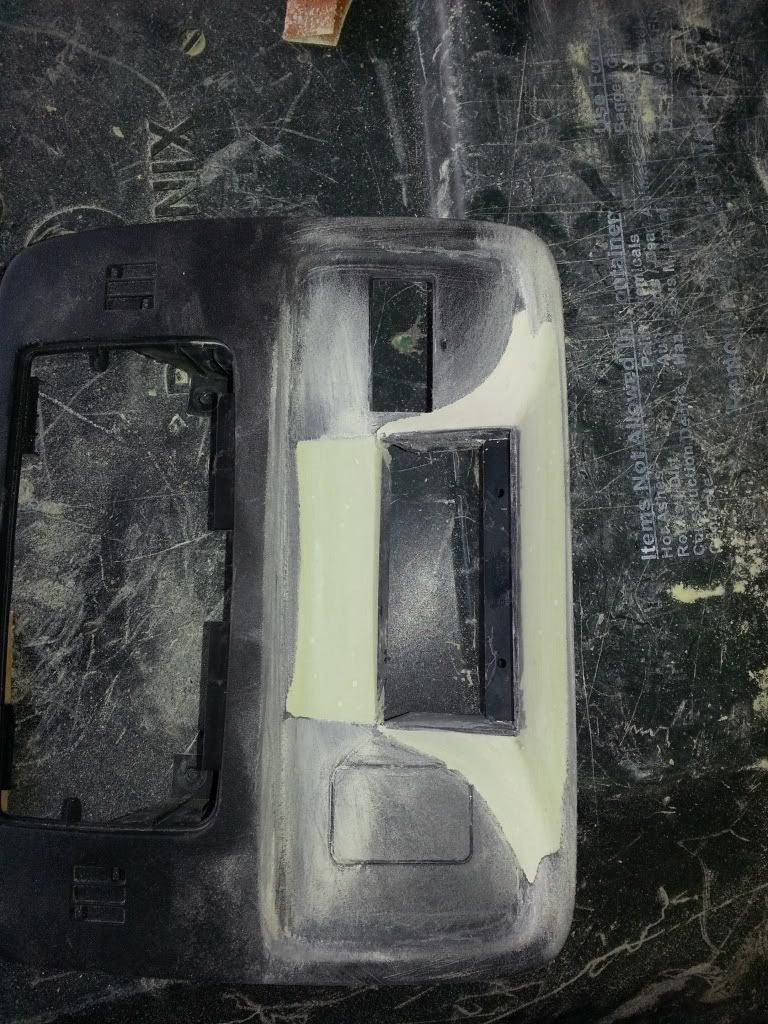 and some primer: 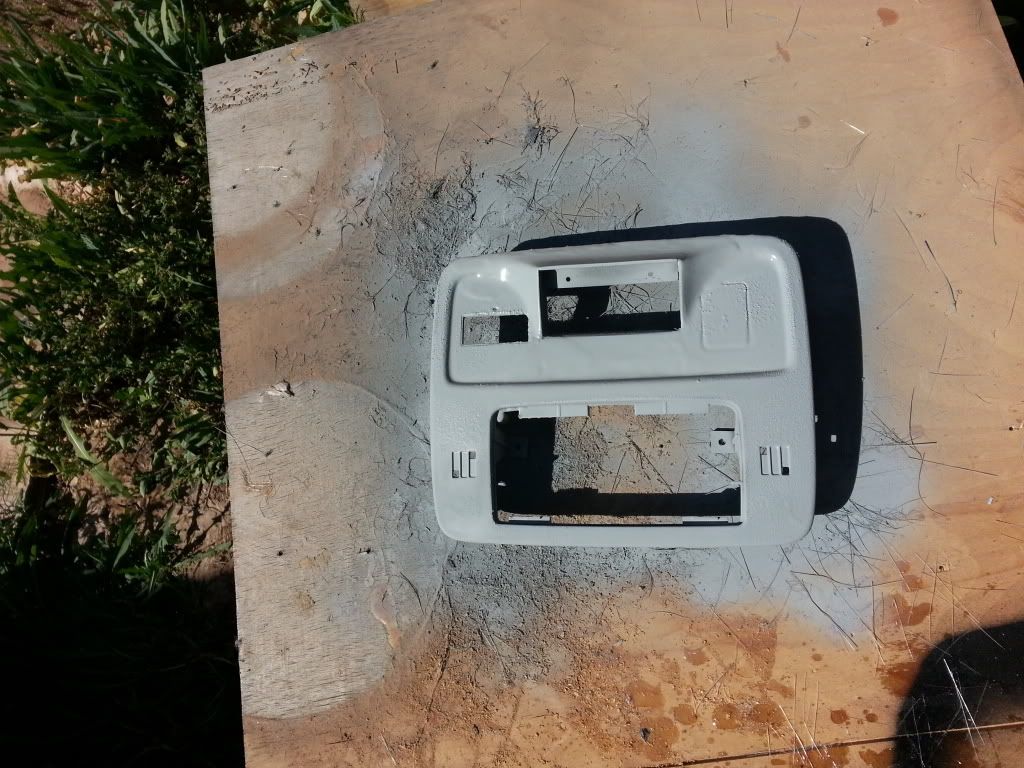 and this is where we end for the day. I got a bit too much primer on there, and am going to have to figure out how to deal with the excess. (it's not fully dried - so I can't sand it) Last edited by mattyjman; 04-06-2013 at 06:53 PM. |
|
|
|
|
04-06-2013, 09:27 PM
|
#17 |
|
Its so hard

Drives: 2010 SS, 2009 Yamaha Warrior Join Date: May 2012
Location: San Antonio
Posts: 295
|
What all did you order from don and can you post a ballpark figure for all of the sound deadining supplies? Like 100-200 200-300 or 300+?
|
|
|
|
|
04-06-2013, 11:18 PM
|
#18 | |
|
Drives: 2013 2SS 1LE Join Date: Mar 2013
Location: United States
Posts: 134
|
Quote:
70 CLD Tiles 1 Roll of Butyl Rope 121 sq ft of MLV 10 sheets of CCF 40 sq ft of Thinsulate 3 Packs of Velcro Strips 32 oz can of HH-66 vinyl cement Here's a link to the site... if you add it all up you'll see ballpark figure for pricing... shipping kills on this stuff cause of weight. http://www.sounddeadenershowdown.com/ |
|
|
|
|
|
04-06-2013, 11:51 PM
|
#19 |
|
Its so hard
Drives: 2010 SS, 2009 Yamaha Warrior Join Date: May 2012
Location: San Antonio
Posts: 295
|
Thanks for the info. I subscribed to the thread so I'll be asking how much you had leftover when your all finished.
Once again I need a second job. |
|
|
|
|
04-07-2013, 12:19 AM
|
#20 | |
|
Aural Assault Vehicle

Drives: 2010 IBM 2SS/RS, 2015 Sierra Denali Join Date: Jun 2011
Location: Garner, NC
Posts: 792
|
Quote:
PM me about the AS300.2's. Maybe we can work something out. That is my trunk in my signature. We have a very good shop that is local - only place I have ever felt like I could trust to work on my car. I did installs back in the 90's and I had to fix a lot of bad work by other "pro shops", so it's really hard for me to trust anyone else to do things the right way. Adrenaline Autosound definitely did it right by me.
__________________
My amplifier pop/click/thump solution thread
Power Mods * K&N Typhoon CAI, Flowmaster American Thunder cat-back exhaust, Hurst Short Throw Shifter Exterior Mods * Black Phantom Grille * 22" T.I.S. 537MS wheels w/ Nitto INVO rubber * OEM body kit Suspension Mods * BC Racing Coilovers * Lakewood Strut Tower Brace Audio Mods * Stinger SPP 2250 Battery * Mosconi 6to8v8 w/ RCD * Pioneer AVH-X7500BT * Scosche Dash Kit * 2 - Mosconi AS200.4 * 2 - JL Audio 13W6v2 * Focal 165KRX2 Power (active) * Mosconi Gladen One 240.2 * Rockford Fosgate Power T1692 |
|
|
|
|
|
04-07-2013, 06:52 PM
|
#21 |
|
Drives: 2013 2SS 1LE Join Date: Mar 2013
Location: United States
Posts: 134
|
well, good news... I'm just an idiot apparently and didn't mix enough mekp... in all fairness, i'm using more mekp/oz of resin than I normally do... I wonder if the materials are any different than the last time I fiberglassed last year... all new materials from US Composites, so.... yeah.
so, while I was starting down today, I'm ending with an up. sort of. my goal today was to have the front baffle spacer attached today, and fiberglass reinforced, ready for the top baffle, volume measurement and inclusion of port tubes. but alas, a lot of today was eerily similar to yesterday.... just with better results. after pulling all the fiberglass from yesterdays snafuu...i went to town taping up both sides again. there are only a few things I hate in this hobby... masking areas... and hanging horns. my pet peeves if you will, and I'll do anything to not have to do them. however, this is DIY and I have to suffer through it... so, after both sides were masked, I started with a fresh layer of mat and resin... the batch started catalyzing before I was finished, so that was a good thing.... it was gelling up good too... 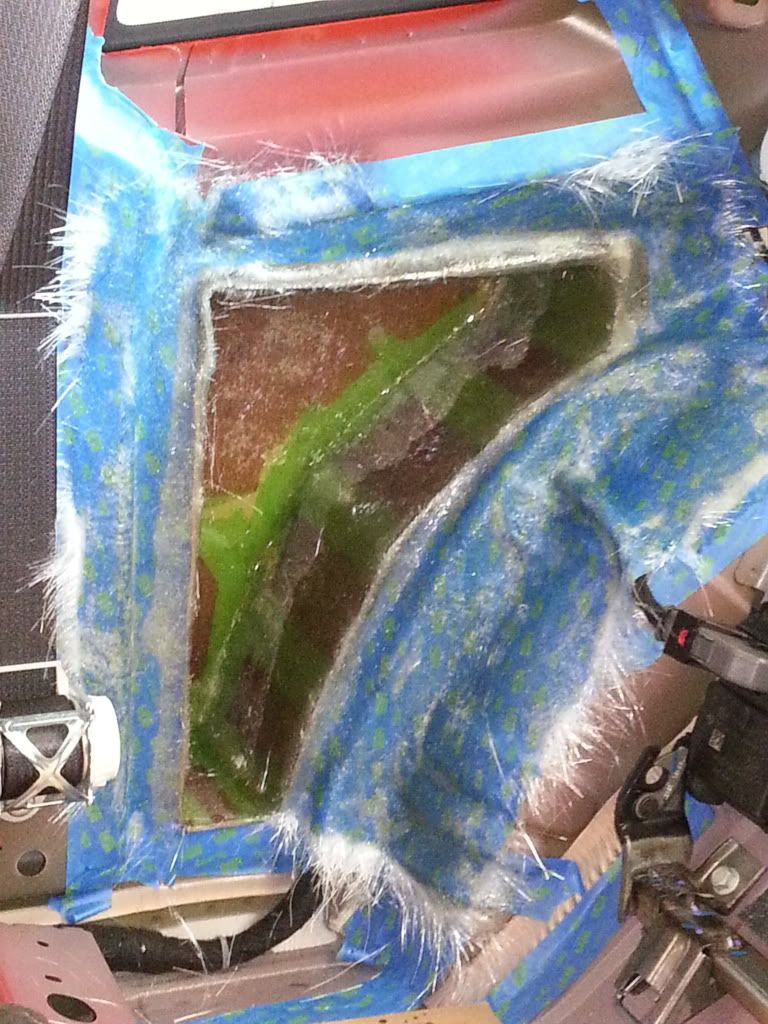 My drivers side insert finally cured... god damnit... so I trimmed that up and masked up the drivers side wall... and then went to town on it with a fresh batch of fiberglass. 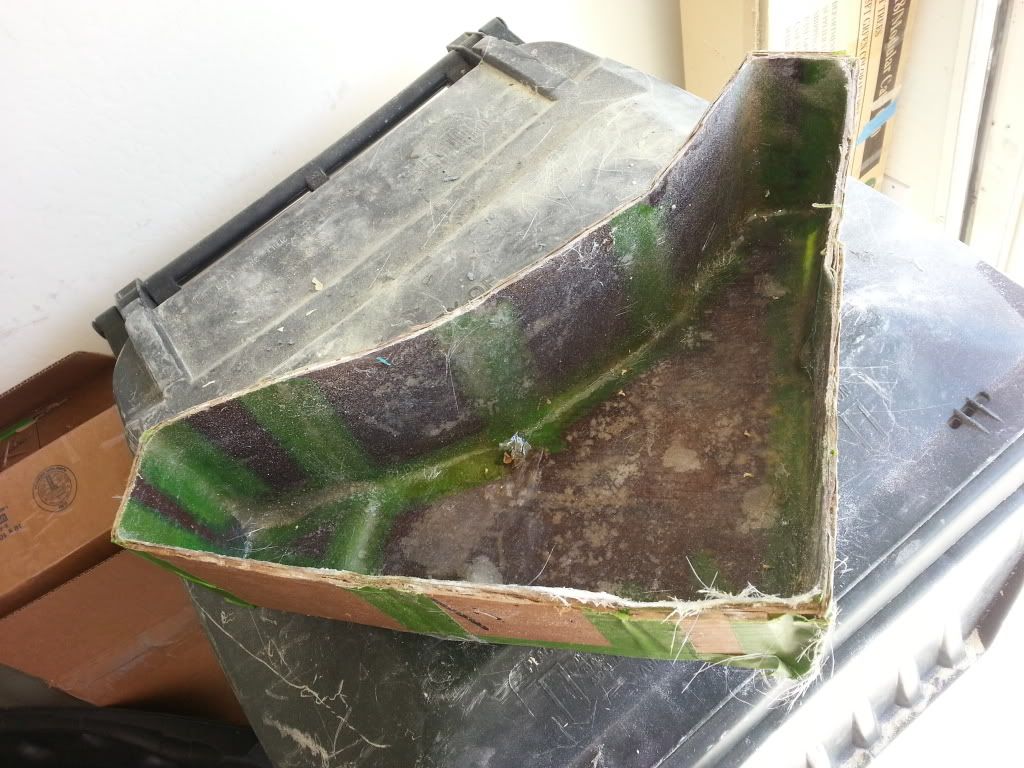 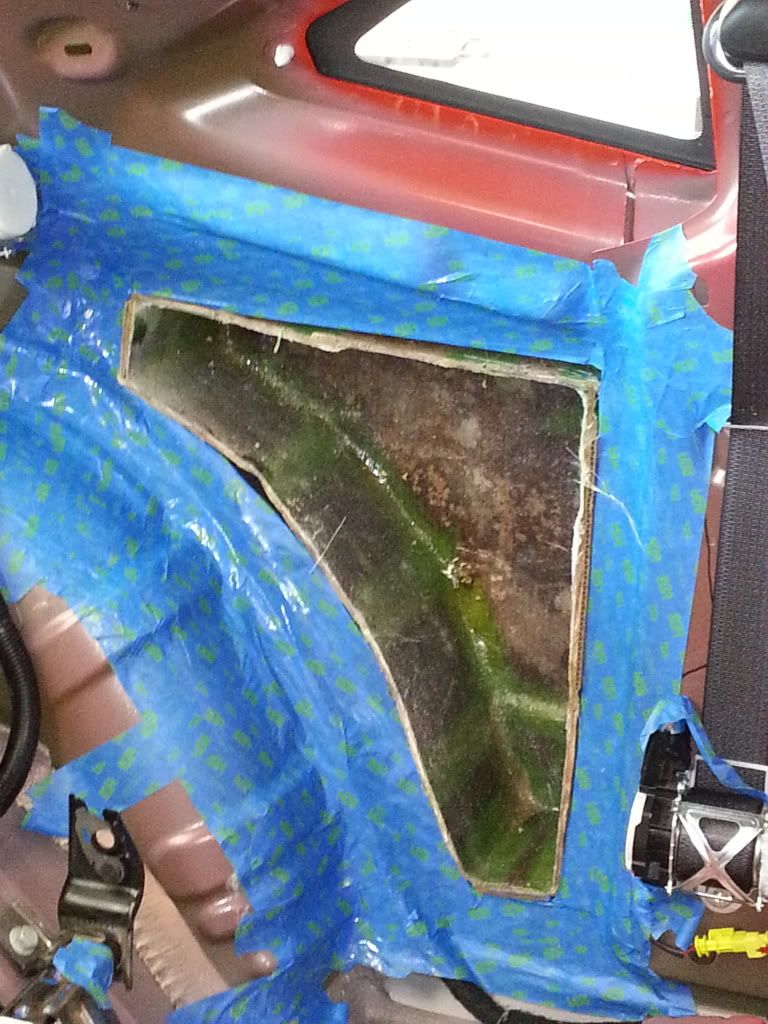 after rolling the car out into the sun, I turned my attention to the other part of yesterday that pissed me off... the center cluster... i had some left over resin, so i used that to fill in any dips, valleys, etc... I know it's not the best, but I didn't feel like mixing up a batch of rage when I already had this. besides, it kinda self levels. It also made some of the softer plastic that got lifted rock hard, so I could sand them down. I couldn't have done that with body filler. only two things bad about resin this way... you have the sand the hell out of it. 2, since it's clear, it still appears in some places to not be smooth... optical illusion that messes with you for sure.. so, sand, sand, sand, sand, fill, sand, sand.... you get the idea. here we are sanded, cleaned and ready for the texture coat... 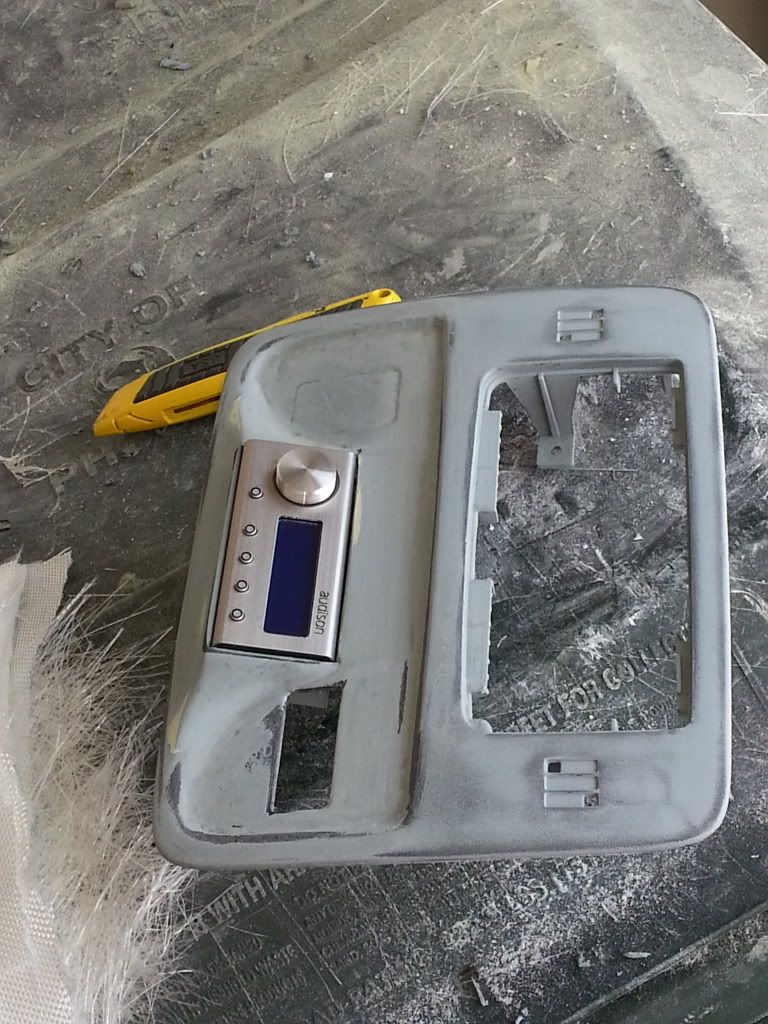 after the texture coat and some sanding, and then SEM paint... 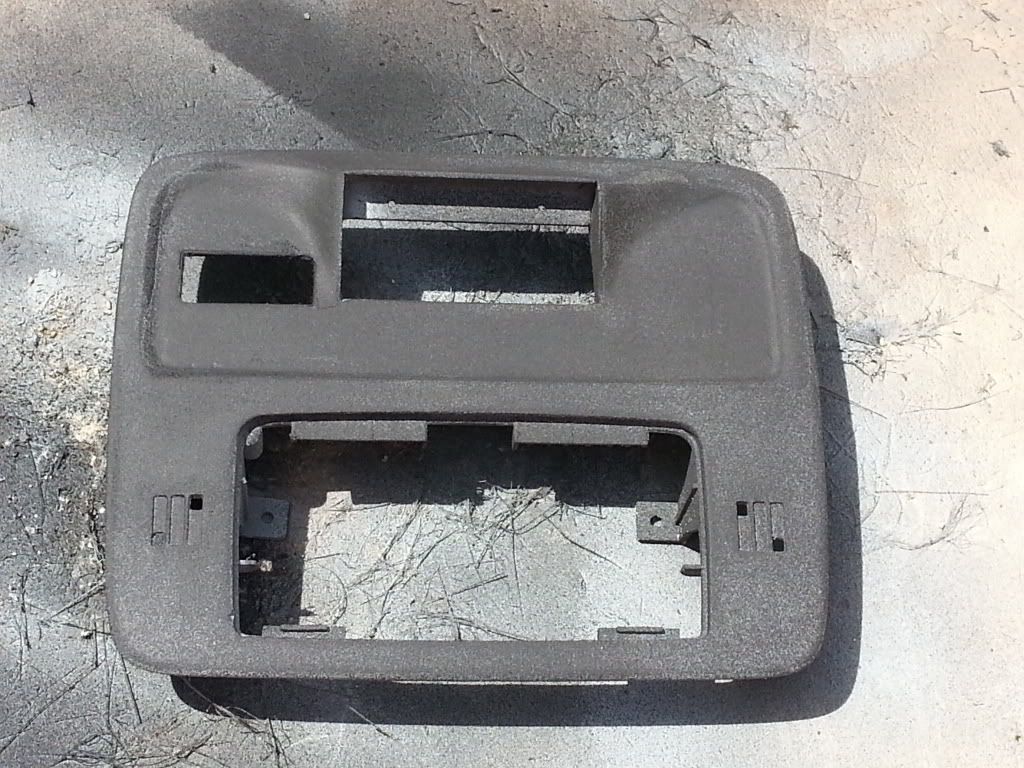 a few more coats of paint, let it dry, etc... and voila... 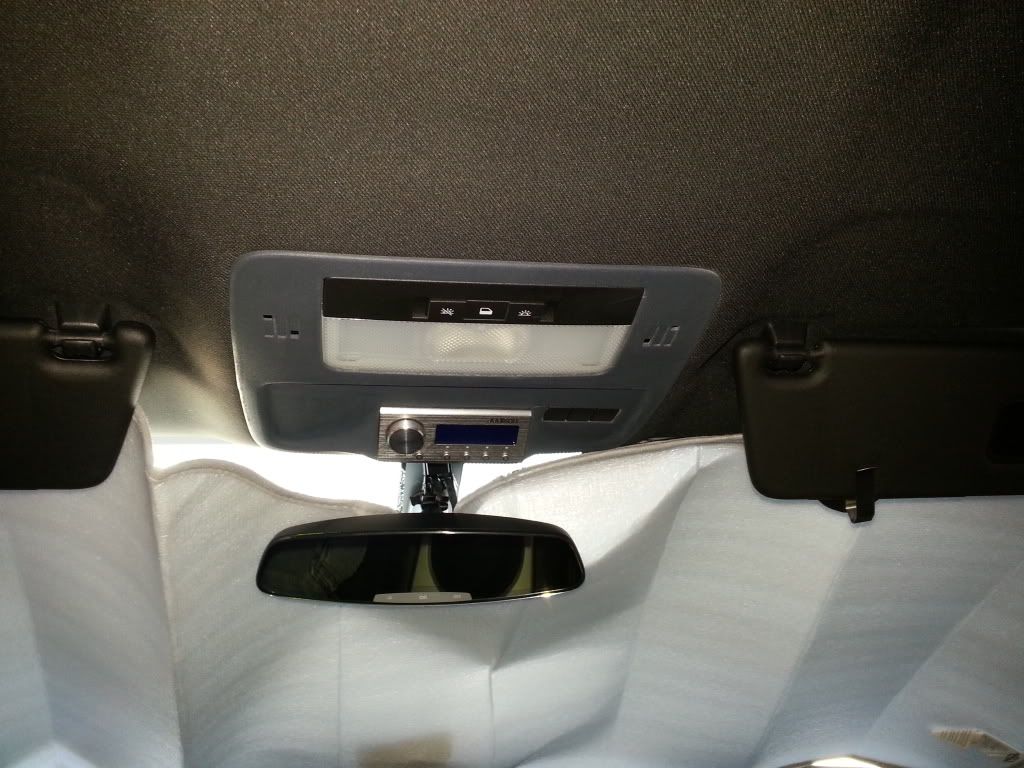 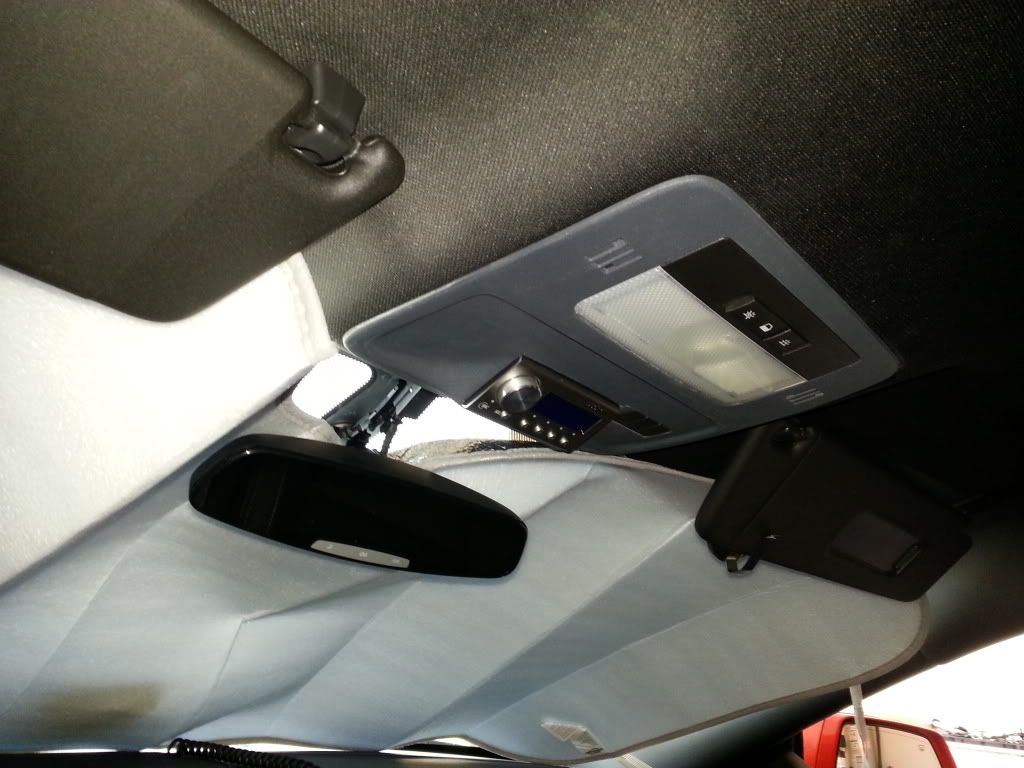 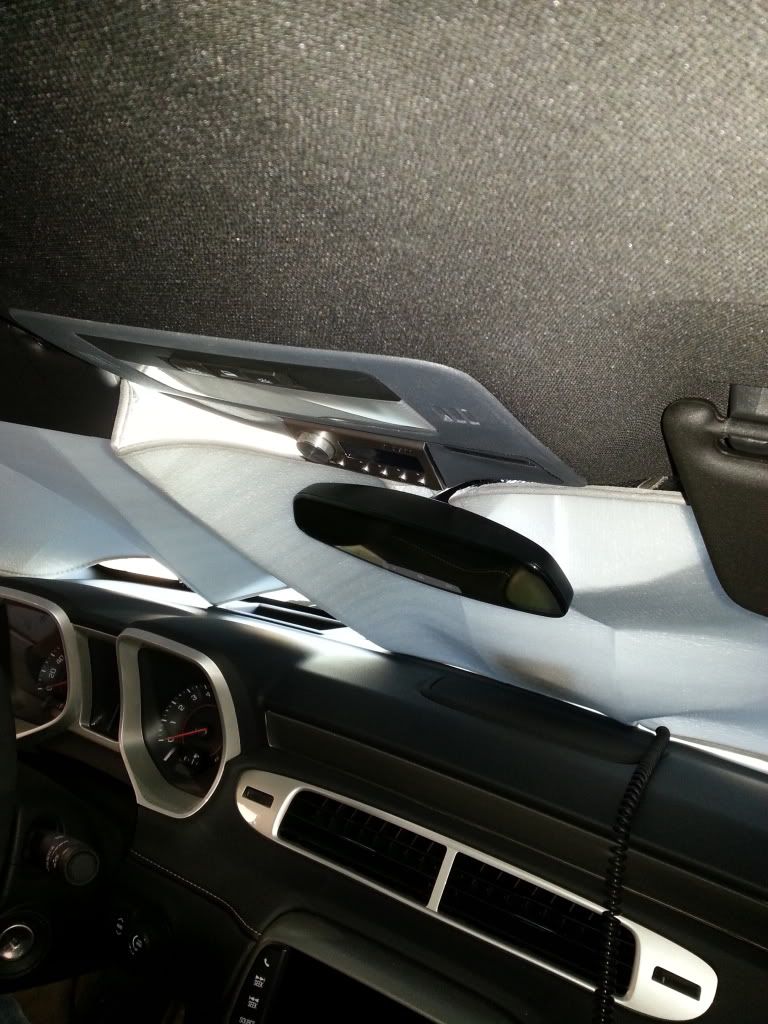 it's not my best work and it was a bit rushed, but it looks great, and I can say I have one more thing I can check off of my to do list... I'm actually pretty happy how it turned out. I just don't get why SEM paint never ever looks like it matches in pictures... oh well.. once this was done I returned to find the quarter panels .... wait for it.... cured!!!!!!!! time to do layer 2... after this, I should be ready to pull them out and form them outside of the car. I'm using heavy chop, so it build up fast, but I should have a minimum of 3 layers everywhere, some 4 layers... can't wait to pull them out... :0 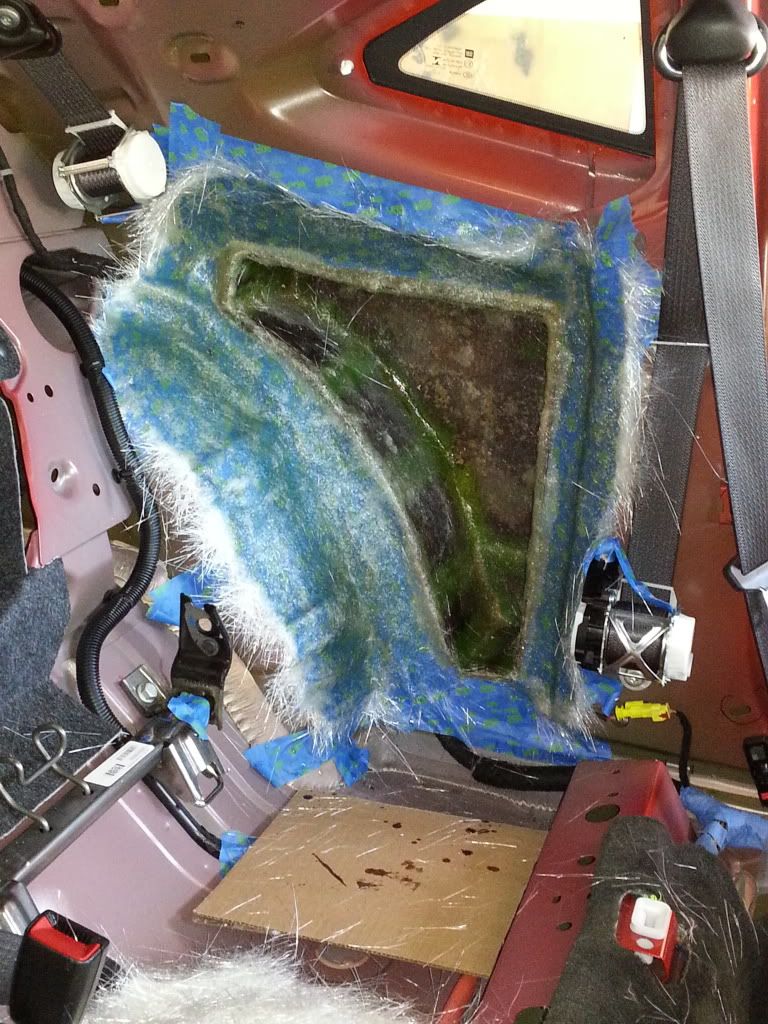 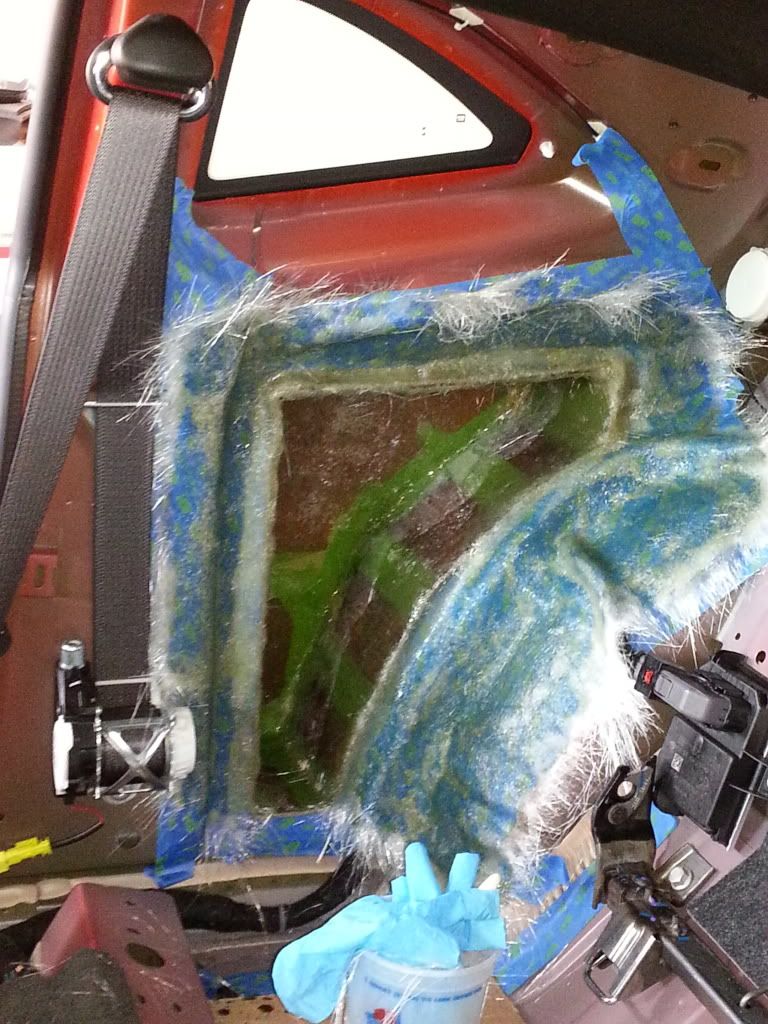 i wonder what type of volume I'm going to be getting out of these. I'm being optimistic, but I'm still not sure I'll have enough to net 1.5 cubes after driver and port displacement... we'll have to see though. I'm definitely stoked about having these drivers in there though.... it's going to be effing sick . |
|
|
|
|
04-07-2013, 07:08 PM
|
#22 |
|
Car Enthusiast

Drives: 2010 Rally Yellow Camaro 2SS A/T Join Date: Dec 2010
Location: Keller, Texas
Posts: 760
 |
Looking good
__________________
 2010 Rally Yellow 2SS/RS 2010 Rally Yellow 2SS/RSPerformance Upgrades: Custom Flowmaster X system Exhaust Audio Upgrades: Too much to write down. Visit http://www.camaro5.com/forums/showthread.php?t=206016 |
|
|
|
|
04-07-2013, 07:13 PM
|
#23 |
|
Do you even lift, bro?
|
SSIIIIIICCK
__________________
My 1LE (645WHP/597WTQ) build/journal Thread:
1st ever 1LE COTW http://www.camaro5.com/forums/showthread.php?t=255461  |
|
|
|
|
04-07-2013, 07:27 PM
|
#24 |
 
Drives: 2017 2SS Hyper Blue Join Date: Apr 2009
Location: North Port,Florida
Posts: 517
|
Incredible---And I'm afraid to rip out the back to get at the rear speakers.
__________________
Mods-Corsa Extreme Axleback
|
|
|
|
|
04-07-2013, 07:31 PM
|
#25 |
         
Drives: 2010 camaro Join Date: Aug 2009
Location: port st lucie ,florida
Posts: 4,273
|
we did similar build..same bit1 ..here is my build if u need any ideas that might help..http://www.camaro5.com/forums/showth...=mikes+extreme
__________________
 |
|
|
|
|
04-07-2013, 07:53 PM
|
#26 | |
|
Drives: 2013 2SS 1LE Join Date: Mar 2013
Location: United States
Posts: 134
|
Quote:
I've used the bit one in every install I've done... love it. |
|
|
|
|
|
04-07-2013, 07:54 PM
|
#27 | |
|
Drives: 2013 2SS 1LE Join Date: Mar 2013
Location: United States
Posts: 134
|
Quote:
|
|
|
|
|
|
04-08-2013, 03:13 PM
|
#28 |
 Drives: 45th Anniversary Edition 2012 2SS Join Date: Jul 2012
Location: San Diego
Posts: 79
|
Really really nice looking. On a side note, whose that model you "accidentally" posted?
__________________
 |
|
|
|
|
|
|
|
 |
|
|


