You are browsing camaro5 

|
 05-09-2014, 04:07 PM
|
#29 |
 
Drives: (sold) 2011 2LT/RS auto, SW/tan top Join Date: Jul 2011
Location: Driftwood, TX (Austin area)
Posts: 162
|
Defective file on DVD
I just went through the videos on the DVD this morning; all would play except #9.
I checked the disc, and there is no visible debris or imperfection. I cleaned it anyway with the appropriate cleaning solution and a microfiber cloth; no joy. Any possibility someone could upload it to Dropbox and provide a link? And where's the link where I can contribute to the "Buy Ofer a New T-shirt" fund? 
|

|

|
|
05-09-2014, 05:59 PM
|
#30 |

Drives: 2014 Z/28 #82+#192, 18ZLE 66Nova Join Date: Oct 2008
Location: By the lake in AZ
Posts: 15,728
|
That is a work t-shirt, no need for a fund.
|
|
|
|
|
05-09-2014, 06:29 PM
|
#31 |
         
Drives: 2LS 2014 Join Date: Oct 2013
Location: Staten ISland
Posts: 3,404
|
THANKS!! for the info

__________________
 |
|
|
|
|
05-09-2014, 07:46 PM
|
#32 | |
|
RIP Betsy ( Vitara )

Drives: '11 SGM 1LT/RS Join Date: Oct 2012
Location: Ottawa, Ontario
Posts: 1,178
   |
Quote:
__________________
 First retrofitted 2014 mylink. |
|
|
|
|
|
05-09-2014, 10:17 PM
|
#33 |
|
Custom User Title :D

Drives: 2011 Summit White 2LT/RS Join Date: Dec 2009
Location: Bolingbrook, IL
Posts: 2,342
|
Soooo in the video for the T-Tap, it shows that the connector lock has to be pulled out first then do the T-Tap... but I don't get why the connector lock has to be messed with since we're not taking the wire out... ?
__________________
 |
|
|
|
|
05-09-2014, 10:25 PM
|
#34 |
|
Custom User Title :D
Drives: 2011 Summit White 2LT/RS Join Date: Dec 2009
Location: Bolingbrook, IL
Posts: 2,342
|
I'm part way through the removal of the parts to get this done, but quit for the night due to lack of light. Just a couple of pointers/tips that might help others -
1 - When removing the two phillips head screws at the base of the rear of the console, if you don't have a 1/4" swivel adapter handy, you can use a 1/4 ratchet, 1/4" socket and put a 6-sided phillips bit in the socket. 1a -also, when removing the two phillips head screws at the base of the rear of the console, first, unplug the 3 connectors from the back of the console, they seemed to be in my way for the driver's side screw. (two are squeeze clips, and the middle one you need to pry up gently on the metal tang to release it)
__________________
|
|
|
|
|
05-10-2014, 12:52 AM
|
#35 | |
|
Drives: 2014 Z/28 #82+#192, 18ZLE 66Nova Join Date: Oct 2008
Location: By the lake in AZ
Posts: 15,728
|
Quote:
|
|
|
|
|
|
05-10-2014, 07:34 AM
|
#36 | |
|
US Veteran

Drives: 2011 Silver Ice Metallic 2SS/RS A6 Join Date: Jan 2011
Location: Bossier City, La
Posts: 1,407
|
Mylink Install
Quote:
Trying to decipher, sorry: For BA system cars you do not need to do this step? Non BA cars need to do this step? Just trying to clarify.
__________________
Dear Lord, give me the strength to carry on despite my Camaro addiction!
JRE iTSX tune, full cat-less Dynatech exhaust, CAI intake, Stillen Slotted/Drilled Rotors, RB braided brake lines, BMR lowering springs, (reserved for definite future MODS) |
|
|
|
|
|
05-10-2014, 07:42 AM
|
#37 |
|
US Veteran
Drives: 2011 Silver Ice Metallic 2SS/RS A6 Join Date: Jan 2011
Location: Bossier City, La
Posts: 1,407
|
For all those with mobile devices that do not have DVD players(iPad). I'll convert the DVD for myself and I wouldn't mind uploading them somewhere we could all access them. The problem is I don't know where to do that. It's not something I've ever needed to do. Anyone have any ideas? I'd also need permission from gen5diy if we think it's feasible to do.
__________________
Dear Lord, give me the strength to carry on despite my Camaro addiction!
JRE iTSX tune, full cat-less Dynatech exhaust, CAI intake, Stillen Slotted/Drilled Rotors, RB braided brake lines, BMR lowering springs, (reserved for definite future MODS) |
|
|
|
|
05-10-2014, 10:05 AM
|
#38 | |
|
Custom User Title :D
Drives: 2011 Summit White 2LT/RS Join Date: Dec 2009
Location: Bolingbrook, IL
Posts: 2,342
|
Quote:
If you do NOT have BA, you are missing the white wire, and either need to wait for GEN5DIY to send it to you, or if you somehow have another terminal/wire that would fit...
__________________
|
|
|
|
|
|
05-10-2014, 10:06 AM
|
#39 |
|
Custom User Title :D
Drives: 2011 Summit White 2LT/RS Join Date: Dec 2009
Location: Bolingbrook, IL
Posts: 2,342
|
Argh. Finding it frustrating that all of the wires in the new radio plug are the same colors (minus the green) and mine weren't separated or marked as to which goes to the onstar box and which go to the faceplate. Trying to find info...
On Edit: Found the info needed in this pic: (the green/red/black/bare wires for faceplate are separated together here) 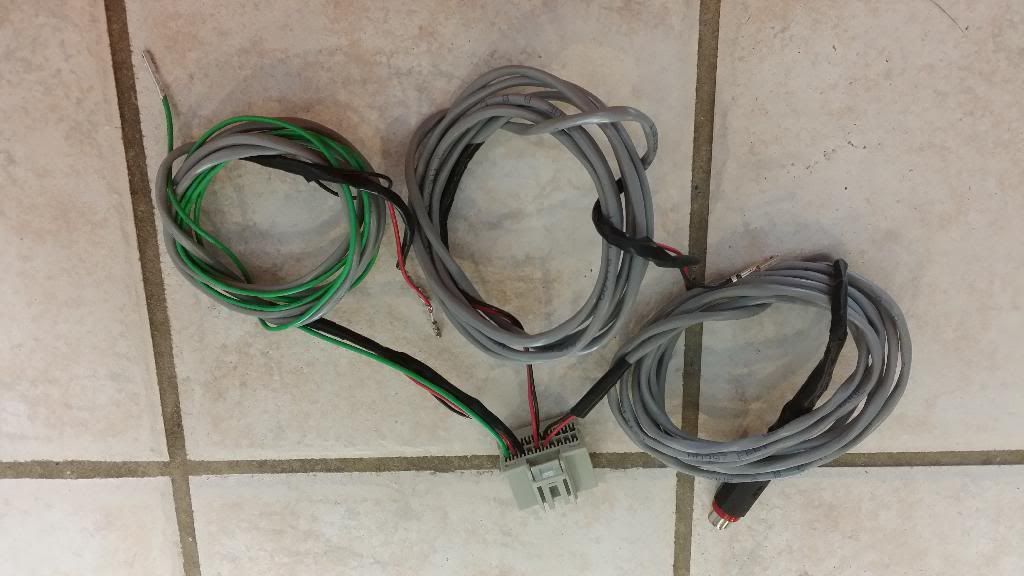
__________________
|
|
|
|
|
05-10-2014, 11:19 AM
|
#40 |
|
Drives: 2014 Z/28 #82+#192, 18ZLE 66Nova Join Date: Oct 2008
Location: By the lake in AZ
Posts: 15,728
|
all 2 ft wires go to AC connector, the long wires go to onstar and RCA video.
|
|
|
|
|
05-10-2014, 11:26 AM
|
#41 |
|
COTW 12/3/12

Drives: 2012 Ashen Gray ZL1 Join Date: Aug 2011
Location: Glen Carbon, IL
Posts: 3,279
|
Ok, so I am trying plugging the wires into the factory harness and the green wire is giving me fits. It won't lock into place and now the crimp connector just broke off in the harness. Any suggestions on how to get it out? The rest of them popped in right away.
__________________
 |
|
|
|
|
05-10-2014, 11:28 AM
|
#42 | |
|
US Veteran
Drives: 2011 Silver Ice Metallic 2SS/RS A6 Join Date: Jan 2011
Location: Bossier City, La
Posts: 1,407
|
Quote:
Jewelers screwdriver, push from the other side. ??
__________________
Dear Lord, give me the strength to carry on despite my Camaro addiction!
JRE iTSX tune, full cat-less Dynatech exhaust, CAI intake, Stillen Slotted/Drilled Rotors, RB braided brake lines, BMR lowering springs, (reserved for definite future MODS) |
|
|
|
|
|
|
|
|
 |
|
|


