You are browsing camaro5 

|
 05-29-2015, 12:04 PM
|
#15 | |
|
Account Suspended
Drives: 2013 1LE Join Date: Jan 2013
Location: Mass
Posts: 162
|
Quote:
With that said in my experience I believe to be safer to offer advice based on driver experience level than any other unknown. In this case it appears that the driver does not have a lot of experience if any. Therefore I believe the stock compound to be sufficient for street tires. My personal choice of brake pads for my car is first dependent on my tires, the suspension setup, mechanical, and perceived aero traction of my car as well as my experience with different brake pad manufacturers. I'm willing to readily admit I am no race car professional but I do not generally pick a compound based on the specific track driven with exception to autocross courses where I always use a street based pad. I know I have lot to learn and willing to listen to new advice. Last edited by Abdi; 05-29-2015 at 12:07 PM. Reason: Grammar |
|

|

|
|
05-29-2015, 01:43 PM
|
#16 | |
 
Drives: 2013 1LE Join Date: Jul 2013
Location: Newtown Square, PA
Posts: 147
|
Quote:
|
|
|
|
|
|
05-29-2015, 01:46 PM
|
#17 | |
|
Drives: 2013 1LE Join Date: Jul 2013
Location: Newtown Square, PA
Posts: 147
|
Quote:
|
|
|
|
|
|
05-29-2015, 01:53 PM
|
#18 | |
|
Drives: Camaro Justice Join Date: Jun 2007
Location: Virginia
Posts: 20,171
|
Quote:
Listen to your instructor. Go easy. Work your way up to speed. Run two or three hot laps and then take a lap light to let your brakes cool and get your mind refocused. Then hit it hard again. If you enjoy it and plan to go back you should upgrade your pads and brake fluid. Nothing ruins a track day faster than over heated fluid or pads that we are willing to put in a post  http://winhpde.com/track-guide/njmp-lightning/ 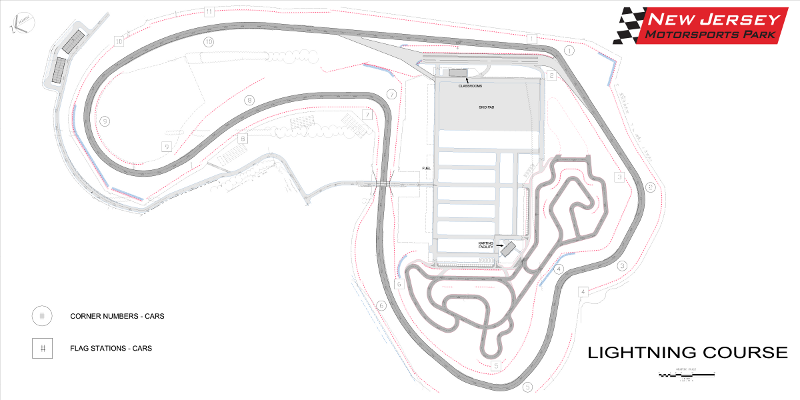 Lightning is a short course, more so in terms of lap time than distance. It is a medium-high speed course, especially for its length. Lightning flows very well and most people find it a joy to drive. In fact, quite a few people prefer Lightning to Thunderbolt despite Thunderbolt being longer and having more turns. Blend Line Pit exit is just past turn 1. Stay all the way right until the apex of turn 2 when you are entering the track. Turn 1 This is a totally blind right hander going over a hill. Start by turning in at the "zero" marker, or a turn in cone if there is one. Touch the apex curbing with right front tire and aim for the center line of the track over the crest. Slowly and smoothly unwind steering to have very little steering angle by the time the car crests. The car should actually crest about 3/4 toward the left edge of the track; continue tracking out until the left edge on the downhill. I have not been able to find anything to look at between the turn in point and the crest. The hill is tall enough that it obscures everything beyond itself. Turn 1 requires consistency and memory - including muscle memory. Turn in at the same point and hit the apex which you can see going up, and the car should fit into the pavement on the other side. You should know by the time you get to the crest if the car is off its desired trajectory, and if so, the corrective action is to stay off throttle but continue to unwind steering. Inside wall between turns 1 and 2 has claimed many cars; if you are not fitting into the pavement on the downhill, straighten the steering wheel, drive 2-off with the car parallel to the track, regain control of the car and return to pavement. Watch out for a gap just outside of the curb - straddle the gap to avoid scraping suspension parts on the curb, then return to pavement. Less experienced and less aggressive drivers take turn 1 as a medium speed turn. In reality, turn 1 is very fast. Because the turn is uphill, the car loses a lot of speed prior to the crest, which requires much less braking prior to the turn. Another consequence of the hill is that the car has much more grip going up which permits significantly higher mid-corner speed. More experienced and more aggressive drivers will be braking much later and turning in earlier and carrying a lot more speed over the hill. The turn is still a late apex turn with nearly all of the rotation happening prior to the crest. Higher horsepower cars especially want to crest just about straight, which will permit partial throttle application just before the crest with full throttle just past the crest. When brake markers are set up on the track, less experienced or more conservative drivers will want to turn in approximately where "0" brake marker would be. Intermediate drivers can try about "1/2" brake marker. Momentum cars carrying a lot of speed into turn 1 can turn in as early as the "1" brake marker. Turn 1 has a good amount of curbing at the apex. Some cars use it, some do not. In just about any car you should be flat out from the apex of turn 1 forward. If using the curb unsettles the car to the point where you have to wait to get on power until past the apex, or lift, then you are likely better off not using the curbing. If you can drive flat out over the curb, doing so will smoothen the corner. Cars with softer, street suspensions are more likely to be able to run over the curbing flat out than cars with stiffer, race suspensions. There are actually two levels of curbing; the first level is the one closer to the pavement and is flatter, the second level is significantly taller. Generally speaking, cars will be getting airborne over the second level of curbing. There is a spot on the second level that both allows a great line to be taken through the turn in terms of angular flatness and is not as elevated as surrounding curbing. However being slightly off that spot will unsettle the car significantly. Turn 2 This turn is partially a turn and partially a straightaway. It is followed by the slower turn 3, and therefore the idea in turn 2 is to carry as much speed as possible from the straightaway between turns 1 and 2 while setting up for turn 3. Many cars will not hit the apex of turn 2, instead moving from left coming out of turn 1 to mid track through the middle of turn 2 back to all the way left to set up for turn 3. Depending on the car's composure through this turn, throttle application may be possible through the early part of the turn. At the end of turn 2 most cars will brake for turn 3, although cars with high grip to horsepower ratio can bleed off enough speed by lifting alone. An alternate line through turn 2 is to hit the apex and not track out all the way to the left between turns 2 and 3, but rather stay about a car width off the left edge, get the car parallel to the track between turns 2 and 3, and turn into 3. High grip cars can find this line working better. Cars that have pronounced understeer, commonly found in street cars on street tires, will benefit from timing brake release to be just prior to to turn in, to rotate the car better into the turn. Cars that are neutral will rotate enough simply driving turn 2 off power, and cars that oversteer may need to start braking earlier, and brake gentler, to avoid transfering too much weight from the rear tires to the front and going into a drift. Turn 3 This is the second part of the turn 2 - turn 3 sequence. Start all the way on the left and position the car on the right side parallel to the track past the apex. Effectively this is an extremely late apex turn. If using the alternate line through turn 2, you will not be turning in from the left edge of the track but you still want to hit the apex in turn 3 and come out close to the right edge between turns 3 and 4. Cars that are neutral or tend to oversteer may find themselves rotating excessively under braking or lifting for turn 3. At this point compromising speed through turn 2 may be necessary to reduce the amount of braking done for turn 3 or outright speed through turn 3. An alternative is to brake in a straight line which moves the braking zone somewhat earlier. As with turn 2, understeering cars will benefit from timing brake release and turn in to achieve better turn in while oversteering cars may need to be gentle with brakes to avoid spinning. Turn 4 This is a fairly straightforward left hander. At lower speeds which are usually correlated with less experienced drivers there is a very small bit of track between turns 3 and 4 where the car is moving straight parallel to the track. If this happens take care to not enter turn 4 too early. At higher speeds the straightaway between turns 3 and 4 is eliminated and the car transitions from a right turn in 3 to a left turn in 4. If you drive like this, it is important for the right to left transition to be smooth to avoid excessive rotation into 4. Cars with pronounced understeer, as may be found in street cars on street tires, can benefit from brushing the brake pedal prior to turn in to create weight transfer forward. Because there is a short straight between turns 4 and 5, exit speed out of 4 makes a difference in lap time. For best results, start accelerating before the apex of 4 through the entire turn. Use entire track width at the exit of 4; there is not much runoff but the exit curb is very flat and can and should be used if necessary. For best lap times, aim to position the car just on the edge of the curb, and if you get a better exit do use the curb. If you are using the exit curbing because the car will not hold any tighter line through turn 4, you have good speed through turn 4. Turn 5 Fairly quick and mostly blind right hander cresting a hill. This is probably the most dangerous turn on the track, with many cars going off at the exit due to either not turning enough before the crest (less experienced drivers) or excessive entry/mid-corner speed (more experienced drivers). Exit is off-camber and not particularly wide, especially for high horsepower cars, although all of the track width there should be used in just about any car. If you are new to the track, restraint is strongly advised in this turn. There are several possible ways of taking this turn. As it is followed by what is effectively a substantial straightaway, exit speed is paramount for a good lap time. In turn obtaining respectable exit speed involves being on power before the crest, and consequently keeping the tires hooked up over the crest. You want to minimize wheelspin while cresting the hill, for which you should try to crest with the front tires as straight as possible. This makes the corner similar to late apex corners in that you get most of the cornering done early, then maintain minimum steering angle over the crest. You should be on power from slightly before the crest onward. If you are getting on power on the downhill, try to straighten the car over the crest by getting more of the turning done earlier (essentially, execute a later apex) or be smoother. Use entire pavement width on corner exit but be careful with running out of pavement in high horsepower cars. Turn 6 This is labeled as a turn but is effectively a straightaway. Stay track right through the curve. Most cars should be able to hug the right edge of the track while accelerating flat out. Turn 7 Tight left. This is probably the slowest turn on the track. It also has a deceptively early apex. Many drivers miss the apex in this turn because they are too concentrated on braking leading up to the turn and are not looking for the apex early enough to point the car toward it. Similarly to turn 4, using exit curbing because the car will not hold a tighter line is an indicator of good mid-corner speed. As turn 7 is followed by a substantial straightaway, you should be on power at least from the apex forward. Turn 8 Another turn that is not really a turn. Transition from track right to track left to hug the apex, and move about 1/3 track width left to set up for turn 9. Turn 9 Also known as "the bowl" or "the lightbulb". A number of lines are possible, but similar to turn 5 exit speed is crucial because this turn leads onto the main straight. Once you get on power, which should happen significantly before what is a very late apex, you should be flat out until the braking zone in turn 1. The two basic DE/TT lines through turn 9 are what I will call a low power line and a high power line. The low power line, suitable for cars with not much power and a fair to high amount of grip, is a very gently tightening arc: An a Miata on R compound tires, I enter about 1/4 track off the left edge around point A. Depending on exact power and grip of the car, one of the following might be necessary: Brush on the brakes to bleed off a bit of speed; Lift to bleed off even less speed; Lift just to rotate the car; Entry under full power (well set up Miatas on good R compounds, for instance). From the entry point the low power line very gently tightens until it touches the apex curb around point B, typically around 1/2-2/3 of the way through the curb. The line continues with the same curvature past the apex, with the car effectively tracking out as the track surface flattens. Low power cars can track out to the beginning of the exit curb or to the middle of it. A high power line is very different: The entry is much closer to the right edge of the track. If you look at the right edge of the track early in turn 9, while the car is between turns 8 and 9, you will see what looks like two apex points sticking out of the grass. Touch the second "apex" which is point A. While in this section of the turn the car should be nearly straight. The goal is to stay on power for as long as possible - for example, a Corvette on R compound tires might be flat out until the corner station F. Then, brake pretty hard, still largely in the straight line, while crossing the track from the inside edge to the outside edge. You will need to start turning as you approach the outside edge, and correspondingly reduce the braking effort. As the car is crossing the track, look at the top of the wall that is on the outside of the turn. The wall changes direction at point E, which is exactly where you should aim the car. Get all the way to the outside edge of the track. Just as the car gets to the outside edge at point B you should be approaching the point from which you can see the very late apex C. When you get to B, turn the car toward the apex. You should do most of the required rotation - up to 80% for high power cars on street tires - at point B, with the remaining 20% happening between B and track out point D. The turn should still be smooth - don't throw the car into the turn - but you should be turning a lot at B and immediately starting to unwind steering as the car begins to drop on the banking. You should be at full throttle by the time the car crosses track center line, and way before the apex. The track seems to have more grip on the lower 2/3 of the pavement in the bowl than on the upper 1/3. Street cars with novice/intermediate drivers generally do not notice this and can go out to the left edge of the pavement following the high power line. Advanced drivers may find it faster to stay on the bottom 2/3 of the track. Novice drivers typically execute an early apex in turn 9 by moving track right/"down the bowl" too soon and too quickly and hugging the right edge of the track through most of the turn. This delays power application until way past the apex, and combined with the fact that the car is coasting through most of the turn makes for very high lap times. Turn 10 This is the right bend between the lightbulb and the main straight. For most intents and purposes it is a straight. The fact that it is a bend comes into play in 3 scenarios: You are following a car on the left edge of the track. If you forget that the track curves right you can continue driving straight and off track as the car you are following blocks your view of the pavement. There is a pretty nasty pothole right at the end of curbing that you are likely to hit. You are on the left side of the track and give a point by on the right. The car passing you forgets that the track curves right and forces you off pavement. You are the passing car and forget that the track curves right. You fit into pavement because you started on the right side but you push the car you are passing off pavement. If the lightbulb is executed optimally you should touch the apex of turn 10 on the right side. Rain Lines Lightning has a number of spots on the track where water accumulates in puddles and rivers, and more spots where water crosses the track in rivers. Turn 1 Due to the braking zone being uphill there is still generally good grip approaching turn 1. If you are coming in a little too hot, maintain composure and you will probably make it. Turn 2 An angular line through turn 2 toward turn 3 can make sense due to reduced speeds and keeping the car longer on straight lines. Turn 4 There are slick spots on the dry line both entering and exiting turn 4. There is also a puddle forming around the apex in this turn which can become a small lake in heavier rain. A rimshot line may be beneficial, alternative might be a very late apex followed by a curb cut. Turn 5 There is a river crossing the track at the exit of turn 5 in hard enough rain. The river is not wide but you probably do not want to maintain full throttle over it. Turn 7 The pavement is uneven in the braking zone for turn 7 after the bridge. There are many puddles forming and staying all over the track there. In heavy rain a river tends to form under the bridge between turns 6 and 7. As turn 7 is a slow turn, it is advised to start braking significantly earlier than normal when standing water is seen anywhere on the track. There is a big lake forming at the apex of turn 7. Turn 7 exit has a slick spot right where the dry line is, which is very annoying. Possible rain lines through turn 7 are a rimshot followed by later power application or an aggressive apex cut with rapid unwinding of steering. Turn 9 There is a river crossing track right in the braking zone for turn 9. It is wide enough that getting off the brakes for a second may be a good idea. Turn 9 itself, due to banking, is much drier on the outside than it is on the inside. The outside is much longer to travel though. Due to the length of the turn a rimshot delays power application significantly. A rimshot is one possible line; I often run a later than normal apex but still hit the apex on the inside in an effort to flatten out my exit earlier, and therefore be on power earlier. |
|
|
|
|
|
05-29-2015, 01:54 PM
|
#19 |
|
Drives: Camaro Justice Join Date: Jun 2007
Location: Virginia
Posts: 20,171
|
Forgot to say learn the track by memory and watch as much in car video as you can find for lightning. The better you know the course, the easier it is to run safely and be fast.
|
|
|
|
|
05-29-2015, 03:19 PM
|
#20 |
|
Drives: 2013 1LE Join Date: Jul 2013
Location: Newtown Square, PA
Posts: 147
|
so far the biggest issue for me with HPDE was to figure out the logistics —*when to arrive, what to look for, etc. I can't seem to find info on that
|
|
|
|
|
05-29-2015, 03:22 PM
|
#21 | |
|
Drives: Camaro Justice Join Date: Jun 2007
Location: Virginia
Posts: 20,171
|
Quote:
|
|
|
|
|
|
05-29-2015, 03:47 PM
|
#22 | |
|
Drives: 2013 1LE Join Date: Jul 2013
Location: Newtown Square, PA
Posts: 147
|
Quote:
|
|
|
|
|
|
05-29-2015, 03:50 PM
|
#23 | |
|
Drives: Camaro Justice Join Date: Jun 2007
Location: Virginia
Posts: 20,171
|
Quote:
|
|
|
|
|
|
05-29-2015, 03:58 PM
|
#24 | |
|
Drives: 2013 1LE Join Date: Jul 2013
Location: Newtown Square, PA
Posts: 147
|
Quote:
|
|
|
|
|
|
05-29-2015, 04:05 PM
|
#25 | |
|
Drives: Camaro Justice Join Date: Jun 2007
Location: Virginia
Posts: 20,171
|
Quote:
For your car https://www.nasaproracing.com/hpde/preparing.html For you, the tracks typically open early. Plan to be there early say 7. That will give you time to find your way around. |
|
|
|
|
|
05-29-2015, 04:20 PM
|
#26 | |
|
Drives: 2013 1LE Join Date: Jul 2013
Location: Newtown Square, PA
Posts: 147
|
Quote:
|
|
|
|
|
|
06-01-2015, 12:49 PM
|
#27 |
|
corner barstool sitter

Drives: 08 Mustang GT, 19 WRX Join Date: Jul 2012
Location: Eastern Time Zone
Posts: 6,990
|
Hope you chose to stay over at one of the Millville area hotels.
Norm
__________________
'08 GT coupe 5M (the occasional track toy)
'19 WRX 6M (the family sedan . . . seriously)  |
|
|
|
|
06-01-2015, 08:22 PM
|
#28 |
|
Drives: 2013 1LE Join Date: Jul 2013
Location: Newtown Square, PA
Posts: 147
|
No, I drove in the morning and got back to PA. I had a lot of fun and got upgraded to Group 2, now will definitely need to upgrade brakes.
|
|
|
|
|
|
|
|
 |
|
|


