You are browsing camaro5 
|
|
 05-24-2009, 12:40 PM
|
#1 |
|
www.Camaro5store.com

|
TAG's 2010 THRSS #2
As featured on homepage.
This is my Journal....a story of how the second built THRSS (Tom Henry Racing Super Sport Camaro) came to be. I'm going to try to update this thread with all the important and interesting points that came to be during this process. But, for me....a 31 year old Camaro enthusiast who'd loved Camaros since "Better off Dead" so many years ago, this is a dream...a complete and utter dream...and I'm going to do my best to document this unbelievable roller coaster ride right here for all to see. This is my story....and I hope you all enjoy.  ~Tag Mods to date: EXTERIOR: 1. Custom paint - SIM hood and hockeys outlined in Wave Blue Metallic - Tom Henry Racing 2. Rear panel painted SIM - Tom Henry Racing 3. Bowties custom painted (front SIM & rear CGM w/ WBM blue line) - Lupe @ Overhaulinengines 4. Wheels - Factory Reproductions ZL1 style #41 20x10's Doug at Factory Reproductions 5. MPD1 spoiler (CGM) - Eric @ MPD1 6. Heritage grill (CGM) - Maureen and Becky @ Rodgers Chevrolet 7. ZL1 front bumper w/ halo and harness 8. Tail light bezels painted CGM 9. ZL1 side skirts 10. ZL1 fender flares INTERIOR: 1. Leather arm rest - Indpower 2. Center console 4 gauge pack - Indpower 2. Custom Dash Plaque - Emblempros 3. Full Dash ABL and extended door ABL - ME!  4. 15/30 Tint - Custom Sounds SATX 5. Footwell Lighting - Done by AAC INTAKE/EXHAUST/DRIVELINE: 1. Stainless Works Long Tube Headers w/ 2" primaries, high flow cats, full 3" straight out the back - Bill @ Stainless Works 2. Roto-Fab CAI and Roto-Fab Radiator cover (personally signed by GM team and all Oshawa employees who built my car) Thanks, Robert! 3. ADM Race Scoop w/ APEX windshield bottle relocation kit - ApexChase 4. Hurst Short Throw Shifter - Subzero05 5. SLP SSE -Dave @ SLP Performance 6. Stainless Steel Brake Lines - MTI Racing LIGHTING: 1. Showstoppers front amber / rear red LED's (turn signals) custom painted 2. Showstoppers front chrome "hide away" blinker bulbs 3. Halo harness and HID fogs 4. AAC full LED light kid inside and rear plate, footwell lighting 5. Custom under hood engine cover w/ dual LED cutouts - Thanks, Robert! Pedders Suspension 1. Pedders Pedders Supercar Coilovers 2. Pedders FE5 rear FE4 Sway Bars 3. Pedders rear cradle bush inserts 4. Pedders front radius bush inserts 5. Pedders Dual Bearing Camber Plates AUDIO: Thanks to Chris & Brandon @ Custom Sounds Walzem/35 SATX 1. JL 600/6 AMP 2. JL 600/1 AMP 3. JL 10" W7 with ported box 4. Focal 6.5 V30 Components (front) 5. Hertz 6x9 (rear) 6. Hertz 3.5 (center channel) 7. LC6i Digital Processor + bass knob |

|

|
|
05-24-2009, 12:41 PM
|
#2 | |
|
www.Camaro5store.com
|
October 20th....
A week after orders have begun to be placed, I decide today............today..............IS the day. And so it began....... Quote:
Yes. Since this day, some changes were made to the order. |
|
|
|
|
|
05-24-2009, 12:41 PM
|
#3 | |
|
www.Camaro5store.com
|
.....Time goes by.......
....................Orders are being taken...... .........other cars are being built............ We learn that one of the items on constraint is the Cyber Gray Metallic paint color. until one day...................... I'm woken up....by a couple text messages..... Quote:
I STILL can't believe this one........ ....how nuts is this..... 
|
|
|
|
|
|
05-24-2009, 12:41 PM
|
#4 | |
|
www.Camaro5store.com
|
Then......
.......a little birdy came along.............. ..and sung a song into my ear............................. Hylton..........TOPLS1..........THANK YOU. ......and there might be another thank you in there too..... but......I don't know who that would go too....But....suddenly.....the first ever pictures of a cyber gray metallic SS hit the pages of Camaro5. Quote:
Another one of those....."you gotta be kiddin' me...." feelings. 
|
|
|
|
|
|
05-24-2009, 12:41 PM
|
#5 | |
|
www.Camaro5store.com
|
Even more time goes by..................
.........................until May 4th, 2009....................... ....when I'm woken up with text messages, emails, ....................... ............and they read...."HERE!!!" and "MORE"....and "MORE 2".......and "MORE 3".......and all these pictures are attached to the emails I'm reading on my phone............. TIME TO GET UP!!! I turn on the computer and open my email....there they are...... ........and there is CGM#1 being taken off the transport truck.......... Oh yeah....it's a beautiful day!!! Quote:
|
|
|
|
|
|
05-24-2009, 12:41 PM
|
#6 | |
|
www.Camaro5store.com
|
This same day, I'm asked, "Do you want me to put your Camaro in the Stainless Works trailer to have the exhaust fitted?"
......After a quick discussion, it's a YES!!!............... And so it goes......on May 4th to Ohio........ .....................and is there for 2 1/2 weeks.... ......and then..... .......................the day before it goes back to Toms........... ......I'm told of some "videos of a cyber gray metallic Camaro SS on youtube"................. .....and I'm told they were from Stainless Works................. .......................OH BOY......................... I've never gotten so HOT so quickly!!!!! But there they were.....of my car...... UPDATED: http://www.camaro5.com/forums/showthread.php?t=32310 Quote:
|
|
|
|
|
|
05-25-2009, 12:25 AM
|
#7 |
|
www.Camaro5store.com
|
May 26th.....some pictures show up in my email..............
.................it has begun.............. The left side shows top of cowl......the right side is inclusive of the cowl side. The bottom picture shows the "fixed" hockey....there was another taped off differently which made the front look too wide. |
|
|
|
|
05-25-2009, 12:25 AM
|
#8 |
|
www.Camaro5store.com
|
Wednesday, May 27th....
I call Randolph Brooks Federal Credit Union and get approved my 20k loan at 3.8%. .......Good day.
|
|
|
|
|
05-25-2009, 12:25 AM
|
#9 |
|
www.Camaro5store.com
|
One of our own went waaaay out of his way to do some good for a few very lucky enthusiasts who ordered a new Camaro.
I was one of the lucky recipients of a lithograph signed by all the Oshawa line workers who built my 2SS/RS. June 2nd...1647 hours, I pick it up from Sigoloff Frame and Art off Broadway...San Antonio, TX. Click this link for more info... |
|
|
|
|
05-25-2009, 12:25 AM
|
#10 |
|
www.Camaro5store.com
|
Taken from later post...06-05-09
Okie Dokie.... So....here we go w/ the paint. Remember, this is NOT finished as we are still planning on changing out the wheels and adding a few more cosmetic items. This is a work IN PROGRESS. Next step... Figure out what color the bowtie should be. I'm thinking blue to match the pin stripes. We were discussing SS emblems in front and back. But, I'm not sure if we can get those done to actually fit the front grill. We'll see.... For now, I think Tom is going to tape off the front bow tie with blue tape so we can get a feel. Now...the car is CGM. I wanted the contrast of bright on the dark. So, on came the Silver Ice Metallic. I've always loved the blue (similar to the Henessey type car) but didn't want blue hockey's. I wanted silver. In fact, this paint job is the opposite of my wife's SUV...funny. Her's is silver w/ dark gray... ...love it.So, we used Silver Ice Metallic on the hockey's and on the center stripe. I don't know if you can really see it yet, but there are two clear coats with blue pearl added to it. That way, we get the blue flake in the paint just like the CGM. The blue (GM 08 - Wave Blue Effect Metallic) was used for the pin stripes. This will also help to bring out the blue flake in the CGM and SIM. The pins are 1/8th in width. Anyway...enough of the talking. Check them out and enjoy! Oh..and ya'll think blue on the bow tie? Or, chrome....or blue SS's or chrome SS's...sheooot...I can't make up my mind. IDEAS ARE WELCOME. Oh...and picture #1 of the white Z28 (in disguise) was the inspiration behind this all...this is what I saw a year ago and what's been in my mind FOREVER....      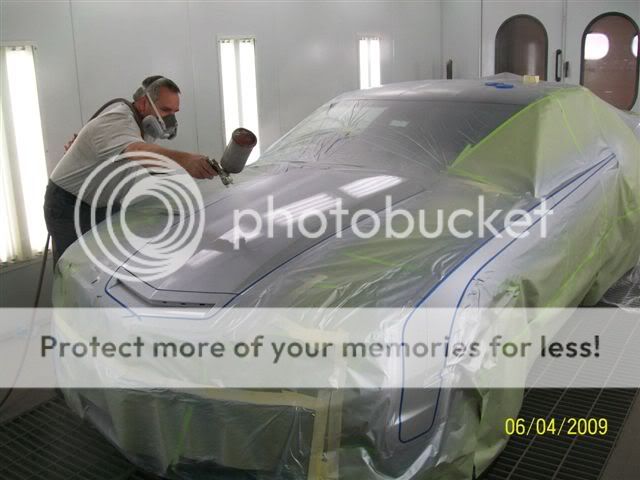   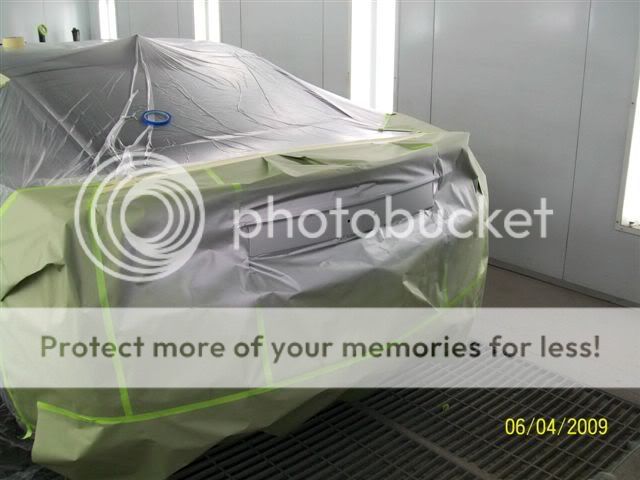    
|
|
|
|
|
05-25-2009, 12:25 AM
|
#11 |
|
www.Camaro5store.com
|
And the pictures began to roll in....
Updated 06-18-09 next up? .........we need some paint on the sides of the cowl............ ..............let's get it workin'!!!!!!!! .............. ...maybe a little "THR" in CGM and "SS" in that same wave blue metallic....... Oh...and we need some wheels..... |
|
|
|
|
05-25-2009, 12:26 AM
|
#12 |
|
www.Camaro5store.com
|
July 1st, 2009...
Registration, taxes, and license fees were paid on my car today. Total damage?....$2,255.68 at the tax office. Ugh....I hate taxes. July 2nd, 2009... Custom Sounds installs my Formula 1 window tint. 15% on the rear (I've had the limo for years and I'd finally like to be able to see out the back on this one...) and 30% on the sides. Yes...I actually decided to go legal. Custom Sounds also takes a look at my trunk space. THIS is going to be a good one. We are going to have a ported subwoofer box built and installed for the trunk. They are going to wire the entire system and claim they can make this single speaker thump better than my previous 10 and 12 JL's TOGETHER. So, we'll see what they have to offer. I WILL be updating this thread/post for pictures of the install. I can't wait to see their work. This should be interesting. 07-10-2009 Here's the install with pix I promised. It's a custom box and it really is a good job. I was surprised at the quality of the box and the install. I gotta hand it to Custom Sounds. They really did a stellar job at the install. The quality of the video is okay. The sound ok. The popping has to be the camera. July 13th, 2009 As silly as this may sound, all you guys n' gals out there running around with stuff in your trunk will quickly figure out that the carpet just doesn't like to stay in place! All that stuff slides from side to side any time you turn left or right. When that stuff slides, it slides the entire carpet. I opened my trunk to find my bags all the way on the left side of my trunk and all my carpet bunched up. Solution? Velcro. Talk about easy. Just run out to your local home depot, wal mart, target, etc. and pick up a couple small boxes of velcro. Lift up the carpet and line the bottom edges with the velcro cutting the strips to fit and then stick them the ones on the bottom in place. Take off the top sticky liner and simply drop the carpet in place securing it by pressing down firmly. Pretty simple. Cost?...$15.00 for one large box to cover the entire trunk. Time?...5 min. I have not had a problem with sliding carpet since...and it just pulls right out if I need to remove the carpet. I know it may sound silly like I already said. But, I don't like my stuff sliding back and forth in the trunk. |
|
|
|
|
05-25-2009, 12:26 AM
|
#13 | ||
|
www.Camaro5store.com
|
07-14-09
Quote:
08-13-09 Quote:
|
||
|
|
|
|
05-26-2009, 02:10 AM
|
#14 |
|
www.Camaro5store.com
|
12-05-09
I got my Hurst Short Throw Shifter delivered a couple days ago (Thanks, Chris!!!) and FINALLY had an opportunity to get in the garage to get it installed.  Like all my installations, I like to help out others with DIY threads so that everyone can see for themselves how the installation works. Like all my installations, I like to help out others with DIY threads so that everyone can see for themselves how the installation works.This following thread should be used as a tool (along with the directions for the install provided by Hurst) to help you get your new shifter installed with ease. First, let me tell you that this install is EASY. If you have any mechanical experience, this is super easy. For someone who's never done anything like this before, follow the directions and you'll be fine. Anyone can do this....and it's actually fun to do it yourself. No need to pay the local guy $100 for install when you can get it done in 45 minutes. Onward to the pix and video!!!! First things first, open that box up and make sure all your parts are there. Included in the box are:
Tools needed for the install:
Once you have all the parts down, make sure you have a clean, flat surface to work on...or a lift which is preferable. I did this in my own garage using a floor jack and two jack stands. But...I would have preferred to use a lift (if you can get one). To start: Use a trim tool to lift up the silver surround (trim/gauge cluster) that goes around the shifter. If you use a flat head (which I don't recommend), USE CAUTION. Scratching the piece is SO easy to do. I decided to slide my fingers under the very bottom right side of the center console and completely pull off the right side cover. I reached under finding two tabs that held the center silver piece in place and pushed them up.  The silver surround popped right up and I removed it laying it over the right side on the floor (never even needing a trim tool or screwdriver). 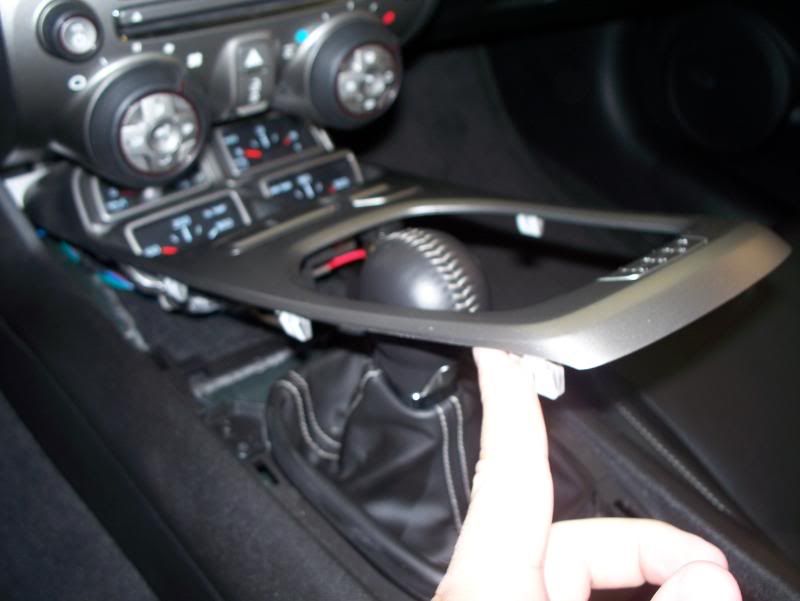 No need to disconnect any wires as this part will not get in the way. 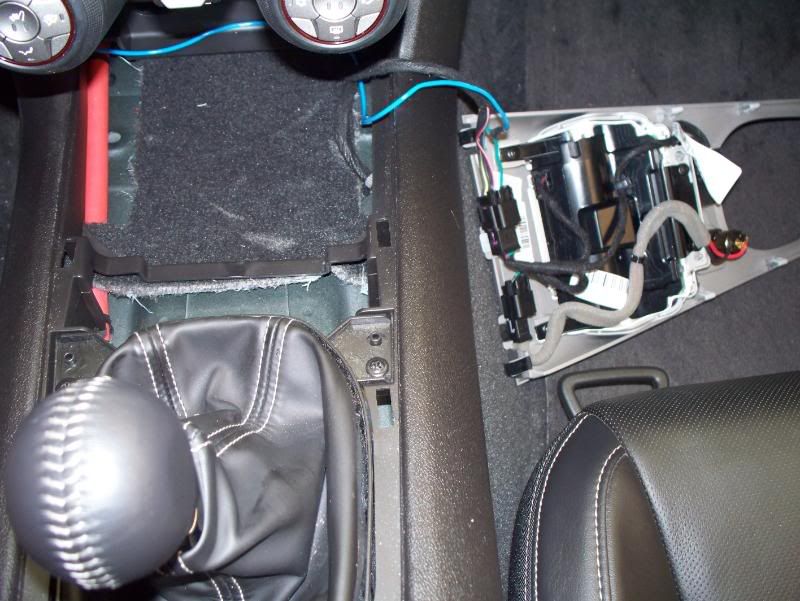 Next part is to unscrew the 4 screws that hold the shift boot ring in place. Put them in the cup holder for later. Two on either side... 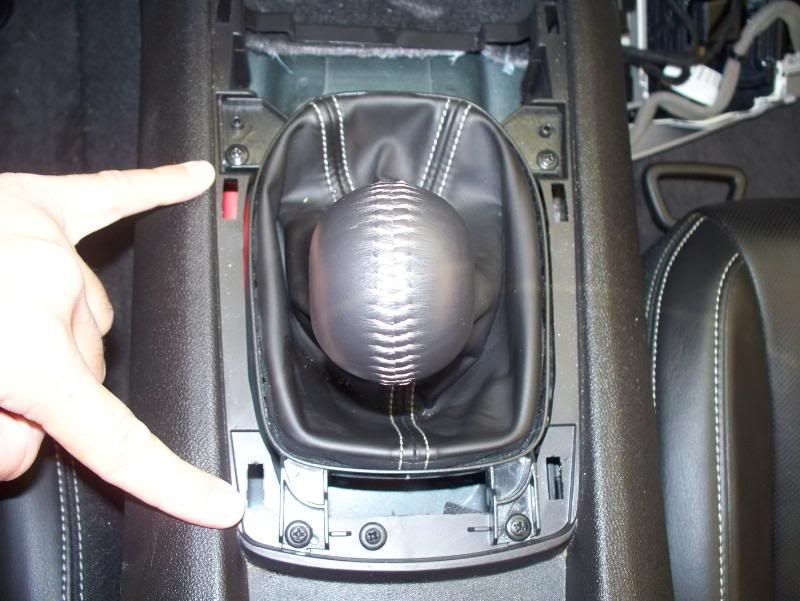 Next, pull up sharply on the stock shifter. You might need to twist it ever so gently and rock it a bit to get it to come up. It DOES take some force. Don't worry...you won't break it. It'll just pop right up. NOTE: MAKE SURE YOU UNSCREW THE 4 SCREWS FIRST....if not, and you pull up on the shifter, that shifter is going to continue going upward with all that force you put into it and the leather boot will come up straight off that boot ring. You'll have to use a flat head to align and pinch the leather back into the holding tabs. Ask me how I know this...  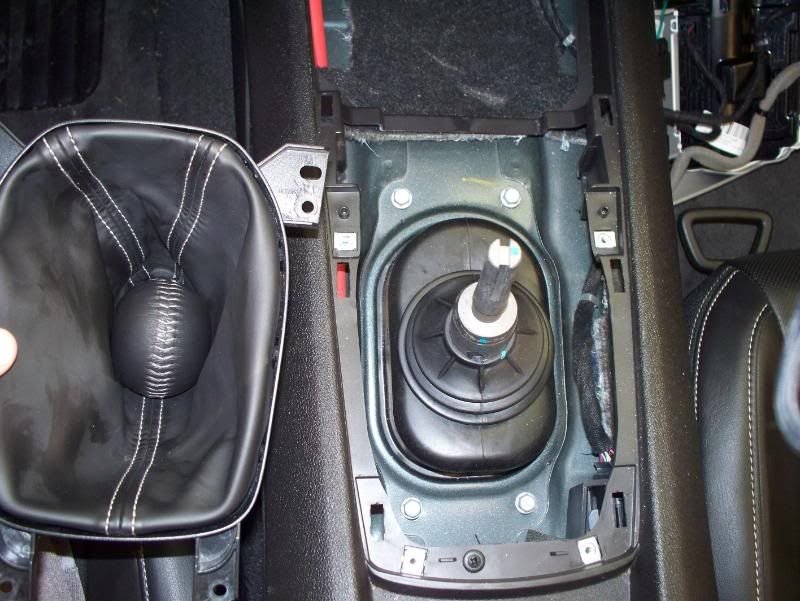 Next, put the car on a lift or use the floor jack to lift it up...put it on jack stands so it doesn't fall on ya! Safety first! 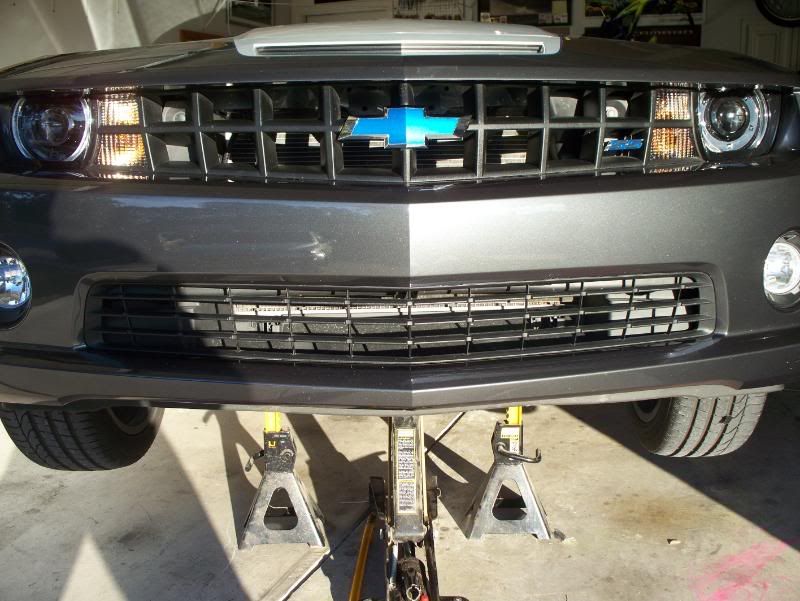  The next step is easy....(as they pretty much all are)... Use the small extension, ratchet, and your 15mm socket to loosen the 4 bolts that hold the rear transmission cross member bolts. Be careful not to loosen them up too much. It'll drop about 1/2 to 1 inch giving you better access to the shifter. I unscrewed them one at a time and allowed the first one to completely come out. I screwed it back in a few full revolutions and repeated for all 4 bolts. I'm pointing to the two bolts on either side shown here.  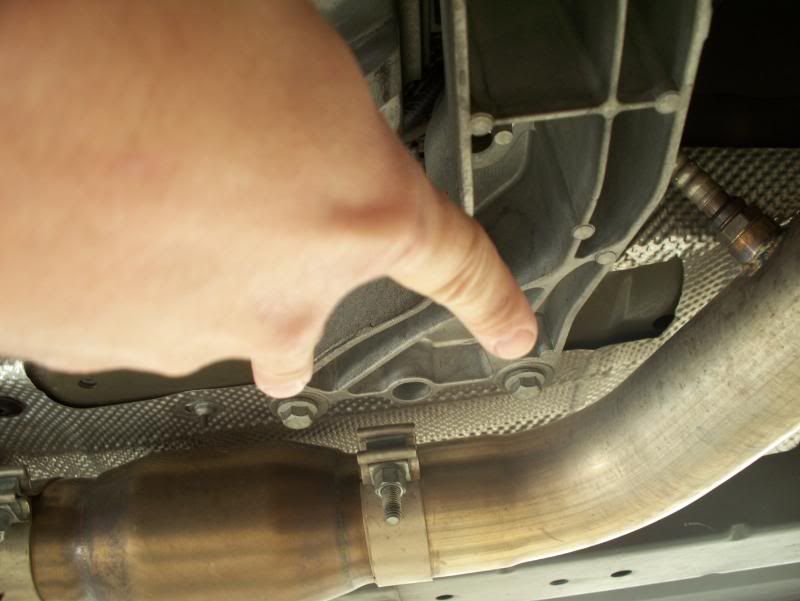 Next part is to pull the dust boot forward (putting it back is an utter PAIN).  Under that dust boot, you'll see the shifter. There are two connection pin clips on both sides of the lower shifter. 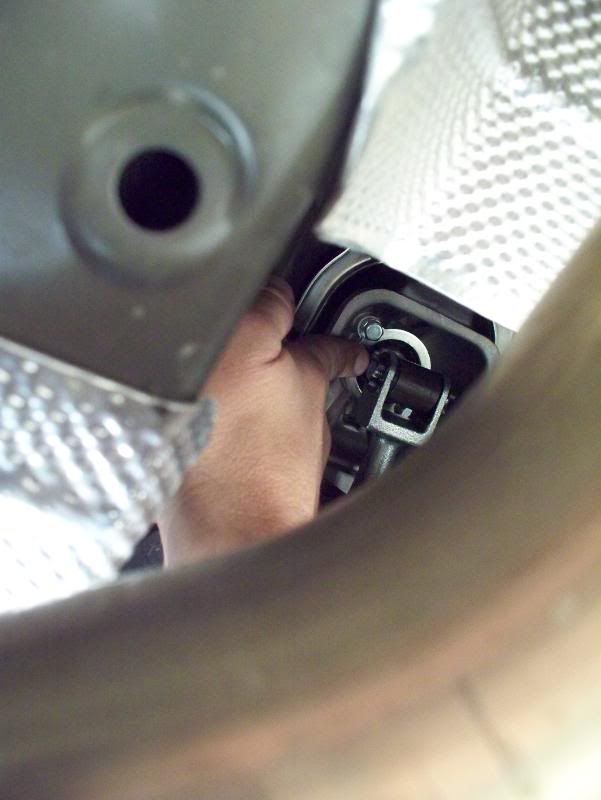 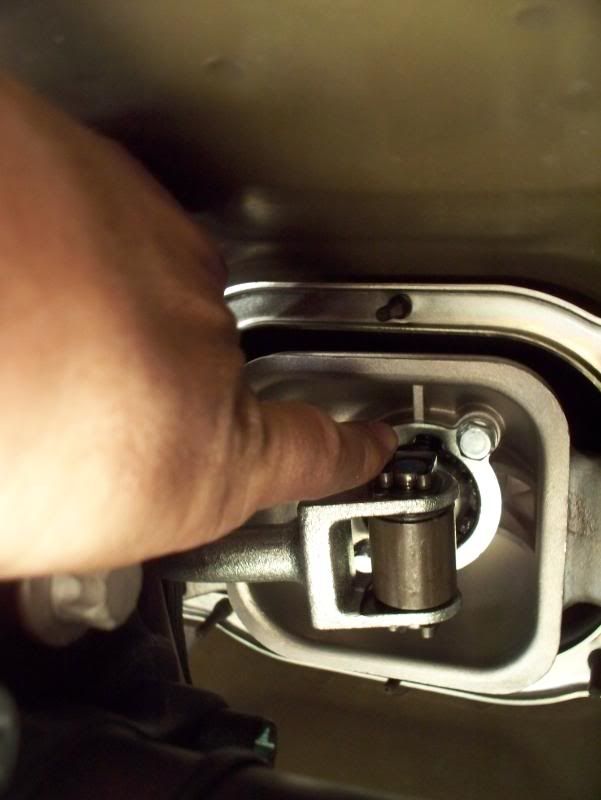 Included directions show a flat head being used to push them off the pin. I was able to remove them by hand. Once you have the pin clips removed, slide out the cross pin either way and disconnect the change rod from the shifter allowing it to hand out of the way. I actually pushed mine backwards to the rear of the car (probably putting it in gear). But, it got it out of the way a bit. Then, use that long ratchet extension, a 10mm socket, and your ratchet to remove the two mounting screws and mounting plate. You won't need those anymore. Pull down firmly on the shifter and it'll pop right out. It's a bit of a pain getting it around the change rod, but if you angle it to the drivers side when pulling it out, it'll come out. 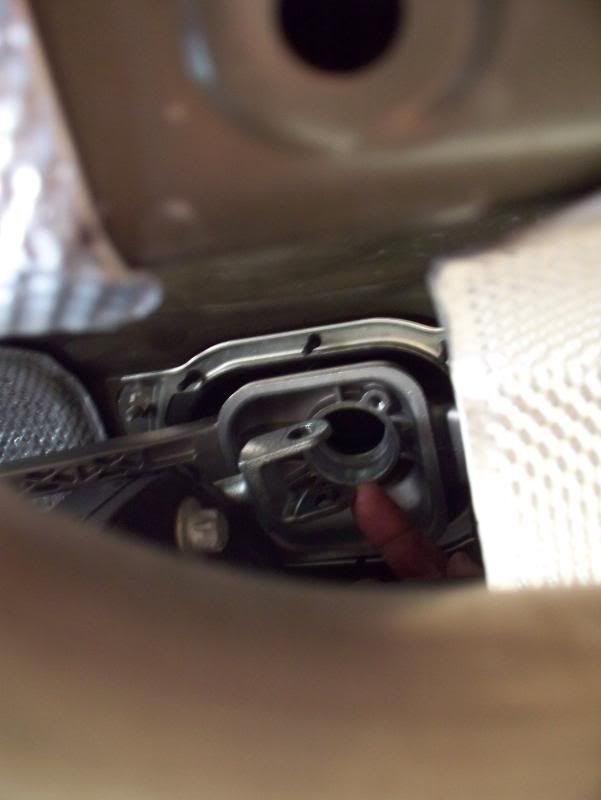 Next step is to use the supplied grease and grease up those O rings on the new shifter and pop it up in place. Remember, the longer stepped side of the lower bushings go towards the driver and the ridges of the upper stick connection to the passenger. Pop it up in place (it'll stay by itself) and line up the mounting screw holes. 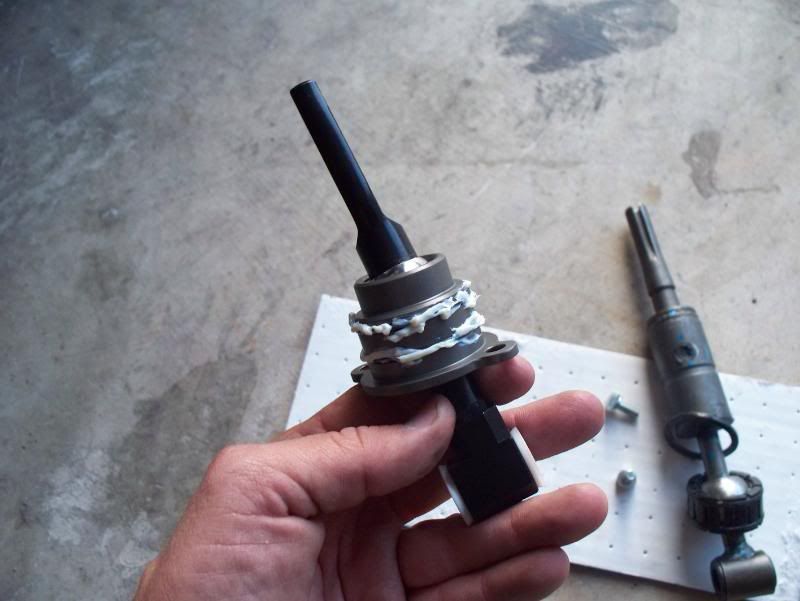 Here comes the tough part... Use the provided Locktight (adhesive) placing a drop onto either counter sunk mounting screw. Reach up there with your allen wrench and tighten them down. There is NOT a lot of room at all to work in there. It's a pain... Just stick with it and you'll get them screwed in. Then attach the connecting rod to the lower shifter bushings sliding the cross pin in place. Secure the cross pin back in place with the locking clips you took off earlier. Next up? Put that dust boot back in place. This was a pain since there is no room to work under there. Just get one side in place and pull the tabs (one at a time) to stretch the boot around and it'll pop back in place in it's grooves. Now, double check the boot and make sure it's all good. Tighten those 4 transmission cross member bolts back up with your 15 mm socket wrench and your in business. Drop the car back down. Using one of the supplied boot supports, slide it down over the shifter stub stick. Then work the rubber boot into the groove of the boot support. Push it down far enough so that it clears the two screw holes.  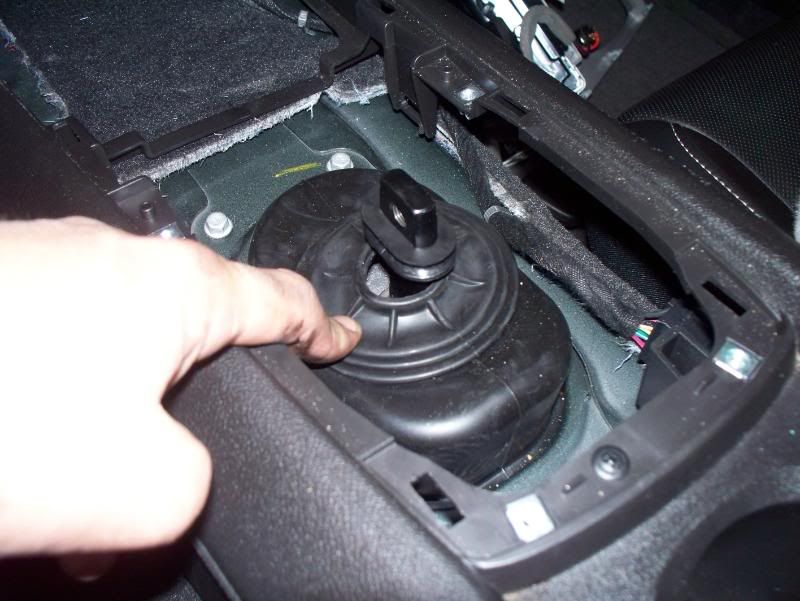 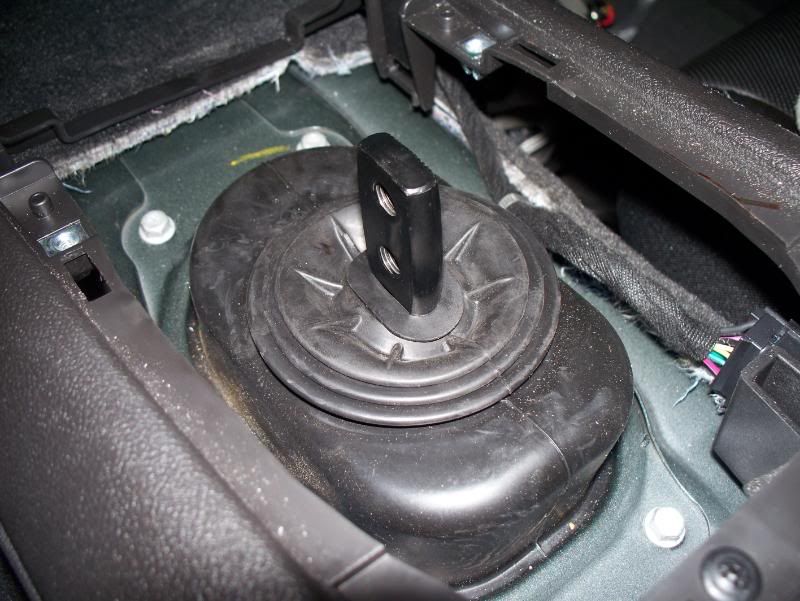 Either use the chrome Hurst handle or stock OEM stick for stock handle shifter. I used the chrome handle for now. Slide the other boot support on the Hurst handle passed the mounting holes. Remove the stock shifter handle by cutting the zip tie. Replace with the Hurst shifter and line up the leather boot around the boot support using the new zip tie to secure the leather to the boot support. Easy to do...just reverse the process in taking apart the original. 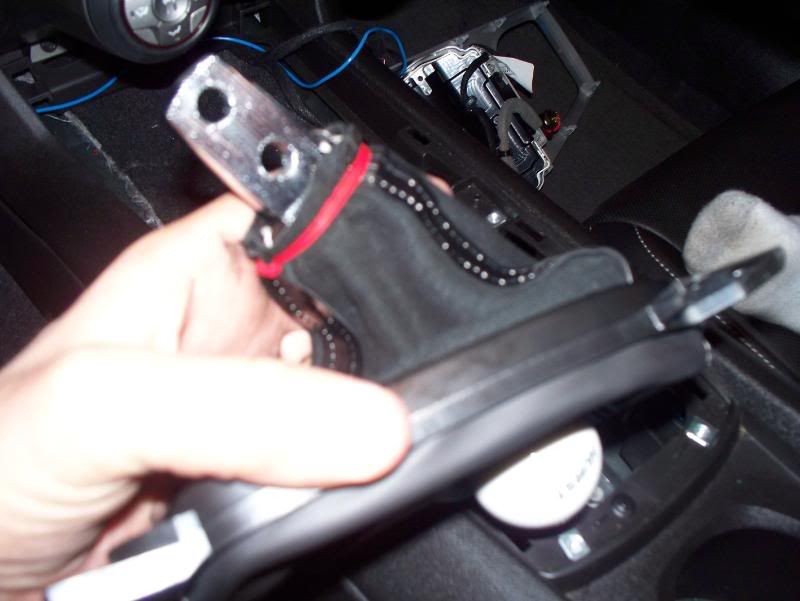 Here's another angle since that first one was blurry.  Line up the groves on the chrome handle to the lower Hurst shift stick and screw in the mounting screws with washers one at a time. I hand tightened mine while holding the shifter in place so that the shifter handle grooves were sure to line up. I then tightened them down properly with my allen wrench.  Then, just put the boot ring back into place screwing it back down w/ the 4 screws left in your cup holder.   Screw the nut onto the top of the Hurst shifter and screw on the white "Q ball." You have to use a wrench after getting the Q ball screwed on to align properly...tighten the screw to keep it in place. Then, just toss the silver console/gauge cluster back in place and you are ready to rock. Make sure you can shift through all the gears. It might be tough at first, but start the car and keep the clutch in. It moved really tight and was hard to get into revers for mine...until I started the car. Then, it moved into reverse with ease. 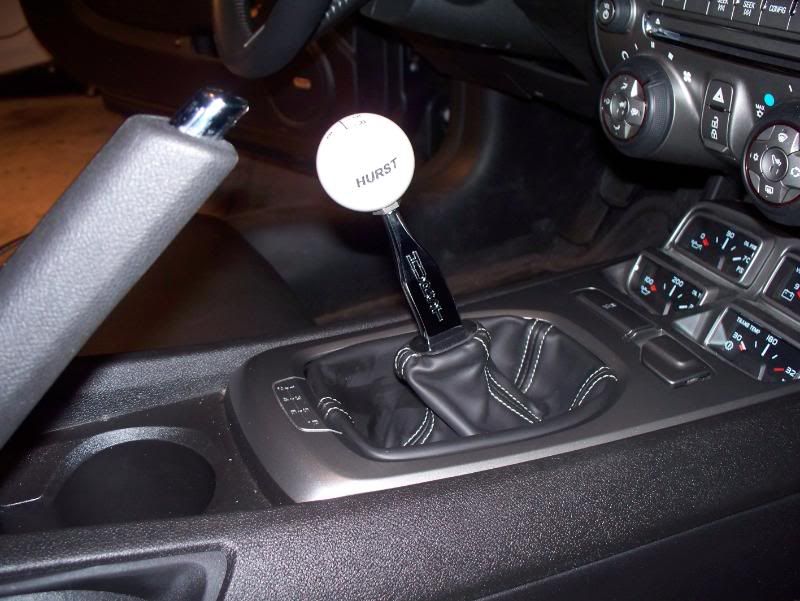 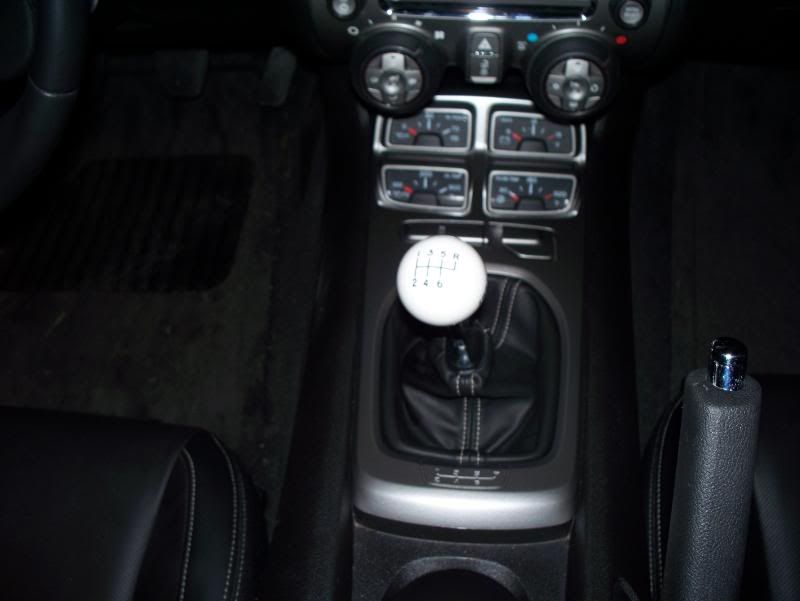 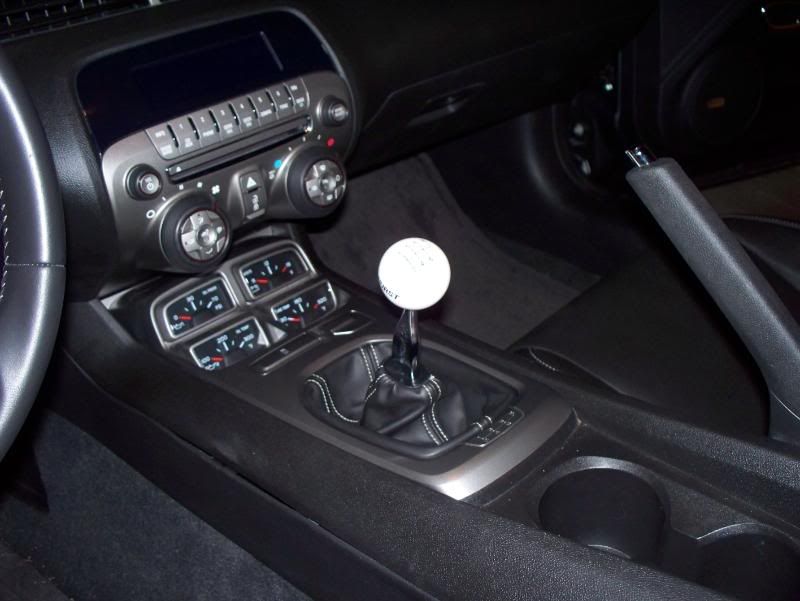 Summary on the install? EASY. There is LITTLE room to work up there around the driveshaft...and that is the ONLY drawback. Other than that, it's a breeze. Very simple install process. And my final opinion on the shifter?  TOTALLY different from the stock OEM shifter. MAJOR difference. If you know anyone with a short throw shifter and have not yet run through the gears, dude...you HAVE to try it. It is UNBELIEVABLE. The two MAIN differences between stock and Hurst are the firmness of the shifts through the gates (waaaay too smooth with stock - I swear, it always felt like I was going to break that stock shifter handle when shifting quickly) and the throw distance. It is immediately apparent that you don't have to move the shifter as far. When rowing through the gears, you FEEL the Hurst shifter go into each gear almost with a "click." It is FIRM. You can FEEL it. If you want smooth, easy, and mushy, stick with stock. If you want to feel your shifts, this is the shifter for you. You KNOW when you shift into gear.  Yeah...so far, I LOVE it. I have not yet "gotten on it." But, when I have the chance, I will...and I'll let ya'll know how it goes. I believe it honest reviews of the parts I put in my car. If I don't like it, I'll say it. Not the case here. I LOVE the shifter so far.  Great job, Hurst!!! Now...for those back ordered black Hurst knobs..... 
|
|
|
|
|
|
|
|
 |
|
|
 Similar Threads
|
||||
| Thread | Thread Starter | Forum | Replies | Last Post |
| An interesting Camaro (and GM) story! I just bought my 2010 Camaro! | Camarodriver | Camaro Price | Ordering | Tracking | Dealers Discussions | 12 | 11-28-2010 03:52 PM |
| Over 230 Satisfied 2010 Camaro Customers! Paddock Chevrolet has 40 in stock NOW | camarojoe | Dealer Camaros for Sale | 2 | 05-24-2010 05:58 PM |
| NFL smack and talk....Poll added, place your bet for the superbowl! | The Dark Knight | The Sports Lounge | 1832 | 02-12-2010 10:31 PM |
| 2010 GT500 Update (Not an AFD gag). | garagelogic | General Automotive + Other Cars Discussion | 9 | 04-02-2009 12:21 PM |


